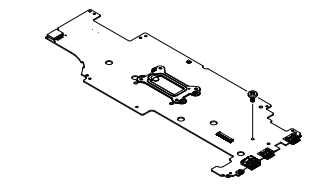
Where's the protect-write screw located on the Thinkpad 13 Chromebook?
Hey, I'm trying to flash Linux onto my chromebook, and cannot find the protect-write screw. Any help appreciated.
Bu iyi bir soru mu?
Hey, I'm trying to flash Linux onto my chromebook, and cannot find the protect-write screw. Any help appreciated.
Bu iyi bir soru mu?
Hey, this was found in the Thinkpad 13 Chromebook repair manual pg. 22 (https://download.lenovo.com/ibmdl/pub/pc...)
To remove the write-protect screw, do the following:
1. Disable the battery. See “Disabling the battery” on page 48.
2. Disconnect the Lenovo USB-C 45W AC Adapter and all cables from the computer, and then remove the keyboard. See “1010 Keyboard” on page 48.
3. Remove the base cover assembly. See “1020 Base cover assembly” on page 54.
4. Remove the wireless LAN card. See “1030 Wireless LAN card” on page 56.
5. Remove the battery. See “1040 Battery” on page 56.
6. Remove the USB support bracket. See “1080 USB support bracket ” on page 59.
7. Remove the thermal fan. See “1090 Thermal fan assembly” on page 60.
8. Remove the system board. See “1110 System board” on page 62.
9. Turn over the system board and then locate the write-protect screw on the system board as shown in the following illustration. To turn off the write-protect function, remove the write-protect screw.

10. After you have removed the write-protect screw, reassemble the computer. Reconnect the Lenovo USB-C 45W AC Adapter and all cables.
11. To turn on the write-protect function, follow the previous steps to locate the hole for the write-protect screw and reinstall the screw. Then reassemble your computer and reconnect the cables.
Bu yanıt yardımcı oldu mu?
Son 24 Saat: 4
Son 7 gün: 19
Son 30 gün: 61
Her zaman: 591