Giriş
Удалите заднюю панель для доступа к компонентам внутри вашего iPhone 4.
Neye ihtiyacın var
Videoya Genel Bakış
-
-
Задняя панель вашего iPhone может быть прикручена #000 Phillips(крестовыми) винтами или Apple 5-ти конечными "Pentalob" винтами(второе изображение). Проверьте какие винты использованы у вас и убедитесь что у вас есть необходимая отвёртка для их удаления.
-
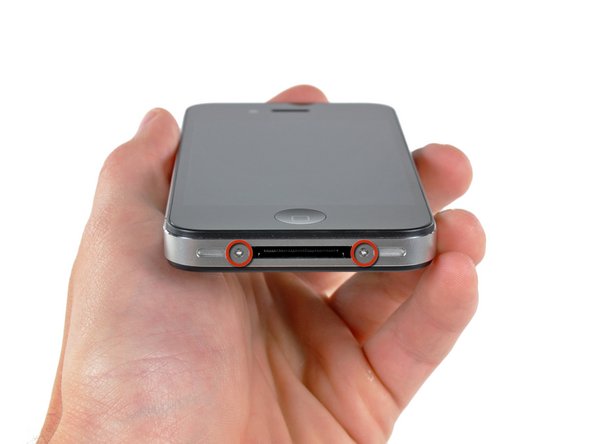
Удалите два 3.6 мм Pentalob или Phillips #000 винты около разъёма.
-
5-ти конечная отвёртка используется только один раз.
-
-
Следуйте этим инструкциям в обратном порядке, чтобы собрать устройство.
Следуйте этим инструкциям в обратном порядке, чтобы собрать устройство.
İptal et: Bu kılavuzu tamamlamadım.
807 farklı kişi bu kılavuzu tamamladı.
Bu çevirmenlere özel teşekkürler:
100%
Bu çevirmenler dünyayı onarmamıza yardım ediyor! Katkıda bulunmak ister misiniz?
Çeviriye Başlayın ›
Ekli Belgeler
9 Yorum
The replacement part for the iPhone 4 rear panel has two thin, clear overlays on the inside surface--a larger one that runs the full length, and a small one that only covers the lens. These should be removed prior to installation. Also, the first rear panel replacement I got from iFixit was not an exact fit and would not easily "click" into place. They replaced it for free and the second one clicked right in.
On step 3 when replacing the back panel with a new one, they aren't kidding about removing ALL the protective slips. There's THREE of them.
1), the obvious back slip that protects the new back.
2). the one inside the back protecting the side with the camera lens
3). the little square one OVER the lens itself.
First time I tried to reinstall my back, that tiny little square over the lens prohibited my ability to actually get the back on completely. My husband jammed it for me, but the screws still wouldn't take. It's amazing that these things are so precise that the tiny little film on the lens would make it that much tighter.
Anyways, hope that helps somebody. :)
Easiest repair I've ever done. Thanks y'all!


