Ana içeriğe geç

1980 -1990 Honda XR80R Carburetor Disassembly

Neye ihtiyacın var

  1. 1980 -1990 Honda XR80R Carburetor Disassembly, 1980 -1990 Honda XR80R Carburetor Disassembly: adım 1, 3 resimden 1. 1980 -1990 Honda XR80R Carburetor Disassembly, 1980 -1990 Honda XR80R Carburetor Disassembly: adım 1, 3 resimden 2. 1980 -1990 Honda XR80R Carburetor Disassembly, 1980 -1990 Honda XR80R Carburetor Disassembly: adım 1, 3 resimden 3.
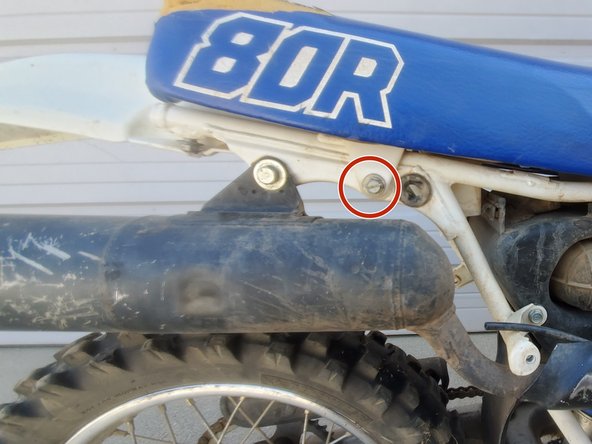
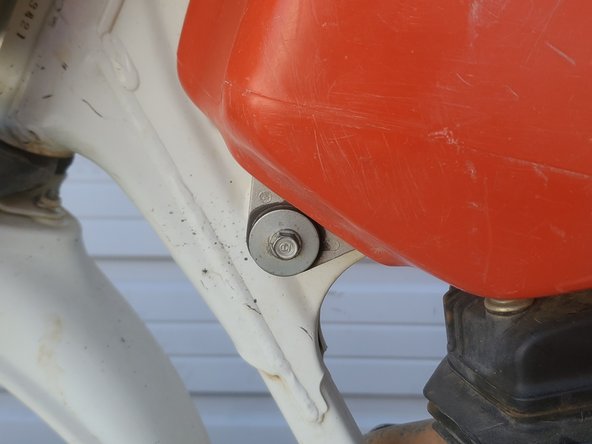
    • The Carburetor is located to the rear of the engine block, right under the gas tank.

  2. 1980 -1990 Honda XR80R Carburetor Disassembly: adım 2, 2 resimden 1. 1980 -1990 Honda XR80R Carburetor Disassembly: adım 2, 2 resimden 2.
    • Before beginning the disassembly process, first turn your fuel off by turning the dial located on the left side of the motorcycle, to the off position.

    • Disconnect the fuel line from the gas tank located on the the fuel dial.

    • Disconnecting fuel line may require prying with a flat head screwdriver.

  3. 1980 -1990 Honda XR80R Carburetor Disassembly: adım 3, 3 resimden 1. 1980 -1990 Honda XR80R Carburetor Disassembly: adım 3, 3 resimden 2. 1980 -1990 Honda XR80R Carburetor Disassembly: adım 3, 3 resimden 3.
    • Remove the rear plastic panels, one on either side, by unscrewing the two 8 mm screws located at the bottom of each panel, by using the 8 mm socket wrench.

    • Anytime screws are removed, they should be placed in container so they are not lost.

    • After the screws are removed, the panels can be easily pulled off with hands.

  4. 1980 -1990 Honda XR80R Carburetor Disassembly: adım 4, 3 resimden 1. 1980 -1990 Honda XR80R Carburetor Disassembly: adım 4, 3 resimden 2. 1980 -1990 Honda XR80R Carburetor Disassembly: adım 4, 3 resimden 3.
    • Remove the seat by unscrewing the two 8 mm screws located 2/3 to the rear of the seat, on either side.

    • One screws are removed, the seat can be easily lifted off the motorcycle.

  5. 1980 -1990 Honda XR80R Carburetor Disassembly: adım 5, 2 resimden 1. 1980 -1990 Honda XR80R Carburetor Disassembly: adım 5, 2 resimden 2.
    • Unhook the elastic strap located on the backside of the gas tank.

  6. 1980 -1990 Honda XR80R Carburetor Disassembly: adım 6, 3 resimden 1. 1980 -1990 Honda XR80R Carburetor Disassembly: adım 6, 3 resimden 2. 1980 -1990 Honda XR80R Carburetor Disassembly: adım 6, 3 resimden 3.
    • Remove the gas tank by unscrewing the two 8 mm screws located on both sides, by using the socket wrench.

    • Once screws are removed, the gas tank can be easily taken off the motorcycle.

    • Be careful to keep the gas tank upright in order to prevent the gas spillage.

  7. 1980 -1990 Honda XR80R Carburetor Disassembly: adım 7, 3 resimden 1. 1980 -1990 Honda XR80R Carburetor Disassembly: adım 7, 3 resimden 2. 1980 -1990 Honda XR80R Carburetor Disassembly: adım 7, 3 resimden 3.
    • Loosen screw, located to the left of the carburetor, using Philip head screw driver.

    • The Air intake now can be pulled off from the Carburetor.

  8. 1980 -1990 Honda XR80R Carburetor Disassembly: adım 8, 3 resimden 1. 1980 -1990 Honda XR80R Carburetor Disassembly: adım 8, 3 resimden 2. 1980 -1990 Honda XR80R Carburetor Disassembly: adım 8, 3 resimden 3.
    • Remove the two 8 mm nuts that hold the carburetor to the engine block.

    • The carburetor can now be freely removed from the engine block.

    • Make sure to plug the Carburetor-Engine Block pipe with a clean rag so no damaging dirt can get into the engine.

  9. 1980 -1990 Honda XR80R Carburetor Disassembly: adım 9, 3 resimden 1. 1980 -1990 Honda XR80R Carburetor Disassembly: adım 9, 3 resimden 2. 1980 -1990 Honda XR80R Carburetor Disassembly: adım 9, 3 resimden 3.
    • Unscrew the the top of the carburetor and pull out the wire that is connected to the fuel needle. Set the top aside.

    • If the motorcycle was recently ran, there might be fuel still trapped in the carburetor, so be careful of spillage.

  10. 1980 -1990 Honda XR80R Carburetor Disassembly: adım 10, 2 resimden 1. 1980 -1990 Honda XR80R Carburetor Disassembly: adım 10, 2 resimden 2.
    • Using the Phillips head screwdriver, remove the two 10 mm screws located on the underside of the carburetor.

    • Once the screws are removed, the two carburetor halves can then be taken apart.

  11. 1980 -1990 Honda XR80R Carburetor Disassembly: adım 11, 2 resimden 1. 1980 -1990 Honda XR80R Carburetor Disassembly: adım 11, 2 resimden 2.
    • On the bottom half of the carburetor, remove the pin that is holding together the fuel bubbler and fuel pin by using needle nose plyers.

  12. 1980 -1990 Honda XR80R Carburetor Disassembly: adım 12, 3 resimden 1. 1980 -1990 Honda XR80R Carburetor Disassembly: adım 12, 3 resimden 2. 1980 -1990 Honda XR80R Carburetor Disassembly: adım 12, 3 resimden 3.
    • In order to remove the Pilot Jets, you will use the Flathead screwdriver to unscrew the two jets from the top.

  13. 1980 -1990 Honda XR80R Carburetor Disassembly: adım 13, 1 resimden 1.
    • Once fully disassembled, use carburetor cleaner and a rag to fully clean the interior and components of the carburetor, or replace any damaged parts.

Sonuç

To reassemble your device, follow these instructions in reverse order.

2 farklı kişi bu kılavuzu tamamladı.

0 Yorum

Yorum Ekle

İstatistikleri Görüntüle:

Son 24 Saat: 2

Son 7 gün: 24

Son 30 gün: 123

Her zaman: 3,681