Giriş
If the battery power of the vacuum cleaner decreases, you can change the battery pack.
To do this, you need a soldering iron, heat-shrink tubing, electrical tape, a cutter, a side cutter, a Phillips screwdriver and a new battery pack.
The battery pack consists of 10 1.2-volt NIMH cells.
I ordered the cells from www.subtel.de.
“Battery 12V, 1300mAh, NiMH for AEG Electrolux AG901, AG902, AG903, AG905 - 4055132304 replacement battery”.
These also have 1300 mAh like the original cells. Of course, you can also use ones with more power, but this will increase the charging time until the vacuum cleaner is full again.
-
-
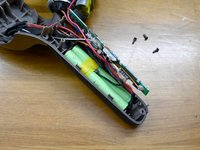
The handle is hooked with 2 plastic lugs on each side. you have to unhook it with a slotted screwdriver or something similar. Then carefully pull off the cover. and clean everything inside first.
-
-
-
-
Unscrew the circuit board, the ones in the handle are simply preconfigured (4 cells). Took the wiring from the old cells and soldered them to the soldering fans of the new cells & insulated them with heat shrink tubing. You must pull the shrink tubing over the cable beforehand!
-
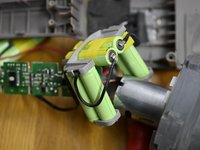
Glue the temperature sensor for thermal monitoring into the cells with insulating tape.
-
-
-
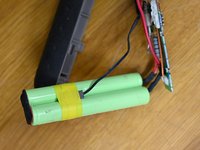
Separate pack of 6 cells into pack of 2 with cutter & separate soldering tab with side cutters. Cover the cut housing insulation with insulating tape. Solder cells, note polarity! Test and then reassemble. Pay attention to the cable routing, it is very tight to the touch. I wish you success!!!
-
I used these cells: https://www.subtel.de/Akku-12V-1300mAh-N...
-


To reassemble your device, follow these instructions in reverse order.
To reassemble your device, follow these instructions in reverse order.
İptal et: Bu kılavuzu tamamlamadım.
Bir başkası bu kılavuzu tamamladı.
Bu çevirmenlere özel teşekkürler:
100%


Bu çevirmenler dünyayı onarmamıza yardım ediyor! Katkıda bulunmak ister misiniz?
Çeviriye Başlayın ›