Ana içeriğe geç

ASUS Transformer Book Flip TP500LA Battery Replacement

Neye ihtiyacın var

  1. ASUS Transformer Book Flip TP500LA Battery Replacement, Back Case: adım 1, 3 resimden 1. ASUS Transformer Book Flip TP500LA Battery Replacement, Back Case: adım 1, 3 resimden 2. ASUS Transformer Book Flip TP500LA Battery Replacement, Back Case: adım 1, 3 resimden 3.
    • Remove the ten 10 mm Phillips #0 screws found on the computer's back case.

  2. ASUS Transformer Book Flip TP500LA Battery Replacement: adım 2, 2 resimden 1. ASUS Transformer Book Flip TP500LA Battery Replacement: adım 2, 2 resimden 2.
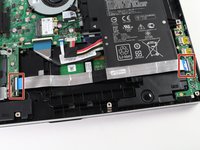
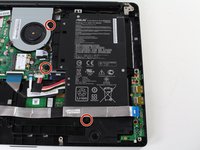
    • Slide a heavy-duty spudger between the back case and the computer.

    • Slowly work around the edges to undo the clips to fully separate the back case from the computer.

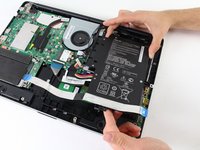
    • Gently lift off the back case.

  3. ASUS Transformer Book Flip TP500LA Battery Replacement, Battery: adım 3, 2 resimden 1. ASUS Transformer Book Flip TP500LA Battery Replacement, Battery: adım 3, 2 resimden 2.
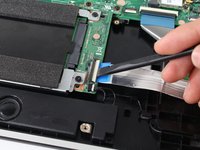
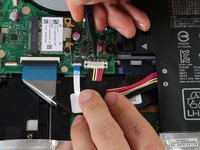
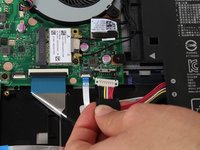
    • Slide a heavy-duty spudger into the ZIF connector and gently flip up the retaining flap to open the connector.

    • Pull the blue tab to remove the ribbon.

  4. ASUS Transformer Book Flip TP500LA Battery Replacement: adım 4, 2 resimden 1. ASUS Transformer Book Flip TP500LA Battery Replacement: adım 4, 2 resimden 2.
    • Remove the three 5 mm Phillips #0 screws.

    • Remove the single 6 mm Phillips #0 screw.

  5. ASUS Transformer Book Flip TP500LA Battery Replacement: adım 5, 2 resimden 1. ASUS Transformer Book Flip TP500LA Battery Replacement: adım 5, 2 resimden 2.
    • Use the heavy-duty spudger to pry the white 8-pin connector away from the motherboard.

    • Gently pull the connector away from the motherboard.

    • The black 8-pin connector on the motherboard is very fragile, so be careful when removing the white 8-pin connector.

  6. ASUS Transformer Book Flip TP500LA Battery Replacement: adım 6, 2 resimden 1. ASUS Transformer Book Flip TP500LA Battery Replacement: adım 6, 2 resimden 2.
    • Use the blue plastic opening tool to loosen and remove the three black wires from the battery.

    • Slide the battery out from the computer to remove.

Sonuç

To reassemble your device, follow these instructions in reverse order.

14 farklı kişi bu kılavuzu tamamladı.

Garrett Fitzpatrick

Üyelik tarihi: 04/10/17

822 İtibar

2 adet Kılavuz yazıldı

Ekip

Cal Poly, Team S13-G5, Forte Spring 2017 Cal Poly, Team S13-G5, Forte Spring 2017 üyesi

CPSU-FORTE-S17S13G5

4 Üyeler

6 adet Kılavuz yazıldı

0 Yorum

Yorum Ekle

İstatistikleri Görüntüle:

Son 24 Saat: 1

Son 7 gün: 4

Son 30 gün: 37

Her zaman: 11,159