Ana içeriğe geç

Acer Aspire 5740-6378 Hard Drive Replacement

Neye ihtiyacın var

  1. Acer Aspire 5740-6378 Hard Drive Replacement, Battery: adım 1, 1 resimden 1.
    • Slide the locking switch into the unlocked position to ready the battery for removal.

  2. Acer Aspire 5740-6378 Hard Drive Replacement: adım 2, 1 resimden 1.
    • Slide the release latch until the battery pops out.

  3. Acer Aspire 5740-6378 Hard Drive Replacement: adım 3, 1 resimden 1.
    • Remove the battery now that it's been unsecured.

  4. Acer Aspire 5740-6378 Hard Drive Replacement, Hard Drive: adım 4, 1 resimden 1.
    • Flip over the device so the back is facing upward.

  5. Acer Aspire 5740-6378 Hard Drive Replacement: adım 5, 2 resimden 1. Acer Aspire 5740-6378 Hard Drive Replacement: adım 5, 2 resimden 2.
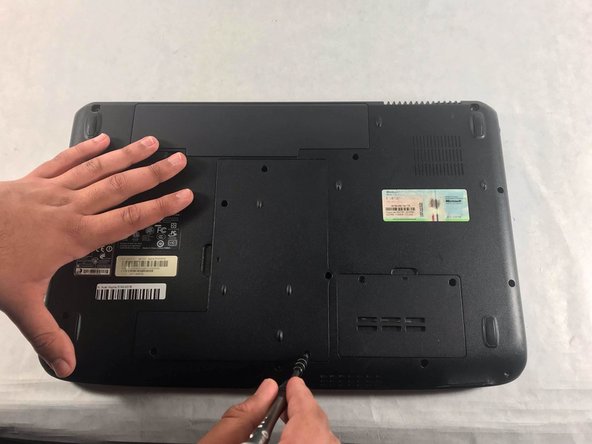
    • Remove the five 8.7mm Phillips #0 screws securing the back panel.

  6. Acer Aspire 5740-6378 Hard Drive Replacement: adım 6, 2 resimden 1. Acer Aspire 5740-6378 Hard Drive Replacement: adım 6, 2 resimden 2.
    • Remove the back panel using a spudger or other similar tool to lever it open to reveal the hard drive and other internal components.

  7. Acer Aspire 5740-6378 Hard Drive Replacement: adım 7, 1 resimden 1.
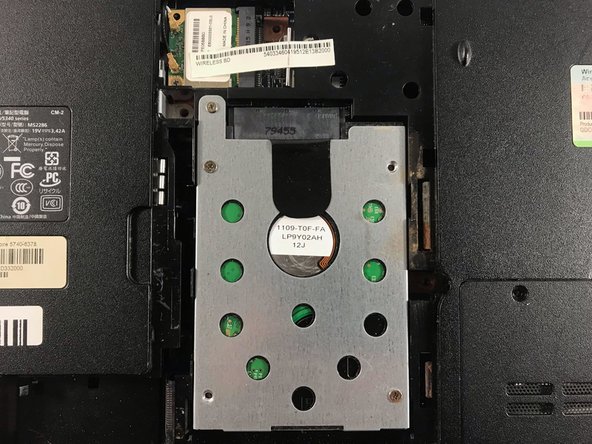
    • Remove the single 3mm Phillips #0 screw that is holding the hard drive in place.

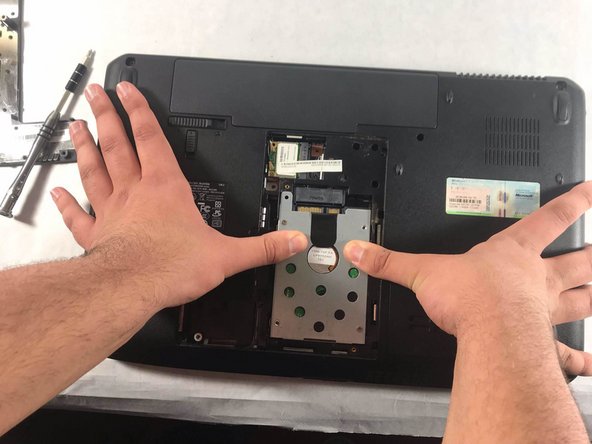
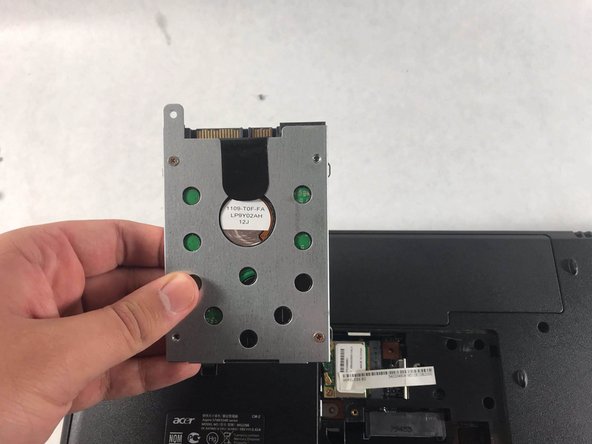
  8. Acer Aspire 5740-6378 Hard Drive Replacement: adım 8, 3 resimden 1. Acer Aspire 5740-6378 Hard Drive Replacement: adım 8, 3 resimden 2. Acer Aspire 5740-6378 Hard Drive Replacement: adım 8, 3 resimden 3.
    • Slide the hard drive away from the connector, then lift it to remove the drive.

Sonuç

To reassemble your device, follow these instructions in reverse order.

Ian Rodriguez

Üyelik tarihi: 03/20/19

734 İtibar

5 adet Kılavuz yazıldı

Ekip

UMass Dartmouth, Team S2-G5, Bailey Spring 2019 UMass Dartmouth, Team S2-G5, Bailey Spring 2019 üyesi

UMASSD-BAILEY-S19S2G5

3 Üyeler

5 adet Kılavuz yazıldı

0 Yorum

Yorum Ekle

İstatistikleri Görüntüle:

Son 24 Saat: 0

Son 7 gün: 1

Son 30 gün: 5

Her zaman: 295