Ana içeriğe geç

Acer Aspire 5742 Motherboard Replacement

Neye ihtiyacın var

  1. Acer Aspire 5742 Motherboard Replacement, Battery: adım 1, 3 resimden 1. Acer Aspire 5742 Motherboard Replacement, Battery: adım 1, 3 resimden 2. Acer Aspire 5742 Motherboard Replacement, Battery: adım 1, 3 resimden 3.
    • Move the battery catch to the "unlocked" position.

    • Pull back the second spring-loaded battery catch until the battery pops up.

    • Remove the battery.

  2. Acer Aspire 5742 Motherboard Replacement, Cover Panel: adım 2, 3 resimden 1. Acer Aspire 5742 Motherboard Replacement, Cover Panel: adım 2, 3 resimden 2. Acer Aspire 5742 Motherboard Replacement, Cover Panel: adım 2, 3 resimden 3.
    • Turn the notebook around to face you.

    • There are two Phillips #00 screws securing the cover panel to the rest of the notebook. Remove these screws.

  3. Acer Aspire 5742 Motherboard Replacement: adım 3, 3 resimden 1. Acer Aspire 5742 Motherboard Replacement: adım 3, 3 resimden 2. Acer Aspire 5742 Motherboard Replacement: adım 3, 3 resimden 3.
    • Use a spudger to release the panel from the plastic retaining clips keeping it in place.

    • Do not apply too much force, or you may break the clips.

    • Remove the panel and set it aside.

  4. Acer Aspire 5742 Motherboard Replacement, RAM: adım 4, 3 resimden 1. Acer Aspire 5742 Motherboard Replacement, RAM: adım 4, 3 resimden 2. Acer Aspire 5742 Motherboard Replacement, RAM: adım 4, 3 resimden 3.
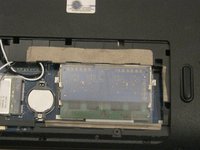
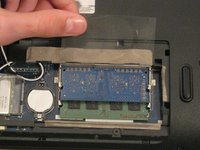
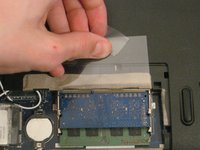
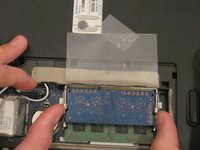
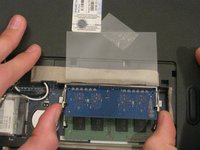
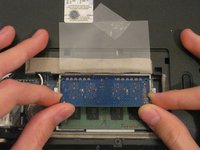
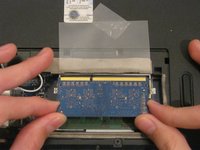
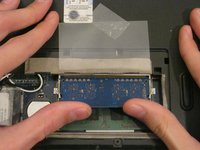
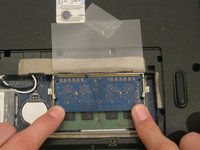
    • The RAM is protected by a transparent cellophane cover.

    • Lift this cover away from the RAM. It will not come free from the RAM.

    • You may wish to use some Scotch tape to hold the cover in place while you work.

  5. Acer Aspire 5742 Motherboard Replacement: adım 5, 2 resimden 1. Acer Aspire 5742 Motherboard Replacement: adım 5, 2 resimden 2.
    • Pull back the retaining clips either side of the RAM.

    • It will spring up, ready to be removed.

  6. Acer Aspire 5742 Motherboard Replacement: adım 6, 3 resimden 1. Acer Aspire 5742 Motherboard Replacement: adım 6, 3 resimden 2. Acer Aspire 5742 Motherboard Replacement: adım 6, 3 resimden 3.
    • Hold on to opposite edges of the RAM chip and gently pull it diagonally upwards to remove it from the computer.

    • Repeat steps 5 and 6 for the second RAM chip if necessary.

  7. Acer Aspire 5742 Motherboard Replacement: adım 7, 2 resimden 1. Acer Aspire 5742 Motherboard Replacement: adım 7, 2 resimden 2.
    • When reinserting RAM, push it diagonally downwards until almost all of the gold connector strip is inside the socket.

    • Push gently down on the RAM until the retaining clips click back over it.

  8. Acer Aspire 5742 Motherboard Replacement, WLAN Card: adım 8, 3 resimden 1. Acer Aspire 5742 Motherboard Replacement, WLAN Card: adım 8, 3 resimden 2. Acer Aspire 5742 Motherboard Replacement, WLAN Card: adım 8, 3 resimden 3.
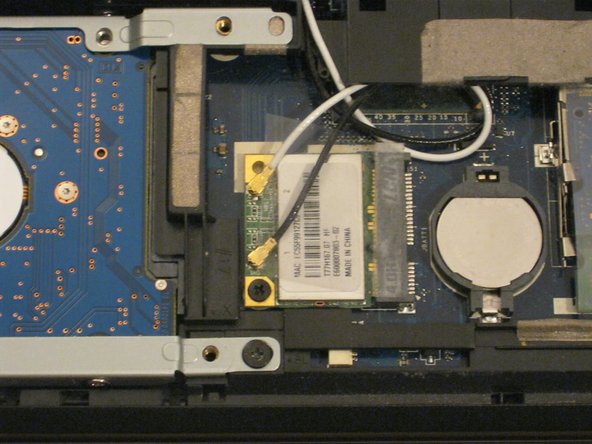
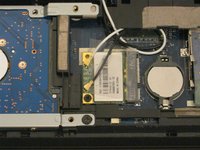
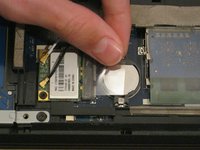
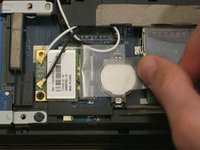
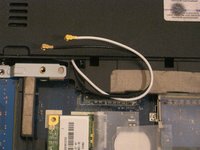
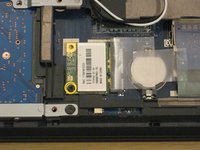
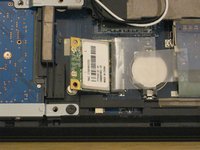
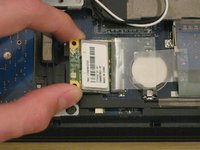
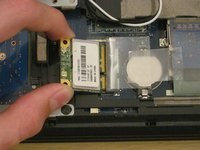
    • The WLAN card is protected by a transparent cellophane cover.

    • Lift this cover away from the WLAN card. It will not come free from the WLAN card socket.

    • You may wish to use some Scotch tape to hold the cover in place while you work.

  9. Acer Aspire 5742 Motherboard Replacement: adım 9, 2 resimden 1. Acer Aspire 5742 Motherboard Replacement: adım 9, 2 resimden 2.
    • Use the pointy end of a spudger to remove the antenna connectors from the WLAN card.

  10. Acer Aspire 5742 Motherboard Replacement: adım 10, 2 resimden 1. Acer Aspire 5742 Motherboard Replacement: adım 10, 2 resimden 2.
    • You may find it useful to pull the antenna cables out from under the plastic retaining clip so you can move them out of the way while you work.

  11. Acer Aspire 5742 Motherboard Replacement: adım 11, 3 resimden 1. Acer Aspire 5742 Motherboard Replacement: adım 11, 3 resimden 2. Acer Aspire 5742 Motherboard Replacement: adım 11, 3 resimden 3.
    • There is one Phillips #00 screw keeping the WLAN card attached to the notebook.

    • Remove this screw.

    • The WLAN card will spring up from the notebook at an angle.

  12. Acer Aspire 5742 Motherboard Replacement: adım 12, 2 resimden 1. Acer Aspire 5742 Motherboard Replacement: adım 12, 2 resimden 2.
    • Just like RAM, hold the WLAN card by the edges and pull it out at an angle.

  13. Acer Aspire 5742 Motherboard Replacement: adım 13, 2 resimden 1. Acer Aspire 5742 Motherboard Replacement: adım 13, 2 resimden 2.
    • When you're installing the new WLAN card, you might want to hold it down with one hand while you put the screw in with the other.

    • You might also want to put the antenna cables back in using the flat end of a spudger.

  14. Acer Aspire 5742 Motherboard Replacement, Hard drive: adım 14, 3 resimden 1. Acer Aspire 5742 Motherboard Replacement, Hard drive: adım 14, 3 resimden 2. Acer Aspire 5742 Motherboard Replacement, Hard drive: adım 14, 3 resimden 3.
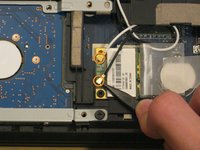
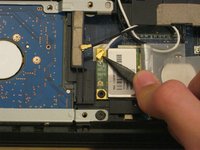
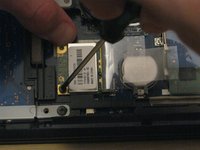
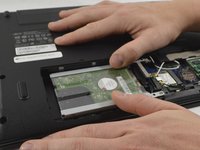
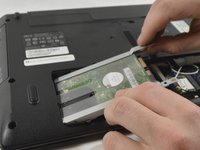
    • Unscrew the Phillips #00 screw which retains the hard drive in place.

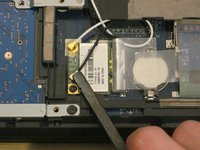
    • Gently slide the hard drive to the left in order to disengage the SATA connectors.

    • It may be quite stiff, in which case you can ease the hard drive out of the SATA connectors by inserting a spudger between the hard drive and the connector block.

    • Lift the drive out of the notebook.

  15. Acer Aspire 5742 Motherboard Replacement, Keyboard: adım 15, 3 resimden 1. Acer Aspire 5742 Motherboard Replacement, Keyboard: adım 15, 3 resimden 2. Acer Aspire 5742 Motherboard Replacement, Keyboard: adım 15, 3 resimden 3.
    • Unfold the laptop so that you are looking at the keyboard.

    • At the top right of the keyboard you will notice two clips above the 'Del' and 'End' keys.

    • Using your spudger, press these clips in to unlock the keyboard from the laptop

    • Be careful not to press too forcefully on these clips with the spudger as they may break

    • Slide the spudger along the top of the keyboard until the keyboard is able to easily be lifted up out of the laptop

    • Do NOT attempt to fully remove the keyboard as there is still a cable on its backside connected to the computer that can be damaged

  16. Acer Aspire 5742 Motherboard Replacement: adım 16, 3 resimden 1. Acer Aspire 5742 Motherboard Replacement: adım 16, 3 resimden 2. Acer Aspire 5742 Motherboard Replacement: adım 16, 3 resimden 3.
    • Now that the keyboard is outside of the laptop, you will see a ribbon cable coming from the back of the keyboard connected to the laptop.

    • To detach this cable you must use the pointed edge of the spudger to press down on the locking mechanisms on each side.

    • Do not use too much pressure when disconnecting the ZIF connector.

    • After unlocking both sides of the ZIF connector remove the keyboard for replacement.

  17. Acer Aspire 5742 Motherboard Replacement, Motherboard: adım 17, 2 resimden 1. Acer Aspire 5742 Motherboard Replacement, Motherboard: adım 17, 2 resimden 2.
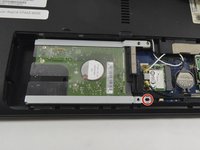
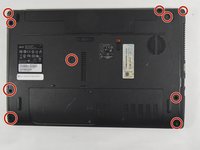
    • Remove the 10 Phillips #0 screws on the bottom cover.

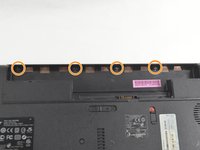
    • Remove the 4 Phillips #00 screws from under the battery.

  18. Acer Aspire 5742 Motherboard Replacement: adım 18, 1 resimden 1.
    • Remove the 8 Phillips #0 screws from under the keyboard.

  19. Acer Aspire 5742 Motherboard Replacement: adım 19, 2 resimden 1. Acer Aspire 5742 Motherboard Replacement: adım 19, 2 resimden 2.
    • Release the two ribbon cables from the ZIF connectors in the same fashion as in Step 11 with the black spudger.

    • Once the mechanism is released you may remove the cable by hand.

    • The plastic cover can now be easily lifted and removed from the rest of the laptop.

  20. Acer Aspire 5742 Motherboard Replacement: adım 20, 1 resimden 1.
    • Remove the two remaining ribbon cables as described in Step 11.

  21. Acer Aspire 5742 Motherboard Replacement: adım 21, 2 resimden 1. Acer Aspire 5742 Motherboard Replacement: adım 21, 2 resimden 2.
    • Remove the display cable with the spudger by pushing each end of the cable out of the connector until it is loose enough to be pulled out by hand.

    • In a similar fashion as with the display cable use the spudger to remove the two power cables from the motherboard.

  22. Acer Aspire 5742 Motherboard Replacement: adım 22, 3 resimden 1. Acer Aspire 5742 Motherboard Replacement: adım 22, 3 resimden 2. Acer Aspire 5742 Motherboard Replacement: adım 22, 3 resimden 3.
    • Remove the 3 Phillips #0 screws from the fan bracket.

    • Lift the fan up and place it back down above the heatsink.

    • Do not fully remove the motherboard. As there is hidden cable on the underside that could be damaged.

    • The heatsink has a strip of adhesive on the underside securing it to the plastic body.

    • The motherboard can be lifted from the side and and then to the right to free the I/O port from the enclosure. Some force may be required to release the heatsink.

  23. Acer Aspire 5742 Motherboard Replacement: adım 23, 2 resimden 1. Acer Aspire 5742 Motherboard Replacement: adım 23, 2 resimden 2.
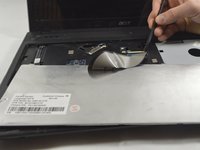
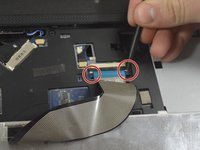
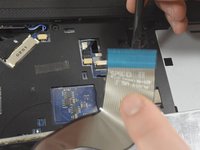
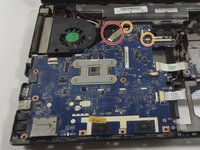
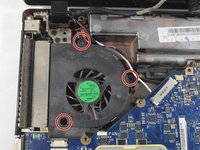
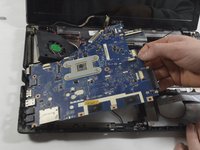
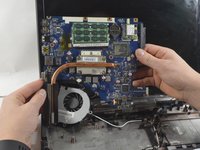
    • Rotate the motherboard to the right and lay it down so that the copper heatsink is facing up and parallel with the bottom of the monitor.

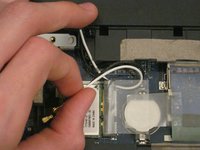
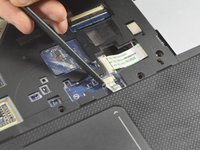
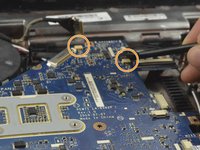
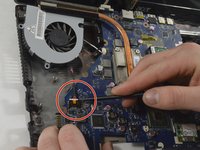
    • In this position the last cable to the motherboard can be disconnected using the spudger to push each end out until loose enough to pull the cable completely out.

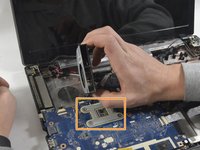
    • The motherboard can now be completely removed from the laptop enclosure.

Sonuç

To reassemble your device, follow these instructions in reverse order.

2 farklı kişi bu kılavuzu tamamladı.

Claudia Torres

Üyelik tarihi: 10/21/16

838 İtibar

3 adet Kılavuz yazıldı

Ekip

UMass Dartmouth, Team 2-6, Isaacson Fall 2016 UMass Dartmouth, Team 2-6, Isaacson Fall 2016 üyesi

UMASSD-ISAACSON-F16S2G6

3 Üyeler

8 adet Kılavuz yazıldı

0 Yorum

Yorum Ekle

İstatistikleri Görüntüle:

Son 24 Saat: 0

Son 7 gün: 10

Son 30 gün: 35

Her zaman: 5,569