Ana içeriğe geç

Acer Aspire ES1-332 LCD Screen Replacement

Neye ihtiyacın var

Videoya Genel Bakış

  1. Acer Aspire ES1-332 LCD Screen Replacement, LCD Screen: adım 1, 3 resimden 1. Acer Aspire ES1-332 LCD Screen Replacement, LCD Screen: adım 1, 3 resimden 2. Acer Aspire ES1-332 LCD Screen Replacement, LCD Screen: adım 1, 3 resimden 3.
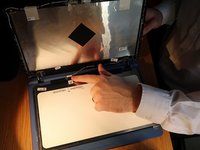
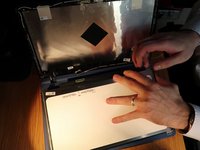
    • Grab a spudger and work your way around the outer edge of the screen

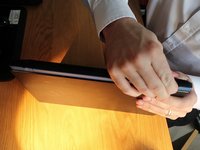
    • Lean the screen all the way back to remove the plastic frame from the hinges at the bottom

  2. Acer Aspire ES1-332 LCD Screen Replacement: adım 2, 2 resimden 1. Acer Aspire ES1-332 LCD Screen Replacement: adım 2, 2 resimden 2.
    • Unscrew the 4 screws around the edge of the screen

    • Lean the screen all the way forward on to the keyboard

  3. Acer Aspire ES1-332 LCD Screen Replacement: adım 3, 2 resimden 1. Acer Aspire ES1-332 LCD Screen Replacement: adım 3, 2 resimden 2.
    • Peal up the sticky tape next to the screen connector

    • Pull the connector down carefully away from the screen and disconnect it

  4. Acer Aspire ES1-332 LCD Screen Replacement: adım 4, 3 resimden 1. Acer Aspire ES1-332 LCD Screen Replacement: adım 4, 3 resimden 2. Acer Aspire ES1-332 LCD Screen Replacement: adım 4, 3 resimden 3.
    • connect the new screen and screw back in place

    • Turn on the screen to test before putting the screen frame back on

    • Tilt the screen all the way back and push the frame back on hinges 1st.

    • Finally lean the laptop on its edge and clip the back on the hinges back in place.

Bitiş Çizgisi

Bir başkası bu kılavuzu tamamladı.

Nick Myers

Üyelik tarihi: 04/15/18

3.410 İtibar

22 adet Kılavuz yazıldı

0 Yorum

Yorum Ekle

İstatistikleri Görüntüle:

Son 24 Saat: 0

Son 7 gün: 2

Son 30 gün: 4

Her zaman: 676