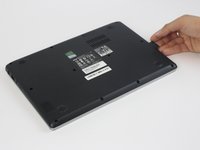
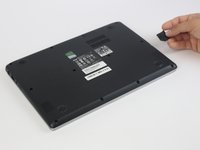
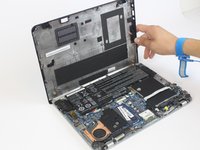
Ana içeriğe geç

Acer Aspire V5-122P-0468 Display Replacement

Neye ihtiyacın var

  1. Acer Aspire V5-122P-0468 Display Replacement, Battery: adım 1, 2 resimden 1. Acer Aspire V5-122P-0468 Display Replacement, Battery: adım 1, 2 resimden 2.
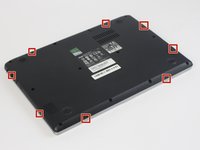
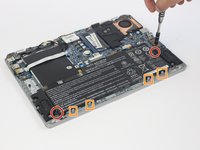
    • Remove the nine 4mm screws with a PH0 screwdriver.

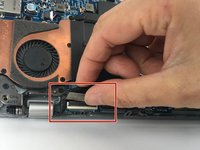
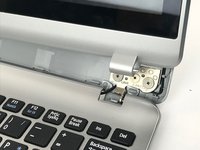
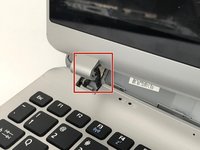
    • Remove the two 6mm screws with a PH0 screwdriver.

  2. Acer Aspire V5-122P-0468 Display Replacement: adım 2, 2 resimden 1. Acer Aspire V5-122P-0468 Display Replacement: adım 2, 2 resimden 2.
    • Remove the black rubber tab on the back of the computer

    • Remove the 4mm screw hidden underneath the black tab with a PH0 screwdriver.

  3. Acer Aspire V5-122P-0468 Display Replacement: adım 3, 2 resimden 1. Acer Aspire V5-122P-0468 Display Replacement: adım 3, 2 resimden 2.
    • Orient the computer upside down, with the hinges facing away from you.

    • Find the black plastic piece in the SD card slot on the right side of the computer.

    • Remove the plastic piece by sliding it out of the SD card slot.

  4. Acer Aspire V5-122P-0468 Display Replacement: adım 4, 3 resimden 1. Acer Aspire V5-122P-0468 Display Replacement: adım 4, 3 resimden 2. Acer Aspire V5-122P-0468 Display Replacement: adım 4, 3 resimden 3.
    • Insert a spudger at these eight locations to disengage the plastic tabs from the housing cover, and pry apart.

    • Continue around the entire perimeter of the cover with the spudger.

    • Use a spudger to pry the cover around I/O ports.

  5. Acer Aspire V5-122P-0468 Display Replacement: adım 5, 3 resimden 1. Acer Aspire V5-122P-0468 Display Replacement: adım 5, 3 resimden 2. Acer Aspire V5-122P-0468 Display Replacement: adım 5, 3 resimden 3.
    • Remove the two 4mm screws using a PH0 screwdriver.

    • Depress the tabs holding the battery with a spudger.

    • Disconnect the battery connector from the motherboard using a spudger.

    • Pull the battery up and away from the laptop to remove.

  6. Acer Aspire V5-122P-0468 Display Replacement, Display: adım 6, 2 resimden 1. Acer Aspire V5-122P-0468 Display Replacement, Display: adım 6, 2 resimden 2.
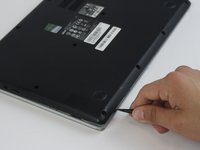
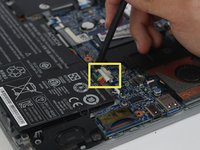
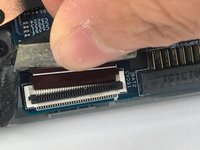
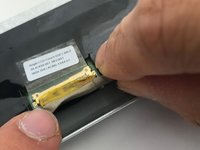
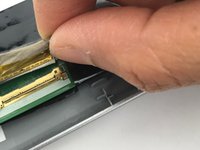
    • Flip up the black locking tab on the ZIF connector, and pull out the ribbon cable.

  7. Acer Aspire V5-122P-0468 Display Replacement: adım 7, 2 resimden 1. Acer Aspire V5-122P-0468 Display Replacement: adım 7, 2 resimden 2.
    • Wedge a spudger in between the plastic bezel frame and back cover to create a gap.

    • Then insert a plastic opening tool to pry apart the bezel from the back cover.

    • Work your way around the perimeter of the cover with the plastic opening tool.

  8. Acer Aspire V5-122P-0468 Display Replacement: adım 8, 2 resimden 1. Acer Aspire V5-122P-0468 Display Replacement: adım 8, 2 resimden 2.
    • Open up the laptop to unsnap the hinges from the back of the computer.

    • Slide the pin connector and cable through the hinge that connects the display to the rest of the laptop.

  9. Acer Aspire V5-122P-0468 Display Replacement: adım 9, 2 resimden 1. Acer Aspire V5-122P-0468 Display Replacement: adım 9, 2 resimden 2.
    • Remove the transparent tape covering the pin connector.

    • Unplug the pin connector from the display.

  10. Acer Aspire V5-122P-0468 Display Replacement: adım 10, 1 resimden 1.
    • Cut the tape between the display and the plastic frame using the flat end of a spudger.

    • Work the spudger around the perimeter of the display to separate it from the bezel.

    • The display is attached with a strong adhesive. Applying heat with a hairdryer or heat gun may make the removal process easier.

Sonuç

To reassemble your device, follow these instructions in reverse order.

2 farklı kişi bu kılavuzu tamamladı.

Nat McCormick

Üyelik tarihi: 02/15/18

801 İtibar

5 adet Kılavuz yazıldı

Ekip

USF Tampa, Team S16-G1, Boczar Spring 2018 USF Tampa, Team S16-G1, Boczar Spring 2018 üyesi

USFT-BOCZAR-S18S16G1

5 Üyeler

10 adet Kılavuz yazıldı

0 Yorum

Yorum Ekle

İstatistikleri Görüntüle:

Son 24 Saat: 0

Son 7 gün: 0

Son 30 gün: 2

Her zaman: 1,017