Ana içeriğe geç

Acer Aspire V5-591G-75KE Motherboard Replacement

Neye ihtiyacın var

  1. Acer Aspire V5-591G-75KE Motherboard Replacement, Acer Aspire V5-591G-75KE Disassembly: adım 1, 3 resimden 1. Acer Aspire V5-591G-75KE Motherboard Replacement, Acer Aspire V5-591G-75KE Disassembly: adım 1, 3 resimden 2. Acer Aspire V5-591G-75KE Motherboard Replacement, Acer Aspire V5-591G-75KE Disassembly: adım 1, 3 resimden 3.
    • Close down the display and flip the device upside down.

    • Use a Phillips #1 screwdriver to remove 18 black 10mm Phillips Head screws in order to loosen up the protective bottom casing.

  2. Acer Aspire V5-591G-75KE Motherboard Replacement: adım 2, 2 resimden 1. Acer Aspire V5-591G-75KE Motherboard Replacement: adım 2, 2 resimden 2.
    • With the screws removed, flip the device right-side up and open up the display.

    • Run a plastic spudger tool along the seam of the face-plate in order to loosen up the protective bottom casing.

    • Popping sounds are normal, but forceful prying can damage delicate components. Be especially careful near the USB and HDMI ports.

  3. Acer Aspire V5-591G-75KE Motherboard Replacement: adım 3, 2 resimden 1. Acer Aspire V5-591G-75KE Motherboard Replacement: adım 3, 2 resimden 2.
    • Close the display down once more, and flip the laptop upside down, with the hinge facing away from you.

    • Do not yank the bottom casing off. There is a small speaker wire that connects it to the motherboard.

    • Taking note of the small speaker wire, gently lift only the left side of the bottom casing.

  4. Acer Aspire V5-591G-75KE Motherboard Replacement: adım 4, 3 resimden 1. Acer Aspire V5-591G-75KE Motherboard Replacement: adım 4, 3 resimden 2. Acer Aspire V5-591G-75KE Motherboard Replacement: adım 4, 3 resimden 3.
    • Using a pair of blunt tweezers, push on the tabs of the small white connector to separate it from the motherboard.

    • The entire bottom casing should lift with no resistance. If there is too much resistance, verify you removed all the screws, and run the plastic spudger tool around the face-plate again.

  5. Acer Aspire V5-591G-75KE Motherboard Replacement, Hard Drive: adım 5, 3 resimden 1. Acer Aspire V5-591G-75KE Motherboard Replacement, Hard Drive: adım 5, 3 resimden 2. Acer Aspire V5-591G-75KE Motherboard Replacement, Hard Drive: adım 5, 3 resimden 3.
    • Using the plastic tabs, lift the hard drive slightly and pull to the left.

    • Remove the rubber mounting brackets from the hard drive.

    • If you are replacing your hard drive with a new one, please note you will need to reuse the rubber mounting brackets in order to secure it in place.

  6. Acer Aspire V5-591G-75KE Motherboard Replacement, Memory Modules: adım 6, 3 resimden 1. Acer Aspire V5-591G-75KE Motherboard Replacement, Memory Modules: adım 6, 3 resimden 2. Acer Aspire V5-591G-75KE Motherboard Replacement, Memory Modules: adım 6, 3 resimden 3.
    • Locate the memory modules at the bottom right quadrant of the motherboard. The two memory modules are slightly stacked on top of each other.

    • Using both hands, pull the clasps away simultaneously in order to release the memory modules.

    • Once the clasps have been released, each memory module will spring up.

  7. Acer Aspire V5-591G-75KE Motherboard Replacement: adım 7, 2 resimden 1. Acer Aspire V5-591G-75KE Motherboard Replacement: adım 7, 2 resimden 2.
    • To remove the top memory module, lift the module slightly up and pull away.

    • Repeat the previous step to remove the bottom memory module.

    • Take note of the pins on the bottom of each memory module and make sure they line up with the slots when re-installing the memory modules. Once aligned and inserted, simply push the memory module down to lock it in place.

  8. Acer Aspire V5-591G-75KE Motherboard Replacement, Wireless Card: adım 8, 1 resimden 1.
    • Locate the wireless card on the top left quadrant. It should have two antenna cables connected to it, one white and one black.

  9. Acer Aspire V5-591G-75KE Motherboard Replacement: adım 9, 1 resimden 1.
    • With a pair of blunt tweezers, firmly grasp each antenna head and detach it by lifting straight up.

    • The antenna cables are connected through small sockets. Small popping sounds when attaching and detaching the antennas are normal.

    • Note that the white cable connects on the top socket.

  10. Acer Aspire V5-591G-75KE Motherboard Replacement: adım 10, 2 resimden 1. Acer Aspire V5-591G-75KE Motherboard Replacement: adım 10, 2 resimden 2.
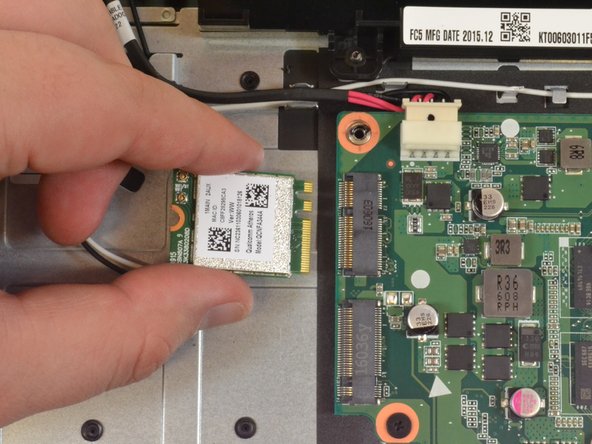
    • Using a Phillip Head size 1 screwdriver, remove the screw attaching the wireless card to the laptop frame.

    • To detach the wireless card, lift up slightly and pull away.

  11. Acer Aspire V5-591G-75KE Motherboard Replacement, Fan and Heatsink: adım 11, 2 resimden 1. Acer Aspire V5-591G-75KE Motherboard Replacement, Fan and Heatsink: adım 11, 2 resimden 2.
    • Use a Phillips Head size #1 screwdriver to remove the two silver-colored 10mm Phillips Head screws securing the fan to the motherboard.

    • There are two screw holes, but you might only find one screw.

  12. Acer Aspire V5-591G-75KE Motherboard Replacement: adım 12, 2 resimden 1. Acer Aspire V5-591G-75KE Motherboard Replacement: adım 12, 2 resimden 2.
    • Use a pair of blunt tweezers to gently push on the 3-pin connector. This disconnects the fan from the motherboard.

    • You can lift up the fan if you need additional space to remove the connector.

  13. Acer Aspire V5-591G-75KE Motherboard Replacement: adım 13, 3 resimden 1. Acer Aspire V5-591G-75KE Motherboard Replacement: adım 13, 3 resimden 2. Acer Aspire V5-591G-75KE Motherboard Replacement: adım 13, 3 resimden 3.
    • Use a Phillips #1 screwdriver to remove 6 black 10mm Phillips Head screws that connect the copper heat-sink to the motherboard.

  14. Acer Aspire V5-591G-75KE Motherboard Replacement: adım 14, 3 resimden 1. Acer Aspire V5-591G-75KE Motherboard Replacement: adım 14, 3 resimden 2. Acer Aspire V5-591G-75KE Motherboard Replacement: adım 14, 3 resimden 3.
    • Once you separate the heat-sink from the motherboard, you will need to clean and re-apply thermal compound. Do not proceed unless you are prepared and you have the necessary materials.

    • Using both hands, gently lift the heat-sink and fan components from the motherboard.

    • Old thermal compound can dry up and adhere the heat-sink to the motherboard like glue. This may make removing the fan and heat-sink difficult.

    • Do not re-seat the fan and heat-sink without cleaning and re-applying the thermal compound. For more information, please refer to this guide.

  15. Acer Aspire V5-591G-75KE Motherboard Replacement, Motherboard: adım 15, 1 resimden 1.
    • With all major components removed, proceed to locate the connectors marked on the photograph:

    • Power jack harness connector.

    • Ribbon cables.

    • Display cable connector.

    • Keyboard connector.

    • Please note that at this stage, the thermal compound has been cleaned off the motherboard. For more information, please refer to this guide.

  16. Acer Aspire V5-591G-75KE Motherboard Replacement: adım 16, 1 resimden 1.
    • Disconnect the power jack harness from the motherboard by pushing on the tabs with a pair of blunt tweezers.

    • Use a plastic opening tool to pry open the locks, then pull the ribbon cables out.

  17. Acer Aspire V5-591G-75KE Motherboard Replacement: adım 17, 2 resimden 1. Acer Aspire V5-591G-75KE Motherboard Replacement: adım 17, 2 resimden 2.
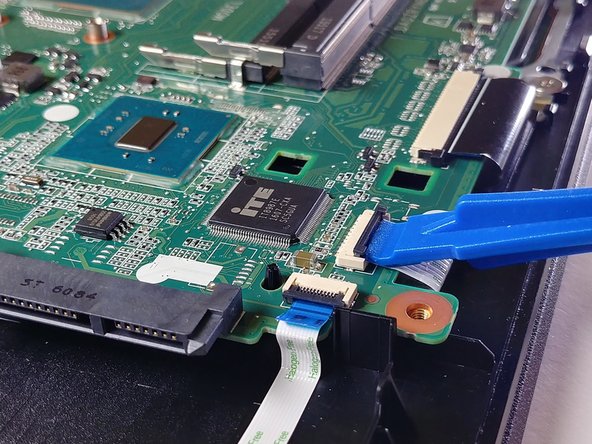
    • The ribbon cables have small locks securing them in place.

    • Use a plastic opening tool to pry the locks up. Once unlocked, simply pull the cables out.

  18. Acer Aspire V5-591G-75KE Motherboard Replacement: adım 18, 3 resimden 1. Acer Aspire V5-591G-75KE Motherboard Replacement: adım 18, 3 resimden 2. Acer Aspire V5-591G-75KE Motherboard Replacement: adım 18, 3 resimden 3.
    • The display cable connects the motherboard to your laptop's monitor. It has a small tab lock on it.

    • Use a plastic opening tool to pry the tab lock up.

    • Use the plastic ears on top of the cable to head to disconnect the display cable from the motherboard.

  19. Acer Aspire V5-591G-75KE Motherboard Replacement: adım 19, 2 resimden 1. Acer Aspire V5-591G-75KE Motherboard Replacement: adım 19, 2 resimden 2.
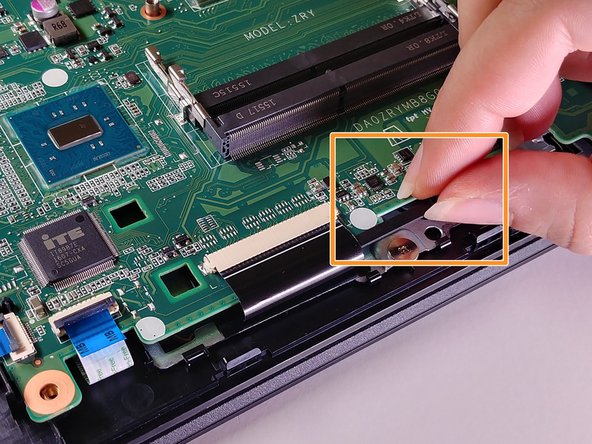
    • To disconnect the wide ribbon cable, use your fingers to pull back the black tab until it is loose.

    • Slide out the black plastic tab from beneath the ribbon cable.

    • Once the plastic tab is out, simply pull out the wide ribbon cable.

    • Take care not to flip the tab upside down, as it is not symmetrical. If you are having difficulties fitting it back, it might have flipped at some point.

  20. Acer Aspire V5-591G-75KE Motherboard Replacement: adım 20, 3 resimden 1. Acer Aspire V5-591G-75KE Motherboard Replacement: adım 20, 3 resimden 2. Acer Aspire V5-591G-75KE Motherboard Replacement: adım 20, 3 resimden 3.
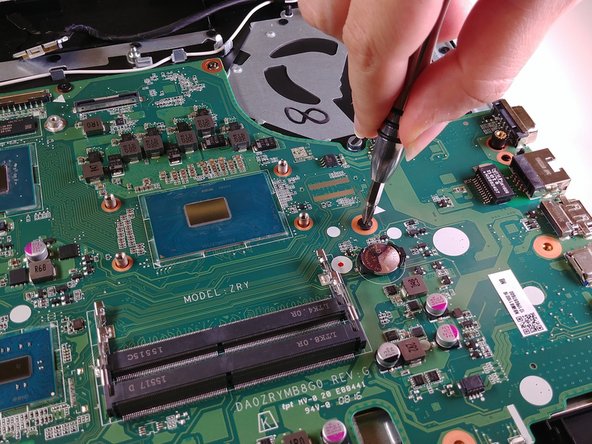
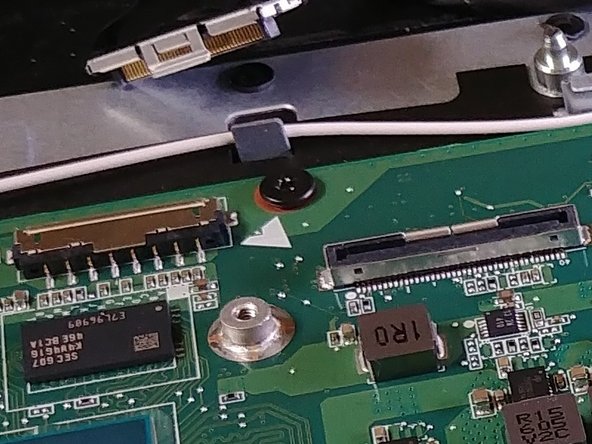
    • Use a Phillips #1 screwdriver to remove the 3 black 10mm Phillips Head screws securing the motherboard to the face-plate of the device.

    • Note that each of the holes for these screws are marked with a small white triangle.

  21. Acer Aspire V5-591G-75KE Motherboard Replacement: adım 21, 1 resimden 1.
    • Lift the motherboard gently to completely remove this component from the device.

Sonuç

You can follow the steps in reverse to reassemble your device, but you should not re-seat the heat sink and fan without cleaning and re-applying the thermal compound.

2 farklı kişi bu kılavuzu tamamladı.

Reina Godeck

Üyelik tarihi: 10/16/17

741 İtibar

5 adet Kılavuz yazıldı

Ekip

UW Tacoma, Team S3-G5, Liner Fall 2017 UW Tacoma, Team S3-G5, Liner Fall 2017 üyesi

UWT-LINER-F17S3G5

4 Üyeler

18 adet Kılavuz yazıldı

2 Yorum

Is it necessary to remove everything especially heat sink if I want to replace only keyboard?

Nikolas Tomaštík - Yanıt

Where do you purchase the motherboard?

sh iro - Yanıt

Yorum Ekle

İstatistikleri Görüntüle:

Son 24 Saat: 0

Son 7 gün: 1

Son 30 gün: 11

Her zaman: 2,635