Ana içeriğe geç

Acer Aspire V5-591G-75KE Wireless Card Replacement

Neye ihtiyacın var

  1. Acer Aspire V5-591G-75KE Wireless Card Replacement, Acer Aspire V5-591G-75KE Disassembly: adım 1, 3 resimden 1. Acer Aspire V5-591G-75KE Wireless Card Replacement, Acer Aspire V5-591G-75KE Disassembly: adım 1, 3 resimden 2. Acer Aspire V5-591G-75KE Wireless Card Replacement, Acer Aspire V5-591G-75KE Disassembly: adım 1, 3 resimden 3.
    • Close down the display and flip the device upside down.

    • Use a Phillips #1 screwdriver to remove 18 black 10mm Phillips Head screws in order to loosen up the protective bottom casing.

  2. Acer Aspire V5-591G-75KE Wireless Card Replacement: adım 2, 2 resimden 1. Acer Aspire V5-591G-75KE Wireless Card Replacement: adım 2, 2 resimden 2.
    • With the screws removed, flip the device right-side up and open up the display.

    • Run a plastic spudger tool along the seam of the face-plate in order to loosen up the protective bottom casing.

    • Popping sounds are normal, but forceful prying can damage delicate components. Be especially careful near the USB and HDMI ports.

  3. Acer Aspire V5-591G-75KE Wireless Card Replacement: adım 3, 2 resimden 1. Acer Aspire V5-591G-75KE Wireless Card Replacement: adım 3, 2 resimden 2.
    • Close the display down once more, and flip the laptop upside down, with the hinge facing away from you.

    • Do not yank the bottom casing off. There is a small speaker wire that connects it to the motherboard.

    • Taking note of the small speaker wire, gently lift only the left side of the bottom casing.

  4. Acer Aspire V5-591G-75KE Wireless Card Replacement: adım 4, 3 resimden 1. Acer Aspire V5-591G-75KE Wireless Card Replacement: adım 4, 3 resimden 2. Acer Aspire V5-591G-75KE Wireless Card Replacement: adım 4, 3 resimden 3.
    • Using a pair of blunt tweezers, push on the tabs of the small white connector to separate it from the motherboard.

    • The entire bottom casing should lift with no resistance. If there is too much resistance, verify you removed all the screws, and run the plastic spudger tool around the face-plate again.

  5. Acer Aspire V5-591G-75KE Wireless Card Replacement, Wireless Card: adım 5, 1 resimden 1.
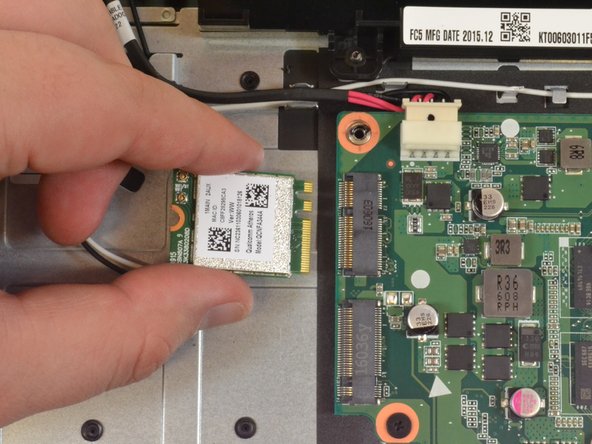
    • Locate the wireless card on the top left quadrant. It should have two antenna cables connected to it, one white and one black.

  6. Acer Aspire V5-591G-75KE Wireless Card Replacement: adım 6, 1 resimden 1.
    • With a pair of blunt tweezers, firmly grasp each antenna head and detach it by lifting straight up.

    • The antenna cables are connected through small sockets. Small popping sounds when attaching and detaching the antennas are normal.

    • Note that the white cable connects on the top socket.

  7. Acer Aspire V5-591G-75KE Wireless Card Replacement: adım 7, 2 resimden 1. Acer Aspire V5-591G-75KE Wireless Card Replacement: adım 7, 2 resimden 2.
    • Using a Phillip Head size 1 screwdriver, remove the screw attaching the wireless card to the laptop frame.

    • To detach the wireless card, lift up slightly and pull away.

Sonuç

To reassemble your device, follow these instructions in reverse order.

Tasier Hagler

Üyelik tarihi: 10/18/17

428 İtibar

4 adet Kılavuz yazıldı

Ekip

UW Tacoma, Team S3-G5, Liner Fall 2017 UW Tacoma, Team S3-G5, Liner Fall 2017 üyesi

UWT-LINER-F17S3G5

4 Üyeler

18 adet Kılavuz yazıldı

0 Yorum

Yorum Ekle

İstatistikleri Görüntüle:

Son 24 Saat: 0

Son 7 gün: 1

Son 30 gün: 10

Her zaman: 1,235