Giriş
You will need a printed adapter to mount the ADXL345 to the rear of the X carriage. You can find one here
Neye ihtiyacın var
-
-
Connect the Accelerometer to the RPI
-
Accelerometer 3V3 to RPI pin 17 3.3v
-
Accelerometer GND to RPI pin 20 Ground
-
Accelerometer CS to RPI pin 24 GPIO08 (SPI0_CE0_N)
-
Accelerometer SDO 21 to RPI pin GPIO09 (SPI0_MISO)
-
Accelerometer SDA to RPI pin 19 GPIO10 (SPI0_MOSI)
-
Accelerometer SCL 23 to RPI pin GPIO11 (SPI0_SCLK)
 FixBot'a Sor
-
-
-
There are a number of options you can use to mount the accelerometer. I used this mount
-
-
-
You need to SSH into to your printer and install Numby.
-
~/klippy-env/bin/pip install -v numpy
-
sudo apt update
-
sudo apt install python3-numpy python3-matplotlib -y
-
Verify Linux SPI driver is enabled
-
sudo raspi-config
-
#3 Interface Options > P4 SPI > Yes > OK > Finish
-
-
-
-
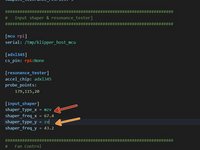
Uncomment the input shaper & resonance tester section in the config.
-
probe_points: It's recommended to use 1 point in the center of the bed slightly above. I used the same coordinates used when homing Z
-
Restart klipper with
-
RESTART
-
-
-
Check to make sure the RPI can communicate with the ADXL345 by running the following command in console
-
ACCELEROMETER_QUERY
-
It should return something like:
-
adxl345 values (x, y, z): -152.983740, 10249.910580, 152.983740
-
-
-
Home the printer.
-
During resonance testing the vibrations can become extremely violent. Make sure you're in proximity of the printer in case you need to cancel the test with M112
-
Now you can run the first resonance test for X
-
TEST_RESONANCES AXIS=X
-
When the test completes run it again for Y
-
TEST_RESONANCES AXIS=Y
-
When the test is complete it will generate CSV files stored on the pi.
-
-
-
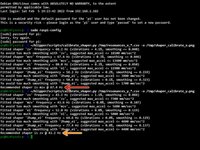
SSH back in to the printer and run the following 2 commands
-
~/klipper/scripts/calibrate_shaper.py /tmp/resonances_x_*.csv -o /tmp/shaper_calibrate_x.png
-
~/klipper/scripts/calibrate_shaper.py /tmp/resonances_y_*.csv -o /tmp/shaper_calibrate_y.png
-
This script will generate the charts /tmp/shaper_calibrate_x.png and /tmp/shaper_calibrate_y.png with frequency responses
-
You will also get the suggested frequencies for each input shaper, as well as which input shaper is recommended for your setup.
-
You can see my values for X
-
You can see my values for Y
-
-
-
With a CoreXY you can also use Klipper to compare belt tension between X and Y. This doesn't tell you if the belts are too tight or too loose. It tells you have the belts are tensioned equally.
-
Run the following commands in the console
-
TEST_RESONANCES AXIS=1,1 OUTPUT=raw_data
-
TEST_RESONANCES AXIS=1,-1 OUTPUT=raw_data
-
SSH into the pi and run
-
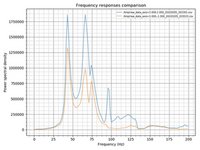
~/klipper/scripts/graph_accelerometer.py -c /tmp/raw_data_axis*.csv -o /tmp/resonances.png
-
Based off the generated graph, X had much higher frequencies than Y. I had to tighten the left belt tensioner to to bring the frequencies closer to each other.
-
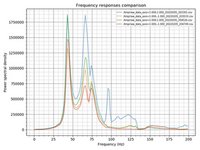
As you can see from the 2nd test the frequencies for X and Y are closer together, but could still use a little more adjustment. I think a lot of the frequency variation is due to my cable chain. At lower frequencies it rattles considerably more only when calibrating X.
-


İptal et: Bu kılavuzu tamamlamadım.
9 farklı kişi bu kılavuzu tamamladı.