Giriş
Replacing the power supply on the AirPort Extreme A1521 takes a few steps. Once you get to the second to last step you need to be careful and not touch the black cylinders. They are capacitors and could give you a shock.
Neye ihtiyacın var
-
-
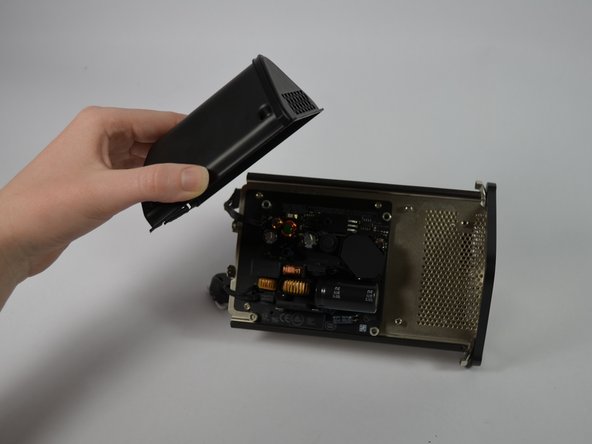
Using a metal spudger, gently pry the cover off the bottom of the device.
-
-
-
To detach the small clips from the connectors, place the flat end of the plastic spudger underneath the clip and gently lever it away from the center of the device.
-
To detach the large clip from its connector, place the flat end of the spudger on the clip and lever it upward out of the connector.
In later versions of A1521 you will find Step 2 unnecessary because the wires are already underneath the top plate and the connectors do not need to be unplugged. Also, don’t forget about the tiny reset button and LED status light that should be loosened before removing the unit from its case.
I thought all the AirPorts I have seen in the videos (and here) were opened prior to filming so I assumed I must unplug all three of them, and broke the three-wire connector of the indicator light : ) trying not to worry about it, but I would not really need to unplug that one throughout the process (at all) because the fan is running over the other (four-wire) small connector in the first place
Sansal -
I accidentally broke the clip on the 3 wire connection. Is there a supplier / part number in order to get a replacement? (Not the receiving clip on the circuit board, but the clip that the 3 wires press into.)
Hello Mark, I broke mine too - the connector. The three wire connection cable goes to the green/yellow status led. If you can’t live without it like I could not :) than you can use some superglue (gel!) and try to reassemble the connector back with much patience and steady hand. Wait at least 2 hours to dry out completely!! I used Loctite super attach gel. It worked for me. Two wires were lose and one was still on the connector. Next time I open my unit I will not touch this connector but instead rather remove the LED from housing and let it stay connected to the board.
Hey Mark - I broke mine too : ) the small(est) connector that should have remained as an integral part of the broad actually broke/come off with the cable despite the fact that I was literally trying hard to be very careful, and pulling that particular three-wire small clip (outwards) from the connector (placing the flat end of the spudger underneath the clip, and gently levering it away from the center of the device) as instructed) unfortunately was not enough. I am writing to let everyone here know that this is not of a big deal as it was the least important connector among the three:
Now that my Airport extreme runs indicator-free; but the good thing is I can learn everything over the app on iPhone and/or MacBook - tying not to worry about it.
Hope this helps in a particular way as intended: the reader feels a bit better, and knows that he/she is not alone : )
Lesson to learn: read the comments as well - if I had read this, perhaps (just perhaps) I could have been more (?) careful with the 3-wire one
Sansal -
I’m very skilled at this sort of thing having done dozens of iPhones, iPads and many many computers. I also knew about the small clips needing to be popped off away from the board and the large one sliding up across the board. Despite that, the reset connector on the board broke off into two pieces. I write this to let people know I believe it is a fault of the connector design. Perhaps when the plastic hasn’t been heated through many years of use, it might work better. But in my case, I used a microscope to piece back the connector and re-solder it. It was NOT easy. As I was using a microscope I could see the condition of the connector. Honestly, they are so small that it is pushing the limits of that kind of connector. The plastic piece molding was very rough. As in, I don’t know why they use such poor quality connectors. If I were to do this again, I would cut the wires in a good spot and solder them back when done. At least for the small connectors. But after cleaning/oiling fan, it works great!
I inadvertently broke the 3 wire clip (wire end - not circuit board end) - is there a supplier / part number for a replacement clip?
The large clip is lifted out of it’s holder by lifting the clip up toward the top of the device, like upward toward the sky. Don’t lift it from the very bottom because it’s in a little holding case. The small clips are different. They lift outward away from the circuit board. Just put a flat screwdriver blade behind the wire just above the clip and lift it off - not upward - but in the opposite direction of the circuit board.
I found it easier to remove only the big clip(careful! nearly half of it remain on the keyboard ) I succeeded best in lifting the tiny litte “noses(<1mm!) first left an right alternating then the plug comes out slowly (little bitt left .. little bit right)
2Then to remove the circuit plug of the housing:
After this its easy to take the black metal plate out by sliding it out under the crossing cables.
3removing the Resetbutton from the housing: no need to remove the plug from the “mainboard”
4 removing the control light from the housing: no need to remove the plug from the “mainboard”
I want to substitute that it isn't even necessary to remove the big connector from the logic board so it is not necessary to remove any connectors to take the airport extreme out of the housing. You just have to remove the (power plug) the control light and the reset button out of the house in keeping them connected with the logic board.
otto -
Where is the mention of the difficulty in removing and replacing the reset button connection? Mine got ruined in the process. I was also unable to reattach one of the connections for the hard drive so it no longer functions. I would not recommend this repair unless you are experienced or are willing to lose functionality.
as i wrote it is not necessary at all to remove the reset button connection. neither the connection of the control lights. U just take them out of the housing and they kepp connected to the mainboard. So its also posssible to try the AEBS or Time capsule without the housing.
otto -
My metal plate covered all the wires, so I had to remove it before disconnecting the cables.
As a number of people have pointed out. The connectors are not the same, so their removal methods are different.
With the unit upside down, and the bottom removed.
1) Remove the hardest to reach LED connector, by placing a spudger against the circuit board, and gently easing the cable out perpendicular to the surface of the circuit board.
2) Remove the fan connector (as it was covered by the LED cable) using the same technique.
3) The BIG connector pulls vertically up, parallel to the circuitboard. Be gentle, these are delicate.
I’m very skilled at this sort of thing having done dozens of iPhones, iPads etc. I also knew about the small clips needing to be popped off away from the board and the large one sliding up across the board. Despite that, the reset connector on the board broke off into two pieces.
I write this to let people know that I believe it is a fault of the connector design. Perhaps when the plastic hasn’t been heated through many years of use, it might work better. But in my case, I used a microscope to piece back the connector and re-solder it. It was NOT easy. As I was using a microscope I could see the condition of the connector. Honestly, they are so small that it is pushing the limits of that kind of connector. The plastic piece’s molding was very rough. As in, I don’t know why they use such poor quality connectors.
If I were to do this again, I would cut the wires in a good spot and solder them back when done. At least for the small connectors. Happy to say that after cleaning/oiling fan axle, it works great!
No need to remove any cables!
I have the version that has all the cables under the metal plate.
Just to make sure that I didn’t break any cables I didn’t disconnect any.
Carefully remove the reset button and the LED-light from the case. The reset button slides from one side out, its self explanatory. The LED-light is glued to the case and can carefully be removed.
To put back together, just be sure that the reset button is pushed down so it will fit in the “track” before using force to slide it in.
The LED is just to carefully line up(one side is not rounded) and push back.
Sorry for my English, not my native language. Hope you understand.
On my first airport, I pulled the entire connector off of the circuit board, not just the half connected to the wire, but the both parts of the connector. I thought that I was being careful and was impressed with how easily it came off. On my second unit I was determined to get it right and followed a suggestion from a different guide to use a straight pin, it worked like a charm. Just got a longish pin from the sewing kit and gently pushed it between the two halves of the connector, directly behind the point where the wires enter the connector. The pin being very small exerted very little tension, but enough that the connector popped right out with a minimum amount of pushing.
-
-
-
Using two fingers, pinch the power supply wire and gently lift it upward. Move it away from the metal plate.
-
Next, unscrew the four 3.3mm T8 Torx screws and remove the metal plate.
When putting the metal plate back on, be sure all wiring does not get pinched. The wires sit in little cutouts so they don’t get pinched.
You need to remove the hard drive by pulling it up, before you can remove the chassis.
In case it is a time capsule; this is a guide for the airportExtreme; Again in want to emphasize that there is no need to take out any of these fragile connectors out of the mainboard; U just take out the contol light, the resetbutton an the Power plug out of the housing, keeping them connected with “mainboard” of the router; so there is no risk to break any connectors. If you just clean the fan and oil the axis, the whole inner thing stays as it is an is even functional without the housing; one could even put it into another housing. No risk to ruin anything..
otto -
-
-
-
-
Remove the T8 Torx screwdriver head and replace it with the 60 mm extension; then, add the T9 Torx head.
-
Loosen, but do not remove the two screws at the bottom of the 1.2-inch wide gap in the middle of the internal structure.
The two screws at the bottom were T8 in mine; I had no T9 screws in my Airport Extreme.
Mine were T8 as well. I had to loosen these screws until the springs popped up before I could pry the internal structure out.
I forgot to retighten them when I reassembled the thing. Hope nothing bad happens, as I’m not inclined to take it apart again just to tighten these screws.
-
-
-
Using only your fingers, gently compress the internal structure and pull evenly upward to remove it from the white case.
The sockets for the RJ45 (ethernet) ports are locked into the case, fit the internal structure by 1-2mm, then you can compress the two halves together to enable removal of the body.
As plevin says, take care not to damage the cables to the reset switch, and the cable to the status LED
On a more recent model of the AE, could not get the Ethernet ports to come away from the fixing. Seemed to be locked in place by a plastic guide. Multiple efforts were fruitless; had to abort. (Screws deep in the base were definitely unlatched; the blockage was the Ethernet port, esp top one, not moving.)
-
-
-
Rotate the internal structure so that the white ports are facing away from you.
-
Three 8.2mm T8 Torx screws connect the fan to the internal structure. Unscrew all three.
When removing the fan, begin by lifting the side with only one screw because the other side has the wiring tucked under a rubber piece that’s bendable. Push the rubber piece to the side to get the wire out from under it so you can completely remove the fan.
My replacement for the fan had the rubber grommets already in place. I put a tiny amount of grease on the thread of the screws, and screwed them into the grommet before attempting the re-assembly.
You will have to compress the fan against the covered motherboard section to re-align the bolts. Due to the cable’s fragility, I fit the screw by the cable first.
-
-
-
Remove the fan from the device.
I opened my unit to expect it before I buy the new fan because I found fan failure in debug log of my airport utility instead of overheat which was presented right after login into airport utility. The fan costs about 23$ on ebay - not cheap at all!! Turns out the fan is OK but it just needed a bit of oil because it could barely spin (with my hand! on it's own id did not turn at all). I opened the fan casing - be careful no to break the plastic clips and pulled the fan straight up from the mechanism. What can go wrong, if its broken its broken, right? :) … I put a very small amount of oil on the shaft itself (not in the mechanism!!!) and pushed it back to into the mechanism. Then I tried to turn the fan a bit both ways with my hand and with each turn it had less resistance. When I plugged the disassembled unit into power (I really really really do not recommend that!!!) the fan started to turn on its own. The unit is now fully assembled and works for the past 2 days without overheat warning. Hope this helps!
That should be something we can literally call DIY - I would still replace that poorly-engineered fan though : )
Sansal -
I found a fan on eBay that was shipped from China. The OEM manufacturer of the original fan in my Airport Extreme is SUNON, the same brand I found on eBay.
I found its better to remove the metal shield from the mainboard too . the cable for the fan is sticked and fastened to the metal shield. So u can avoid to pull on the cables which might result in braking the wires. I found that cleaning the fan is not enough.. (holds only 24 hours.. one must open the fan.. (there are descriptions on Youtube and somewhere her also cited .
What is unclear to me .. which lubricant is best which means which sort holds longest! (for years?) Its not advisable to open the fan to often because plastic clamps break easily!
WD 40 is said to hold more than 6 Months (which is too short in my opinion)
No idea if
lubricant silicone-spray( silicone applied by a cotton tip) .. does not harm plastic and rubber.
Graphit (dry or with grease? can u just use a soft pencil to apply to the metal shaft? ore take the Graphit powder used for door locks?
Teflon-(spray) (applied by a cotton tip)
special oil for wrist watches .. mechanical robustness
will last longer?
When I opened it the second time I found that it is not necessary anymore to remove the metal sheet of the logic board. I just losing the bit that screws and there is a rubber profile between at the rim of the metal sheet which now could be pulled out carefully and then it is easy loosen the cable from the fan without unplugging it of the board. When reassembling I just put the cable under the rubber profile.
the WD 40 only lasted six months, this time are used a special “oil for wrist watches type 2”. And I cleaned the pin access with isoproylalcohol before. Let's see how much longer this one lasts.
would be exciting to know if the fan had to be oiled again since then :)
I used a q-tip to apply silicone lubricant to the fan shaft. It has only been 24 hours, but so far so good. There were several dust bunnies throughout the Extreme’s housing, so I’m going to be more diligent about regularly dusting the area around the router.
For the love of god, do not use WD-40! It’s full of stuff that will gunk up over time.
BEWARE…! I recently bought a replacement fan for another AirPort Extreme. When I re-assembled it and powered the unit up, the fan whined. I contacted the vendor who sent me another (after another 3 week wait) Same problem. I complained again and they gave me a refund. I bought from a different supplier. Same problem. So (in desperation/stupidity) I have bought from a third vendor. It seems the 4 noisy fans I have are all Chinese copies. Yes they are sunon, but are “pattern” versions. When you strip them they have 4 windings not 6. The cables are not channeled etc. The fan which has not arrived had photos like the OEM. I may try a resistor to reduce the voltage to make one of them spin more slowly. But only if the last best chance fan also whines.
The eBay fans branded SUNTON are very poor quality, the socket won’t fit even it is the correct socket …they cannot be used..
Florian -
thank you for this instruction! a little generic fine mechanic oil on the fan shaft and the problem is solved. It is absolutely not necessary to buy a new fan.
-


To reassemble your device, follow these instructions in reverse order.
To reassemble your device, follow these instructions in reverse order.
İptal et: Bu kılavuzu tamamlamadım.
13 farklı kişi bu kılavuzu tamamladı.
Ekip

Cal Poly, Team 4-26, Amido Fall 2013 Cal Poly, Team 4-26, Amido Fall 2013 üyesi
CPSU-AMIDO-F13S4G26
5 Üyeler
18 adet Kılavuz yazıldı
4 Yorum
When removing the fan pay attention to the cable. It is glued down with sticky tape and is routed beneath the rubber seal that mates against the case. You may want to remove the power supply cover first since the cable for the fan is routed beneath its cover. But once the power supply fasteners are removed the power supply is dangling from its cables so be careful to relieve the strain.
Splendid! It worked! I'm so happy. The old fan did really have some slackness and the new one makes no sound. Thanks for describing how to change the fan.
I replaced the power supply but the router still does turn on, any advice?
The black cover is about 1/8 to 1/4 inch thick and is held in with pressure points. Might be good to use two spudgers or thin, flat screwdriver tips.
John Vitali - Yanıt
When putting the cover back on after completing the fan replacement, be sure you put the side with the cutout on the same side of the Airport that has the LAN and power connectors. The black cover can only go back on in one correct position. Look at the inside bottom of the black cover and you’ll see one side is configured differently. Place that different side to align with the LAN and power holes of the Airport unit, then push it down gently into place.
John Vitali - Yanıt
Not found anything “gentle” works here! Can’t manage this without damage personally (gentle guy).
Martin - Yanıt
I was able to compete this step with a butter knife and much gentle prying. The scariest part is slipping the butter knife in.
James - Yanıt
Be gentile. Work around slowly a couple of times. Make sure to have a thin putty knife. Do not stubbornly use a lot of force but with some gentile but moderate pressure you will do it with minor issues on the plastic.
saltobanana - Yanıt