Ana içeriğe geç

Alienware M15x Processor Fan and Heat Sink Assembly Replacement

Neye ihtiyacın var

  1. Alienware M15x Processor Fan and Heat Sink Assembly Replacement, Turn the Computer: adım 1, 1 resimden 1.
    • WARNING: Before working inside your computer, read the safety information that shipped with your computer.

    • Turn the computer over.

  2. Alienware M15x Processor Fan and Heat Sink Assembly Replacement, Sliding the Battery: adım 2, 1 resimden 1.
    • Slide the battery latch to the unlock position as shown.

  3. Alienware M15x Processor Fan and Heat Sink Assembly Replacement, Removing the Battery Pack: adım 3, 1 resimden 1.
    • After the Battery Pack pops up, remove the Battery Pack.

  4. Alienware M15x Processor Fan and Heat Sink Assembly Replacement, Aligning the Battery Pack Tabs: adım 4, 1 resimden 1.
    • Align the battery pack tabs with the slots in the battery bay.

  5. Alienware M15x Processor Fan and Heat Sink Assembly Replacement, Pushing the Battery Pack: adım 5, 1 resimden 1.
    • Push the NEW battery pack into the battery bay until the battery pack clicks into place.

  6. Alienware M15x Processor Fan and Heat Sink Assembly Replacement, Loosen the Screws: adım 6, 1 resimden 1.
    • WARNING: Before working inside your computer, read the safety information that shipped with your computer.

    • CAUTION: To avoid electrostatic discharge, ground yourself by using a wrist grounding strap or by periodically touching an unpainted metal surface (such as a connector on the back of the computer).

    • Loosen the two captive screws that secure the memory-module door to the computer base.

  7. Alienware M15x Processor Fan and Heat Sink Assembly Replacement, Lifting the Memory Module Door: adım 7, 2 resimden 1. Alienware M15x Processor Fan and Heat Sink Assembly Replacement, Lifting the Memory Module Door: adım 7, 2 resimden 2.
    • Slide the memory-module door to release the tabs and lift the memory-module door out of the computer base.

  8. Alienware M15x Processor Fan and Heat Sink Assembly Replacement, Popping up the Memory Module: adım 8, 2 resimden 1. Alienware M15x Processor Fan and Heat Sink Assembly Replacement, Popping up the Memory Module: adım 8, 2 resimden 2.
    • CAUTION: If you need to remove memory modules from both connectors, remove the memory module in the upper connector before you remove the module in the lower connector.

    • CAUTION: To prevent damage to the memory module connector(s), do not use tools to spread the memory module spring-locks.

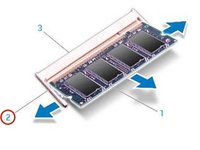
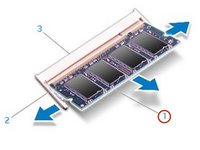
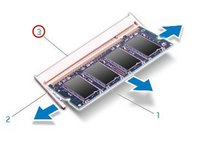
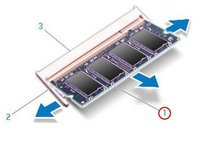
    • Use your fingertips to carefully spread apart the spring-locks on the memory-module connector until the memory module pops up.

  9. Alienware M15x Processor Fan and Heat Sink Assembly Replacement, Remove the Memory Module: adım 9, 1 resimden 1.
    • Remove the memory module.

  10. Alienware M15x Processor Fan and Heat Sink Assembly Replacement, Align the Notch: adım 10, 3 resimden 1. Alienware M15x Processor Fan and Heat Sink Assembly Replacement, Align the Notch: adım 10, 3 resimden 2. Alienware M15x Processor Fan and Heat Sink Assembly Replacement, Align the Notch: adım 10, 3 resimden 3.
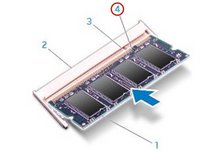
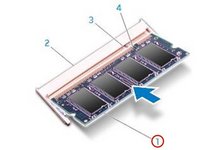
    • Align the notch on the NEW memory module with the tab on the memory-module connector.

  11. Alienware M15x Processor Fan and Heat Sink Assembly Replacement, Insert the Module: adım 11, 2 resimden 1. Alienware M15x Processor Fan and Heat Sink Assembly Replacement, Insert the Module: adım 11, 2 resimden 2.
    • Insert the module into the memory-module connector at a 45-degree angle, and press the memory module down until it clicks into place. If you do not hear the click, remove the module and reinstall it.

  12. Alienware M15x Processor Fan and Heat Sink Assembly Replacement, Align and Insert the Memory Module Tabs: adım 12, 2 resimden 1. Alienware M15x Processor Fan and Heat Sink Assembly Replacement, Align and Insert the Memory Module Tabs: adım 12, 2 resimden 2.
    • CAUTION: If the memory-module door is difficult to close, remove the memory module and reinstall it. Forcing the memory-module door to close may damage your computer.

    • NOTE: If the memory module is not installed properly, the computer may not boot.

    • Align and insert the memory-module door tabs into the slots on the computer base.

  13. Alienware M15x Processor Fan and Heat Sink Assembly Replacement, Replacing and Tightening the Screws: adım 13, 1 resimden 1.
    • Replace and tighten the two captive screws that secure the memory-module door to the computer base.

  14. Alienware M15x Processor Fan and Heat Sink Assembly Replacement, Loosen the Screws: adım 14, 1 resimden 1.
    • WARNING: Before working inside your computer, read the safety information that shipped with your computer.

    • WARNING: If you remove the hard drive from the computer when the drive is hot, do not touch the metal housing of the hard drive.

    • Loosen the four captive screws that secure the hard-drive assembly.

  15. Alienware M15x Processor Fan and Heat Sink Assembly Replacement, Lifting the Hard-Drive Assembly: adım 15, 1 resimden 1.
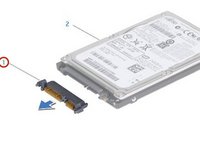
    • Using the pull-tab, lift the hard-drive assembly out of the hard-drive bay.

  16. Alienware M15x Processor Fan and Heat Sink Assembly Replacement, Remove the Screws: adım 16, 1 resimden 1.
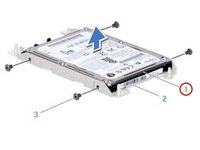
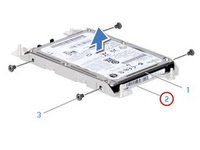
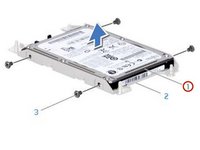
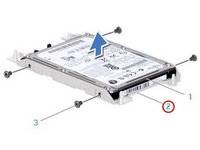
    • Remove the four screws that secure the hard drive to the hard-drive bracket.

  17. Alienware M15x Processor Fan and Heat Sink Assembly Replacement, Lifting the Hard Drive: adım 17, 2 resimden 1. Alienware M15x Processor Fan and Heat Sink Assembly Replacement, Lifting the Hard Drive: adım 17, 2 resimden 2.
    • Lift the hard drive out of the hard-drive bracket.

  18. Alienware M15x Processor Fan and Heat Sink Assembly Replacement, Disconnect the Interposer: adım 18, 2 resimden 1. Alienware M15x Processor Fan and Heat Sink Assembly Replacement, Disconnect the Interposer: adım 18, 2 resimden 2.
    • Disconnect the interposer from the hard drive.

  19. Alienware M15x Processor Fan and Heat Sink Assembly Replacement, Connecting the Interposer: adım 19, 2 resimden 1. Alienware M15x Processor Fan and Heat Sink Assembly Replacement, Connecting the Interposer: adım 19, 2 resimden 2.
    • Connect the interposer to the NEW hard drive.

  20. Alienware M15x Processor Fan and Heat Sink Assembly Replacement, Placing the Hard-Drive in the Bracket: adım 20, 2 resimden 1. Alienware M15x Processor Fan and Heat Sink Assembly Replacement, Placing the Hard-Drive in the Bracket: adım 20, 2 resimden 2.
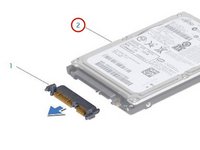
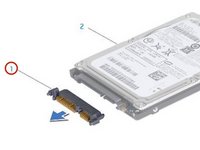
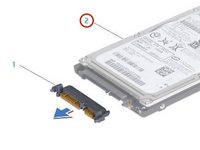
    • Place the hard drive in the hard-drive bracket.

  21. Alienware M15x Processor Fan and Heat Sink Assembly Replacement, Replace the Four Screws: adım 21, 1 resimden 1.
    • Replace the four screws that secure the hard drive to the hard-drive bracket.

  22. Alienware M15x Processor Fan and Heat Sink Assembly Replacement, Placing the Hard-Drive Assembly: adım 22, 1 resimden 1.
    • Place the hard-drive assembly in the hard-drive bay.

  23. Alienware M15x Processor Fan and Heat Sink Assembly Replacement, Aligning and Tightening the Screws: adım 23, 1 resimden 1.
    • Align and tighten the four captive screws that secure the hard-drive assembly to the hard-drive bay.

  24. Alienware M15x Processor Fan and Heat Sink Assembly Replacement, Disconnecting the Fan and Heat Sink Assembly: adım 24, 1 resimden 1.
    • WARNING: Before working inside your computer, read the safety information that shipped with your computer.

    • CAUTION: To avoid electrostatic discharge, ground yourself by using a wrist grounding strap or by periodically touching an unpainted metal surface (such as a connector on the back of the computer).

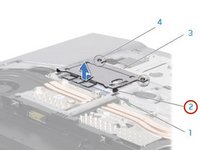
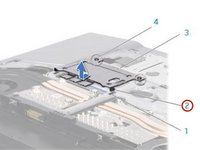
    • Disconnect the processor fan and heat sink assembly cable from the system board connector.

  25. Alienware M15x Processor Fan and Heat Sink Assembly Replacement, Loosen the Screws: adım 25, 1 resimden 1.
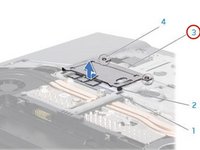
    • In sequential order (indicated on the processor fan and heat sink assembly), loosen the four captive screws that secure the processor fan and heat sink assembly to the system board.

  26. Alienware M15x Processor Fan and Heat Sink Assembly Replacement, Lifting the Processor Fan and Heat-Sink Assembly: adım 26, 1 resimden 1.
    • Lift the processor fan and heat sink assembly off the system board.

    • Peel the backing off the thermal cooling pads attached to the NEW processor fan and heat sink assembly.

    • NOTE: If the processor fan and heat sink assembly is replaced, the thermal cooling pads will be attached to the new processor fan and heat sink assembly. Do not reuse the old thermal cooling pads.

  27. Alienware M15x Processor Fan and Heat Sink Assembly Replacement, Align the Four Captive Screws: adım 28, 1 resimden 1.
    • Align the four captive screws on the processor heat sink with the screw holes on the system board and tighten the screws in sequential order (indicated on the processor fan and heat sink assembly).

  28. Alienware M15x Processor Fan and Heat Sink Assembly Replacement, Tighten the Screw: adım 29, 1 resimden 1.
    • Tighten the screw that secures the processor fan and heat sink assembly to the computer base.

  29. Alienware M15x Processor Fan and Heat Sink Assembly Replacement, Connect the Processor Fan and Heat Sink Assembly: adım 30, 1 resimden 1.
    • Connect the processor fan and heat sink assembly cable to the system board connector.

Sonuç

To reassemble your device, follow these instructions in reverse order.

Terrence15

Üyelik tarihi: 12/18/17

79.034 İtibar

441 adet Kılavuz yazıldı

Ekip

RampUP America, Inc. RampUP America, Inc. üyesi

Community

42 Üyeler

1.985 adet Kılavuz yazıldı

0 Yorum

Yorum Ekle

İstatistikleri Görüntüle:

Son 24 Saat: 1

Son 7 gün: 4

Son 30 gün: 9

Her zaman: 1,073