Ana içeriğe geç

Bu sürüm, hatalı düzenlemeler içerebilir. En son doğrulanmış bellek kopyası dönün.

Neye ihtiyacın var

  1. , iOpener'ı Isıtma: adım 1, 2 resimden 1. , iOpener'ı Isıtma: adım 1, 2 resimden 2.
    • İşleme başlamadan önce mikrodalganızı temizlenmenizi tavsiye ederiz. Aksi takdirde, yüzeydeki yağlı maddeler iOpener'a yapışabilir.

    • iOpener'ı mikrodalga fırının ortasına yerleştirin.

    • Döner tablalı mikrodalga fırınlar için: Tablanın sorunsuz bir şekilde döndüğünden emin olun. Aksi takdirde, iOpener'ınız takılıp fazla ısınabilir ve yanabilir.

  2. : adım 2, 1 resimden 1.
    • iOpener'ı otuz saniye boyunca ısıtın.

    • Tamir süresince iOpener ısınacağı için, tek seferde otuz saniye olmak üzere yeniden ısıtın.

    • Tamir süresince iOpener'ı fazla ısıtmamaya dikkat edin; fazla ısıtma iOpener'ın patlamasına sebep olabilir.

    • iOpener'ın kabarık bir görüntüsü varsa, kesinlikle dokunmayın.

    • iOpener'ın orta kısmı hala dokunulamayacak kadar sıcaksa, tekrar ısıtmadan önce biraz daha kullanabilirsiniz. Doğru bir şekilde ısıtılmış iOpener, yaklaşık 10 dakika kadar sıcak kalacaktır.

  3. : adım 3, 1 resimden 1.
    • iOpener'ı sıcak olan ortasından değil, herhangi iki ucun birinden tutarak mikrodalga fırından çıkartın.

    • iOpener fırından çıktığında epey sıcak olacaktır, dikkat edin. Gerekli ise, fırın eldiveni kullanabilirsiniz.

  4. Bu adım çevrilmemiş. Çevrilmesine yardım edin

    : adım 4, 2 resimden 1. : adım 4, 2 resimden 2.
    • If you don't have a microwave, follow this step to heat your iOpener in boiling water.

    • Fill a pot or pan with enough water to fully submerge an iOpener.

    • Heat the water to a boil. Turn off the heat.

    • Place an iOpener into the hot water for 2-3 minutes. Make sure the iOpener is fully submerged in the water.

    • Use tongs to extract the heated iOpener from the hot water.

    • Thoroughly dry the iOpener with a towel.

    • The iOpener will be very hot, so be careful to hold it only by the end tabs.

    • Your iOpener is ready for use! If you need to reheat the iOpener, heat the water to a boil, turn off the heat, and place the iOpener in the water for 2-3 minutes.

  5. Bu adım çevrilmemiş. Çevrilmesine yardım edin

    : adım 5, 2 resimden 1. : adım 5, 2 resimden 2.
  6. Bu adım çevrilmemiş. Çevrilmesine yardım edin

    : adım 6, 1 resimden 1.
    • Prepare an iOpener (or grab a hair dryer or heat gun) and heat the face of the watch until it's slightly too hot to touch.

    • Leave the iOpener on the watch for at least a minute to fully heat the screen and soften the adhesive holding it to the case.

    • You may need to reheat the iOpener, or move it around on the screen as sections cool, to heat the screen enough to pry it off.

  7. Bu adım çevrilmemiş. Çevrilmesine yardım edin

    : adım 7, 2 resimden 1. : adım 7, 2 resimden 2.
    Bu adımda kullanılan alet:
    Safety Glasses
    $3.19
    Satın Al
    • Because the gap between the screen and watch body is so thin, a sharp blade is required to separate the two. Read the following warnings carefully before proceeding.

    • Protect your fingers by keeping them completely clear of the knife. If in doubt, protect your free hand with a heavy glove, such as a leather shop glove or gardening glove.

    • Be careful not to apply too much pressure, as this might cause the knife to slip and cut you, or damage the watch.

    • Wear eye protection. The knife or glass may break, sending pieces flying.

  8. Bu adım çevrilmemiş. Çevrilmesine yardım edin

    : adım 8, 3 resimden 1. : adım 8, 3 resimden 2. : adım 8, 3 resimden 3.
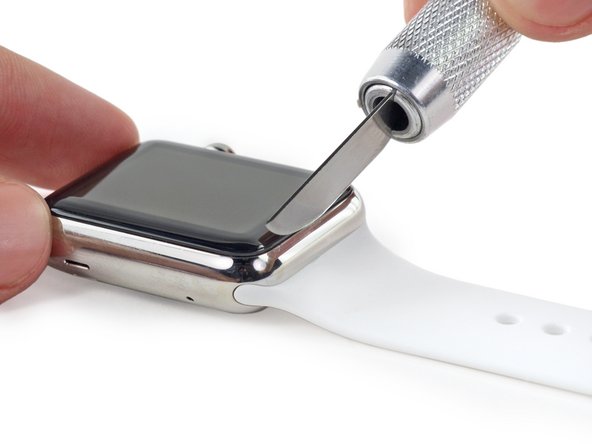
    • Using a curved blade minimizes the chance of scratching the case or cracking the glass. Only pry with the curved section of the blade, and not the tip or flat section.

    • Place the curved section of the blade in the gap between the glass and case on the lower edge of the watch face, and press firmly straight down into the gap.

    • Be very careful to maintain complete control over the knife—once the gap opens, if you're pressing too hard on the knife it may slip in and cut the battery.

    • This should wedge the gap open and cause the glass to lift slightly up from the case.

    • When the glass has lifted, gently rotate the knife down, opening the gap more by pushing the glass up.

  9. Bu adım çevrilmemiş. Çevrilmesine yardım edin

    : adım 9, 3 resimden 1. : adım 9, 3 resimden 2. : adım 9, 3 resimden 3.
    • Once you've opened the gap enough, insert the tip of an opening pick under the glass.

    • Slide the pick along the bottom edge to separate adhesive holding the screen to the case.

    • Be careful not to insert the opening pick too far. Only about 1/8" ( about 3 mm) is necessary, any deeper and you may damage cables.

  10. Bu adım çevrilmemiş. Çevrilmesine yardım edin

    : adım 10, 3 resimden 1. : adım 10, 3 resimden 2. : adım 10, 3 resimden 3.
    • Roll the opening pick up the side of the button side of the watch, gently pushing in to separate the adhesive and widening the gap as you go.

    • Remember not to push the pick in too far—it's easier to avoid this by rolling the pick, rather than dragging a tip along.

  11. Bu adım çevrilmemiş. Çevrilmesine yardım edin

    : adım 11, 3 resimden 1. : adım 11, 3 resimden 2. : adım 11, 3 resimden 3.
    • Work the pick around the top right corner, and roll it along the top edge of the screen.

  12. Bu adım çevrilmemiş. Çevrilmesine yardım edin

    : adım 12, 3 resimden 1. : adım 12, 3 resimden 2. : adım 12, 3 resimden 3.
    • Continue working the pick around the perimeter of the screen, rolling down along the left side to cut the last of the adhesive.

    • Leave the pick in place to keep the adhesive from resealing the screen in place.

  13. Bu adım çevrilmemiş. Çevrilmesine yardım edin

    : adım 13, 3 resimden 1. : adım 13, 3 resimden 2. : adım 13, 3 resimden 3.
    • While holding the first pick in place, use a second to check that all of the adhesive is separated around the entire perimeter of the screen.

  14. Bu adım çevrilmemiş. Çevrilmesine yardım edin

    : adım 14, 3 resimden 1. : adım 14, 3 resimden 2. : adım 14, 3 resimden 3.
    • There are two cables connecting the screen to the inside of the watch, near the top left corner. Be careful when prying or you may damage these cables.

    • Pry slightly up on the right side of the screen, to free it from any remaining adhesive.

    • Pry up on the left to free it as well—but do not attempt to remove the screen as it is still held in place by two cables.

  15. Bu adım çevrilmemiş. Çevrilmesine yardım edin

    : adım 15, 3 resimden 1. : adım 15, 3 resimden 2. : adım 15, 3 resimden 3.
    • If you can see the top layer of your Force Touch sensor among the display adhesive, it means the two layers of the sensor separated and you're going to need to replace or repair it.

    • iFixit screen and battery repair kits come with a replacement Force Touch sensor, so if you got one of those, don't fret.

    • The top layer of the sensor may be adhered to the back of the screen—if so, push it back down and separate it.

  16. Bu adım çevrilmemiş. Çevrilmesine yardım edin

    : adım 16, 3 resimden 1. : adım 16, 3 resimden 2. : adım 16, 3 resimden 3.
    • Lift the screen up and shift it to the left, minding the display data and digitizer cables.

  17. Bu adım çevrilmemiş. Çevrilmesine yardım edin

    : adım 17, 1 resimden 1.
    • Place the watch on an elevated surface, at least 1/2" or 1 cm tall—a small box or the edge of a book will work great. This will allow the screen to hang down vertically and give better access to the battery.

    • Be careful not to bump the screen or strain the cables while you work.

  18. Bu adım çevrilmemiş. Çevrilmesine yardım edin

    : adım 18, 3 resimden 1. : adım 18, 3 resimden 2. : adım 18, 3 resimden 3.
    • Use scissors to cut one of your opening picks to about the width of the battery. Try not to leave any sharp corners.

    • Insert the modified pick between the right side of the battery and the case.

    • Use constant, steady pressure to slowly pry the battery up, separating it from the adhesive securing it to the system board.

    • Be careful not to deform or puncture the battery.

    • On the larger (42 mm) models, it's possible to accidentally pry at the system board underneath the battery. Insert the pick only far enough to get underneath the battery, not the system board.

    • If needed, apply a little high concentration isopropyl alcohol (90% or greater) around and under the battery to help weaken the adhesive.

    • Do not attempt to remove the battery as it is still connected.

  19. Bu adım çevrilmemiş. Çevrilmesine yardım edin

    : adım 19, 2 resimden 1. : adım 19, 2 resimden 2.
    • Rotate the battery counterclockwise to expose its connector.

  20. Bu adım çevrilmemiş. Çevrilmesine yardım edin

    : adım 20, 3 resimden 1. : adım 20, 3 resimden 2. : adım 20, 3 resimden 3.
    • Hold the battery up and out of the way, to expose the battery cable connector.

    • Use a plastic opening tool, prying against the bottom of the case to separate the battery cable connector from the watch's battery cable.

    • Remove the battery from the watch.

    • If the battery is visibly dented or deformed, it should be replaced. For best results, replace with a new battery whenever it is removed.

  21. Bu adım çevrilmemiş. Çevrilmesine yardım edin

    : adım 21, 3 resimden 1. : adım 21, 3 resimden 2. : adım 21, 3 resimden 3.
    • Fold the screen up and over to the right, to expose the cables underneath.

  22. Bu adım çevrilmemiş. Çevrilmesine yardım edin

    : adım 22, 3 resimden 1. : adım 22, 3 resimden 2. : adım 22, 3 resimden 3.
    • The display and digitizer cable connectors are secured beneath a small metal bracket that is adhered to the speaker.

    • Use a plastic opening tool to flip the bracket toward the display and up from the speaker.

    • If you simply pry toward the watch band you may tear the cables.

  23. Bu adım çevrilmemiş. Çevrilmesine yardım edin

    : adım 23, 3 resimden 1. : adım 23, 3 resimden 2. : adım 23, 3 resimden 3.
    • Steady the bracket from the left side using your fingers or tweezers.

    • At the same time, insert a small (1 mm) flathead screwdriver under the tiny tab on the right.

    • Finally, place one finger behind the tab, and pinch the bracket hard between your finger and the screwdriver to detach the cover.

    • This releases two slotted tabs that hold the cover to the bracket, and should free the cover.

    • Prying the cover off can be challenging and may take more than one attempt. Be patient, and take care not to pull on the bracket or tear the attached cables.

  24. Bu adım çevrilmemiş. Çevrilmesine yardım edin

    : adım 24, 3 resimden 1. : adım 24, 3 resimden 2. : adım 24, 3 resimden 3.
    • Grab the cover with your tweezers and slide it toward the top of the watch to free the final slotted tab, and remove the cover.

  25. Bu adım çevrilmemiş. Çevrilmesine yardım edin

    : adım 25, 2 resimden 1. : adım 25, 2 resimden 2.
    • Carefully pry up to disconnect the display data and digitizer cables.

    • Be careful not to touch any of the exposed pins directly, as your finger oils may impede connectivity.

    • Remove the display.

Bitiş Çizgisi

95 farklı kişi bu kılavuzu tamamladı.

Tobias Isakeit

Üyelik tarihi: 03/31/14

117.293 İtibar

188 adet Kılavuz yazıldı

Ekip

Master Techs Master Techs üyesi

Community

322 Üyeler

2.521 adet Kılavuz yazıldı

5 Yorum

I followed all the instructions but needed to look repair videos on YouTube. Everything worked perfectly. The bracket is a bit of a challenge, I just took my time.

Thomas Rossano - Yanıt

I did replace my display and it works super-fine (thanks to iFixit) but the issue am facing right now is glueing the Display+Force Touch Ring+Body. Am unable to keep hold of display to the body and it keeps removing even after sevseral days of rubber banding and heat treatment.

Suraj Jorwekar - Yanıt

It wasn’t easy but the guide really helped a lot.

THANK YOU

Dennis Bailey - Yanıt

Super Anleitung. Die Uhr ist zwischendurch angegangen… Obwohl ich mit den Steckern nicht zimperlich war, funktioniert die Uhr nun wieder perfekt. ⭐⭐⭐⭐⭐

Christian Schickentanz - Yanıt

The screen does not respond to any touch. Does that mean the screen is broken? Do I need to replace the full screen with a Force Touch sensor? Thank you.

Ian Chan - Yanıt

Yorum Ekle

İstatistikleri Görüntüle:

Son 24 Saat: 12

Son 7 gün: 84

Son 30 gün: 450

Her zaman: 78,119