Ana içeriğe geç

Apple Watch Series 2 Display Opening

Salt Önkoşul
Bu kılavuz yalnızca diğer kılavuzlar için bir ön koşul olarak kullanılmak üzere tasarlanmıştır. Tek başına eksiktir.

Neye ihtiyacın var

  1. Apple Watch Series 2 Display Opening, Power off your Apple Watch: adım 1, 2 resimden 1. Apple Watch Series 2 Display Opening, Power off your Apple Watch: adım 1, 2 resimden 2.
  2. Apple Watch Series 2 Display Opening, Apply heat: adım 2, 1 resimden 1.
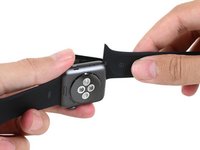
    • Prepare an iOpener (or grab a hair dryer or heat gun) and heat the face of the watch until it's slightly too hot to touch.

    • Leave the iOpener on the watch for at least a minute to fully heat the screen and soften the adhesive holding it to the case.

    • You may need to reheat the iOpener, or move it around on the screen as sections cool, to heat the screen enough to pry it off.

  3. Apple Watch Series 2 Display Opening, Observe all warnings: adım 3, 3 resimden 1. Apple Watch Series 2 Display Opening, Observe all warnings: adım 3, 3 resimden 2. Apple Watch Series 2 Display Opening, Observe all warnings: adım 3, 3 resimden 3.
    Bu adımda kullanılan alet:
    Safety Glasses
    $3.19
    Satın Al
    • Because the gap between the screen and watch body is so thin, a sharp blade is needed to separate the two. Read the following warnings carefully before proceeding.

    • Protect your fingers by keeping them completely clear of the knife. If in doubt, protect your free hand with a heavy glove, such as a leather shop glove or gardening glove.

    • Be careful not to apply too much pressure, as this might cause the knife to slip and cut you, or damage the watch.

    • Wear eye protection. The knife or glass may break, sending pieces flying.

    • Feel free to attach or remove the watch band as needed to provide more control as you make repairs.

  4. Apple Watch Series 2 Display Opening, Pry up the screen: adım 4, 3 resimden 1. Apple Watch Series 2 Display Opening, Pry up the screen: adım 4, 3 resimden 2. Apple Watch Series 2 Display Opening, Pry up the screen: adım 4, 3 resimden 3.
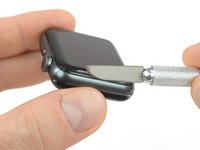
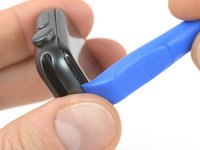
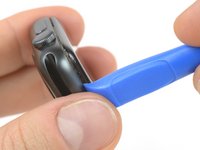
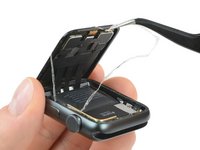
    • Place the edge of a curved blade into the thin gap between the display and the outer case. Start at the short side of the display, closest to the digital crown.

    • Press firmly straight down into the gap.

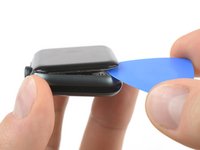
    • Once inserted, tilt the blade to pry the display open slightly.

    • Do not insert the knife more than 1/16th of an inch (~2 mm).

  5. Apple Watch Series 2 Display Opening: adım 5, 2 resimden 1. Apple Watch Series 2 Display Opening: adım 5, 2 resimden 2.
    • Once you've opened a small gap with the curved blade, remove the blade and insert the thinner edge of an opening tool into the gap.

    • Push the opening tool into the gap, using your thumb as a pivot to lift the display open a bit farther.

    • Don't try to fully open or detach the display yet.

  6. Apple Watch Series 2 Display Opening: adım 6, 3 resimden 1. Apple Watch Series 2 Display Opening: adım 6, 3 resimden 2. Apple Watch Series 2 Display Opening: adım 6, 3 resimden 3.
    • Insert an opening pick under the display and carefully separate the Force Touch gasket from the display.

    • iFixit screen and battery repair kits include a replacement Force Touch gasket, so don't fret too much if yours is damaged.

    • Otherwise, to preserve the Force Touch gasket, pry carefully under the edge of the display. If the Force Touch gasket splits when lifting the display, or if you separate the gasket layers, you'll also need to replace the Force Touch gasket itself.

    • Slide the pick around the display to separate the adhesive between the Force Touch gasket and the display.

    • Don't insert the opening pick deeper than 1/16th of an inch (~2 mm).

  7. Apple Watch Series 2 Display Opening: adım 7, 3 resimden 1. Apple Watch Series 2 Display Opening: adım 7, 3 resimden 2. Apple Watch Series 2 Display Opening: adım 7, 3 resimden 3.
    • To avoid straining the display cables, don't open the display all the way yet.

    • Open the display to about a 45° angle, and use tweezers to peel off the adhesive between the display and the Force Touch gasket.

    • Thread the adhesive around and behind the display cables to get it off completely.

Sonuç

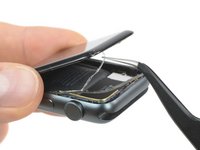
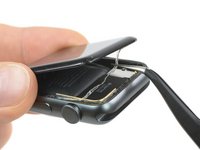
To reassemble your device, follow these instructions in reverse order.

Tobias Isakeit

Üyelik tarihi: 03/31/14

116.496 İtibar

188 adet Kılavuz yazıldı

Ekip

Master Techs Master Techs üyesi

Community

322 Üyeler

2.495 adet Kılavuz yazıldı

0 Yorum

Yorum Ekle

İstatistikleri Görüntüle:

Son 24 Saat: 0

Son 7 gün: 0

Son 30 gün: 0

Her zaman: 220