Ana içeriğe geç

Asus ROG G750JH-DB71 RAM Replacement

Neye ihtiyacın var

  1. Asus ROG G750JH-DB71 RAM Replacement, Battery: adım 1, 2 resimden 1. Asus ROG G750JH-DB71 RAM Replacement, Battery: adım 1, 2 resimden 2.
    • Ensure the laptop is powered off and unplugged before beginning.

    • Flip the laptop over so the bottom case is facing up.

  2. Asus ROG G750JH-DB71 RAM Replacement: adım 2, 3 resimden 1. Asus ROG G750JH-DB71 RAM Replacement: adım 2, 3 resimden 2. Asus ROG G750JH-DB71 RAM Replacement: adım 2, 3 resimden 3.
    • Push the switch near the front of the laptop to release the battery from the computer.

    • Pull the battery out and away from the center of the computer.

  3. Asus ROG G750JH-DB71 RAM Replacement, Asus ROG G750JH-DB71: adım 3, 3 resimden 1. Asus ROG G750JH-DB71 RAM Replacement, Asus ROG G750JH-DB71: adım 3, 3 resimden 2. Asus ROG G750JH-DB71 RAM Replacement, Asus ROG G750JH-DB71: adım 3, 3 resimden 3.
    • Use a spudger or your finger to lift up the plastic cover on the bottom of the laptop.

    • Under the plastic cover is a captive screw; unscrew it using a Phillips #00 screwdriver.

  4. Asus ROG G750JH-DB71 RAM Replacement: adım 4, 2 resimden 1. Asus ROG G750JH-DB71 RAM Replacement: adım 4, 2 resimden 2.
    • Remove the cover.

    • If your goal is to replace/remove only the hard drive, you don't have to complete the following disassembly steps and can go on to the hard drive replacement guide.

  5. Asus ROG G750JH-DB71 RAM Replacement: adım 5, 3 resimden 1. Asus ROG G750JH-DB71 RAM Replacement: adım 5, 3 resimden 2. Asus ROG G750JH-DB71 RAM Replacement: adım 5, 3 resimden 3.
    • Remove the hard drive by unscrewing the 4.4 mm Phillips #00 screws.

    • Remove all of the plastic caps around the edges using a spudger. Remove the screws underneath the caps.

    • There is one 13 mm Phillips #00 screw and six 8 mm Phillips #00 screws.

    • Remove the remaining screws underneath the cover.

    • There are six 8 mm Phillips #00 screws and three 1 mm Phillips #00 screws.

  6. Asus ROG G750JH-DB71 RAM Replacement: adım 6, 3 resimden 1. Asus ROG G750JH-DB71 RAM Replacement: adım 6, 3 resimden 2. Asus ROG G750JH-DB71 RAM Replacement: adım 6, 3 resimden 3.
    • You will find a metal tab holding the disc drive in place. Push on the tab with a spudger to remove the disc drive. It is located below a previously removed screw.

    • Do not pull the disc drive out from the side before pushing the metal tab as it will only damage the cover.

    • Remove the three 4 mm Phillips #00 screws that were previously covered by the disc drive.

  7. Asus ROG G750JH-DB71 RAM Replacement: adım 7, 3 resimden 1. Asus ROG G750JH-DB71 RAM Replacement: adım 7, 3 resimden 2. Asus ROG G750JH-DB71 RAM Replacement: adım 7, 3 resimden 3.
    • The back cover can be taken off by hand.

    • Disconnect the speaker cables.

    • Remove two 8 mm Phillips #00 screws on each corner.

  8. Asus ROG G750JH-DB71 RAM Replacement: adım 8, 3 resimden 1. Asus ROG G750JH-DB71 RAM Replacement: adım 8, 3 resimden 2. Asus ROG G750JH-DB71 RAM Replacement: adım 8, 3 resimden 3.
    • Pry the keyboard gently using a spudger.

    • Make sure to unhook the cables and wires from the keyboard gently in Picture 3.

  9. Asus ROG G750JH-DB71 RAM Replacement: adım 9, 2 resimden 1. Asus ROG G750JH-DB71 RAM Replacement: adım 9, 2 resimden 2.
    • Now you can pull the keyboard off but make sure to do so carefully without damaging or scuffing any components.

    • Pull up and out at an angle to avoid damaging the internals of the laptop.

  10. Asus ROG G750JH-DB71 RAM Replacement, RAM: adım 10, 2 resimden 1. Asus ROG G750JH-DB71 RAM Replacement, RAM: adım 10, 2 resimden 2.
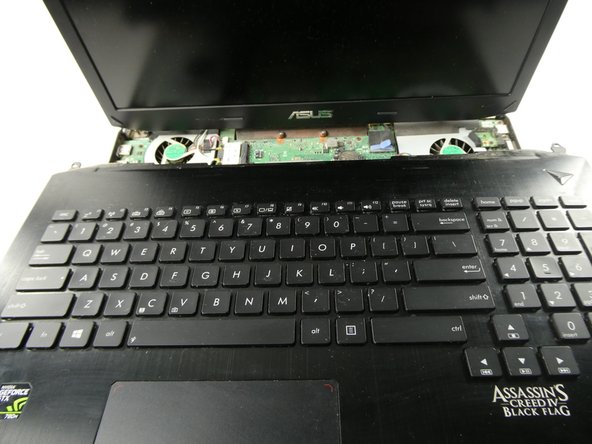
    • The RAM module is located directly in the center of the computer on top of the motherboard.

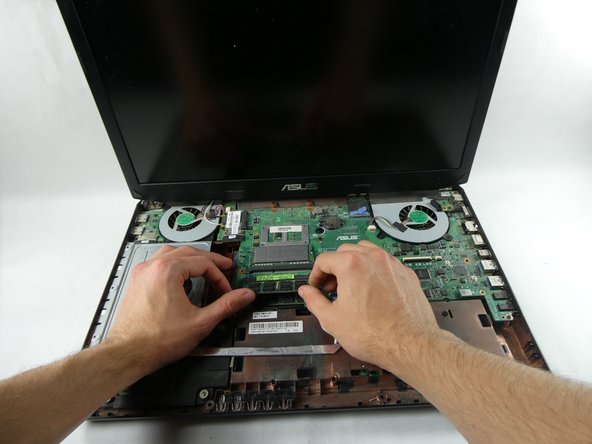
    • Push in the two levers on each side of the RAM module. This frees the module from the slot and allows removal.

    • Once loose, pull the RAM module away from the slot at a 45 degree angle as to not damage it.

Sonuç

To reassemble your device, follow these instructions in reverse order.

James Mills

Üyelik tarihi: 10/25/22

471 İtibar

4 adet Kılavuz yazıldı

Ekip

UMass Dartmouth, Team 5-5, Sinclaire Fall 2022 UMass Dartmouth, Team 5-5, Sinclaire Fall 2022 üyesi

UMASSD-SINCLAIRE-F22S5G5

4 Üyeler

6 adet Kılavuz yazıldı

0 Yorum

Yorum Ekle

İstatistikleri Görüntüle:

Son 24 Saat: 1

Son 7 gün: 3

Son 30 gün: 9

Her zaman: 138