Ana içeriğe geç

Asus ROG G751JL-DS71 Keyboard Replacement

Neye ihtiyacın var

  1. Asus ROG G751JL-DS71 Keyboard Replacement, CD-ROM Player: adım 1, 2 resimden 1. Asus ROG G751JL-DS71 Keyboard Replacement, CD-ROM Player: adım 1, 2 resimden 2.
    • Lift the rubber cover found on the bottom of the laptop.

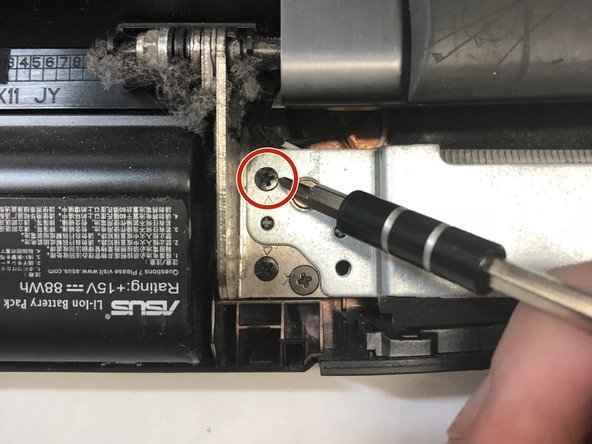
    • Remove the 5.2 mm screw with a Phillips 1 Screwdriver.

  2. Asus ROG G751JL-DS71 Keyboard Replacement: adım 2, 3 resimden 1. Asus ROG G751JL-DS71 Keyboard Replacement: adım 2, 3 resimden 2. Asus ROG G751JL-DS71 Keyboard Replacement: adım 2, 3 resimden 3.
    • Use the nylon spudger to remove the back center panel.

  3. Asus ROG G751JL-DS71 Keyboard Replacement: adım 3, 2 resimden 1. Asus ROG G751JL-DS71 Keyboard Replacement: adım 3, 2 resimden 2.
    • Use a Phillips 1 Screwdriver to remove the 5 mm screw that is located underneath the back panel.

  4. Asus ROG G751JL-DS71 Keyboard Replacement: adım 4, 2 resimden 1. Asus ROG G751JL-DS71 Keyboard Replacement: adım 4, 2 resimden 2.
    • Pull out the optical drive found on the side of the laptop.

  5. Asus ROG G751JL-DS71 Keyboard Replacement, Top Rear Panel: adım 5, 2 resimden 1. Asus ROG G751JL-DS71 Keyboard Replacement, Top Rear Panel: adım 5, 2 resimden 2.
    • Use a pair of tweezers to remove the top four rubber stoppers found on the bottom of the laptop.

  6. Asus ROG G751JL-DS71 Keyboard Replacement: adım 6, 2 resimden 1. Asus ROG G751JL-DS71 Keyboard Replacement: adım 6, 2 resimden 2.
    • Use a Phillips 1 Screwdriver to remove the top four 8.5 mm screws.

  7. Asus ROG G751JL-DS71 Keyboard Replacement: adım 7, 3 resimden 1. Asus ROG G751JL-DS71 Keyboard Replacement: adım 7, 3 resimden 2. Asus ROG G751JL-DS71 Keyboard Replacement: adım 7, 3 resimden 3.
    • Use a nylon spudger to carefully pry the top back panel off.

    • While removing the top back panel, be careful not to break the four pin connector located underneath.

    • Disconnect the four-pin connector and remove the top back panel from the computer.

  8. Asus ROG G751JL-DS71 Keyboard Replacement, Keyboard: adım 8, 3 resimden 1. Asus ROG G751JL-DS71 Keyboard Replacement, Keyboard: adım 8, 3 resimden 2. Asus ROG G751JL-DS71 Keyboard Replacement, Keyboard: adım 8, 3 resimden 3.
    • Use a Phillips 1 Screwdriver to remove the four 6.8 mm screws underneath the back panel.

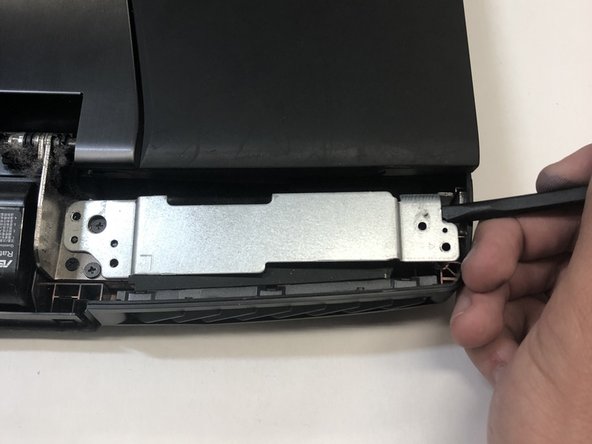
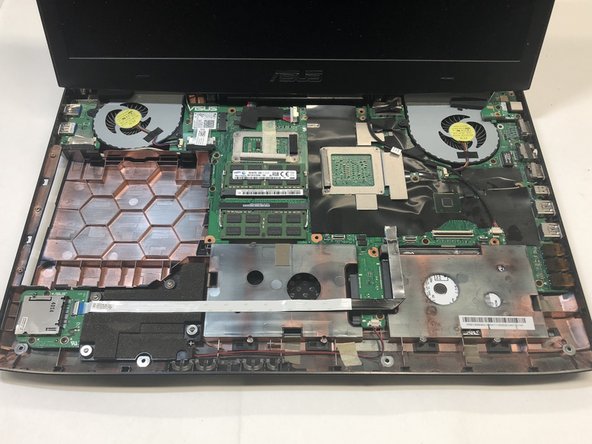
    • Lift away the metal housings from each side of the laptop.

  9. Asus ROG G751JL-DS71 Keyboard Replacement: adım 9, 2 resimden 1. Asus ROG G751JL-DS71 Keyboard Replacement: adım 9, 2 resimden 2.
    • Use a Phillips 1 Screwdriver to remove the ten 5.2 mm screws holding the main panel in place.

    • Use a Phillips 1 Screwdriver to remove the four 5.2 mm screws underneath the center panel.

  10. Asus ROG G751JL-DS71 Keyboard Replacement: adım 10, 3 resimden 1. Asus ROG G751JL-DS71 Keyboard Replacement: adım 10, 3 resimden 2. Asus ROG G751JL-DS71 Keyboard Replacement: adım 10, 3 resimden 3.
    • Use a plastic opening tool to pry the keyboard from the base of the laptop.

    • Lift the keyboard carefully so as to not tear or break the four ribbon connectors underneath the keyboard.

  11. Asus ROG G751JL-DS71 Keyboard Replacement: adım 11, 2 resimden 1. Asus ROG G751JL-DS71 Keyboard Replacement: adım 11, 2 resimden 2.
    • Use a pair of tweezers to undo each of the four ribbon connectors.

    • The keyboard is now completely disconnected from the laptop and you can remove it.

Sonuç

To reassemble your device, follow these instructions in reverse order.

2 farklı kişi bu kılavuzu tamamladı.

Aurora Rios

Üyelik tarihi: 01/22/18

917 İtibar

4 adet Kılavuz yazıldı

Ekip

Cal Poly, Team S16-G1, Banghart Winter 2018 Cal Poly, Team S16-G1, Banghart Winter 2018 üyesi

CPSU-BANGHART-W18S16G1

4 Üyeler

22 adet Kılavuz yazıldı

Bir Yorum

Only shows you how to remove keyboard panel from chasis, not how to actually remove the keyborad from the keyboard panel to replace. sad.

Michael Chiu - Yanıt

Yorum Ekle

İstatistikleri Görüntüle:

Son 24 Saat: 1

Son 7 gün: 23

Son 30 gün: 53

Her zaman: 3,186