Ana içeriğe geç

Asus ROG GL551J Hard Drive Replacement

Neye ihtiyacın var

  1. Asus ROG GL551J Hard Drive Replacement, Battery: adım 1, 1 resimden 1.
    • Lay the device on a flat surface with the battery facing up.

    • Be sure to wear ESD or Rubber gloves to protect the computer components.

  2. Asus ROG GL551J Hard Drive Replacement: adım 2, 1 resimden 1.
    • Push the latch found below the battery to the unlock position.

  3. Asus ROG GL551J Hard Drive Replacement: adım 3, 1 resimden 1.
    • Pull the battery out.

  4. Asus ROG GL551J Hard Drive Replacement, Hard Drive: adım 4, 2 resimden 1. Asus ROG GL551J Hard Drive Replacement, Hard Drive: adım 4, 2 resimden 2.
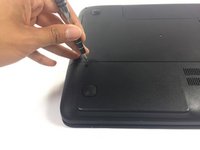
    • With laptop upside-down, locate and unscrew the two screws on the panel with the vents.

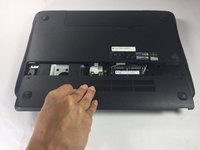
    • Slide the panel out and lift up to remove.

  5. Asus ROG GL551J Hard Drive Replacement: adım 5, 2 resimden 1. Asus ROG GL551J Hard Drive Replacement: adım 5, 2 resimden 2.
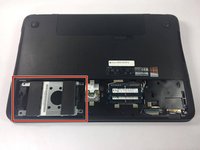
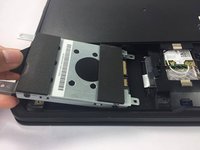
    • The hard drive is the metal rectangle with the two soft padding bars attached to it.

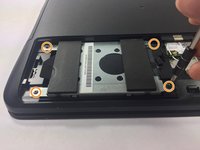
    • Locate and remove the 4 screws holding the hard drive down at each corner using a PH000 Philips head.

  6. Asus ROG GL551J Hard Drive Replacement: adım 6, 2 resimden 1. Asus ROG GL551J Hard Drive Replacement: adım 6, 2 resimden 2.
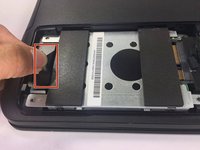
    • Locate the black plastic tab attached to the bottom of the hard drive and pull it straight outwards.

    • Failure to correctly disconnect the hard drive before pulling it up and out can damage the connectors.

    • Once the hard drive detaches from the connector, lift the hard drive up and out.

Sonuç

To reassemble your device, follow these instructions in reverse order.

7 farklı kişi bu kılavuzu tamamladı.

Thien Vu

Üyelik tarihi: 02/15/17

412 İtibar

2 adet Kılavuz yazıldı

Ekip

USF Tampa, Team 5-4, Lacy Spring 2017 USF Tampa, Team 5-4, Lacy Spring 2017 üyesi

USFT-LACY-S17S5G4

4 Üyeler

5 adet Kılavuz yazıldı

0 Yorum

Yorum Ekle

İstatistikleri Görüntüle:

Son 24 Saat: 0

Son 7 gün: 5

Son 30 gün: 28

Her zaman: 4,483