Ana içeriğe geç

Asus Rog GL55VW-DH71 Touchpad Replacement

Neye ihtiyacın var

  1. Asus Rog GL55VW-DH71 Touchpad Replacement, Battery: adım 1, 3 resimden 1. Asus Rog GL55VW-DH71 Touchpad Replacement, Battery: adım 1, 3 resimden 2. Asus Rog GL55VW-DH71 Touchpad Replacement, Battery: adım 1, 3 resimden 3.
    • Flip the laptop over so the backside is facing upwards.

    • Using both hands, slide the lock mechanisms outwards and pull up to remove the battery.

  2. Asus Rog GL55VW-DH71 Touchpad Replacement, Keyboard: adım 2, 3 resimden 1. Asus Rog GL55VW-DH71 Touchpad Replacement, Keyboard: adım 2, 3 resimden 2. Asus Rog GL55VW-DH71 Touchpad Replacement, Keyboard: adım 2, 3 resimden 3.
    • Remove the nine 15.4mm Phillips #00 screws.

    • Remove the four 8.7mm Phillips #00 screws from the hard drive mounting bracket.

    • Remove the hard drive bracket.

  3. Asus Rog GL55VW-DH71 Touchpad Replacement: adım 3, 2 resimden 1. Asus Rog GL55VW-DH71 Touchpad Replacement: adım 3, 2 resimden 2.
    • Flip laptop over and open the screen.

    • Wedge some plastic opening tools between the keyboard and case.

    • Work your way around with the plastic opening tools until the keyboard is separate from the case.

    • Do not try to lift the keyboard straight off at this time. There are some ribbon cables that attach the motherboard to the keyboard that need to be removed first.

  4. Asus Rog GL55VW-DH71 Touchpad Replacement: adım 4, 3 resimden 1. Asus Rog GL55VW-DH71 Touchpad Replacement: adım 4, 3 resimden 2. Asus Rog GL55VW-DH71 Touchpad Replacement: adım 4, 3 resimden 3.
    • Remove the ZIF connected ribbon cables for the touchpad and keyboard by gently lifting the latch on the connector point, then slide the ribbon cable out. Repeat for each cable.

    • Verify all ribbon cables are disconnected and out of the way, and lift the keyboard out of the assembly.

  5. Asus Rog GL55VW-DH71 Touchpad Replacement, Touchpad: adım 5, 1 resimden 1.
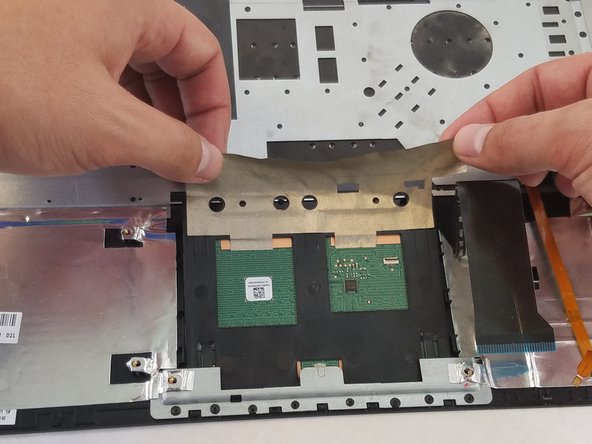
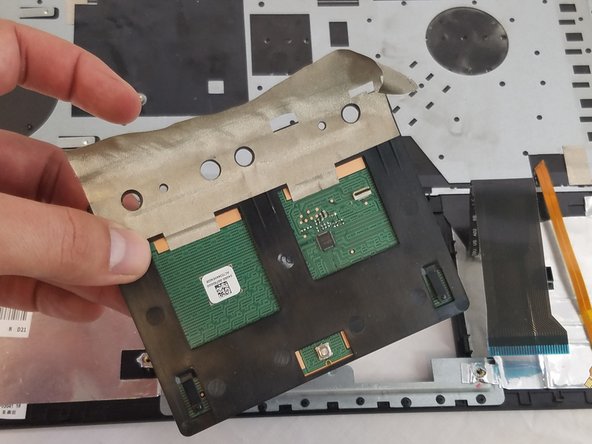
    • Remove the ZIF connector ribbon cable from the back of the touchpad by carefully lifting the latch on the connector and sliding the cable out.

  6. Asus Rog GL55VW-DH71 Touchpad Replacement: adım 6, 1 resimden 1.
    • Remove the three 2.8mm Phillips #00 screws from the trackpad.

  7. Asus Rog GL55VW-DH71 Touchpad Replacement: adım 7, 3 resimden 1. Asus Rog GL55VW-DH71 Touchpad Replacement: adım 7, 3 resimden 2. Asus Rog GL55VW-DH71 Touchpad Replacement: adım 7, 3 resimden 3.
    • Remove the tape.

    • Pull the touchpad out of the assembly.

Sonuç

To reassemble your device, follow these instructions in reverse order.

Bir başkası bu kılavuzu tamamladı.

Addison Thomas

Üyelik tarihi: 02/14/18

1.232 İtibar

8 adet Kılavuz yazıldı

Ekip

USF Tampa, Team S1-G2, Nance Spring 2018 USF Tampa, Team S1-G2, Nance Spring 2018 üyesi

USFT-NANCE-S18S1G2

4 Üyeler

8 adet Kılavuz yazıldı

0 Yorum

Yorum Ekle

İstatistikleri Görüntüle:

Son 24 Saat: 3

Son 7 gün: 10

Son 30 gün: 39

Her zaman: 4,370