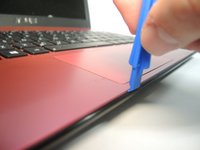
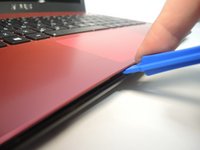
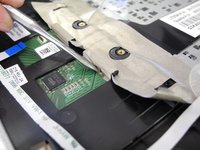
Ana içeriğe geç

Asus X401A Trackpad Replacement

Neye ihtiyacın var

  1. Asus X401A Trackpad Replacement, Trackpad: adım 1, 2 resimden 1. Asus X401A Trackpad Replacement, Trackpad: adım 1, 2 resimden 2.
    • Working on your device while it is turned on may result in electric shock. Shut down and unplug your device before starting repair.

    • Turn over laptop and remove the battery for ease of replacement.

  2. Asus X401A Trackpad Replacement: adım 2, 3 resimden 1. Asus X401A Trackpad Replacement: adım 2, 3 resimden 2. Asus X401A Trackpad Replacement: adım 2, 3 resimden 3.
    • Use a Phillips Head #1 screwdriver to unscrew the eight 3mm screws.

    • Use a Phillips head #1 screwdriver to unscrew the two 4mm screws.

  3. Asus X401A Trackpad Replacement: adım 3, 3 resimden 1. Asus X401A Trackpad Replacement: adım 3, 3 resimden 2. Asus X401A Trackpad Replacement: adım 3, 3 resimden 3.
    • Use a plastic spudger to pry off the front cover of the keyboard.

    • Do not jerk the keyboard cover off as there are ribbon cables that need to be disconnected.

    • When reassembling, there will be loud clicking to indicate you have snapped the keyboard cover into place correctly.

  4. Asus X401A Trackpad Replacement: adım 4, 2 resimden 1. Asus X401A Trackpad Replacement: adım 4, 2 resimden 2.
    • Removing the white wiring from the trackpad.

    • Continue removing the wire until you get to the end.

    • Fold up the latch on the where the cable meets the motherboard.

    • Be careful not to damage any wiring during this process.

    • When reassembling, slide ribbon cable in up to black line.

  5. Asus X401A Trackpad Replacement: adım 5, 2 resimden 1. Asus X401A Trackpad Replacement: adım 5, 2 resimden 2.
    • Use a spudger to lift the ZIF connector tabs up.

    • Remove the black and the white ribbon cable.

    • Remove the entire keyboard covering.

  6. Asus X401A Trackpad Replacement: adım 6, 1 resimden 1.
    • Lay the keyboard cover down with the keys facing down. This component contains the track pad. You will be working with this component until you reassemble.

  7. Asus X401A Trackpad Replacement: adım 7, 1 resimden 1.
    • Begin peeling up the clear tape located on top of the band aid seal.

  8. Asus X401A Trackpad Replacement: adım 8, 2 resimden 1. Asus X401A Trackpad Replacement: adım 8, 2 resimden 2.
    Bu adımda kullanılan alet:
    Magnetic Project Mat
    $19.95
    Satın Al
    • Using a PH0 Phillips Screwdriver, remove the two screws located within the circles of the band aid seal.

    • These screws are small. Be sure to place them on your magnetic mat.

  9. Asus X401A Trackpad Replacement: adım 9, 2 resimden 1. Asus X401A Trackpad Replacement: adım 9, 2 resimden 2.
    • Begin peeling back the band aid tape. Use the plastic spudger if necessary. This will allow you to free up the trackpad.

    • Only pull the tape back to the seam and no further.

  10. Asus X401A Trackpad Replacement: adım 10, 2 resimden 1. Asus X401A Trackpad Replacement: adım 10, 2 resimden 2.
    • Remove the faulty trackpad gently.

Sonuç

To reassemble your device, follow these instructions in reverse order.

2 farklı kişi bu kılavuzu tamamladı.

Lesley Pfening

Üyelik tarihi: 02/07/17

360 İtibar

2 adet Kılavuz yazıldı

Ekip

Ohio State, Team 1-4, Wilder Spring 2017 Ohio State, Team 1-4, Wilder Spring 2017 üyesi

OSU-WILDER-S17S1G4

4 Üyeler

5 adet Kılavuz yazıldı

0 Yorum

Yorum Ekle

İstatistikleri Görüntüle:

Son 24 Saat: 1

Son 7 gün: 2

Son 30 gün: 10

Her zaman: 1,031