Giriş
This guide will show you how to replace a dented or damaged bottom panel on an Asus ZenBook UX303U laptop.
Neye ihtiyacın var
-
-
-
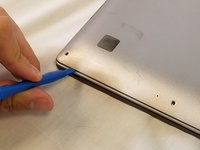
Remove the two round rubber feet at the hinge-edge of the laptop.
 FixBot'a Sor
-
-
-


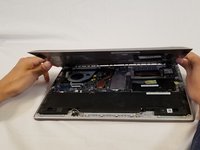
To reassemble your device, follow these instructions in reverse order.
İptal et: Bu kılavuzu tamamlamadım.
3 farklı kişi bu kılavuzu tamamladı.
Ekip

USF Tampa, Team S3-G5, Nance Spring 2018 USF Tampa, Team S3-G5, Nance Spring 2018 üyesi
USFT-NANCE-S18S3G5
3 Üyeler
9 adet Kılavuz yazıldı
1Rehber Yorum
Some models may utilize Phillips #00 screws, but mine (and many others based on what I’ve now read) utilize Torx T5 screws around the edges of the panel.