Ana içeriğe geç

Asus Zenbook UX303L Keyboard Replacement

Neye ihtiyacın var

  1. Asus Zenbook UX303L Keyboard Replacement, Keyboard: adım 1, 1 resimden 1.
    • Make sure the device is turned off and disconnected from the battery charger.

  2. Asus Zenbook UX303L Keyboard Replacement: adım 2, 3 resimden 1. Asus Zenbook UX303L Keyboard Replacement: adım 2, 3 resimden 2. Asus Zenbook UX303L Keyboard Replacement: adım 2, 3 resimden 3.
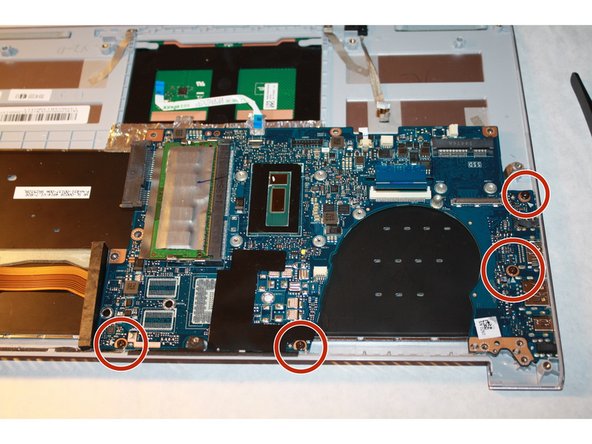
    • Remove all the nine screws from the bottom of the device using a T5 screwdriver.

    • Carefully remove the bottom cover.

    There are two silver long screws under each caoutchouc tabs on the back of the bottom case to remove too.

    Those screws hold the hinges.

    Bernardu Cesari - Yanıt

    Thank you for the comments about the additional screws. This should be added to the original article.

    Kinu Grove - Yanıt

  3. Asus Zenbook UX303L Keyboard Replacement: adım 3, 2 resimden 1. Asus Zenbook UX303L Keyboard Replacement: adım 3, 2 resimden 2.
    • Remove the LVDS cable next to the cooling fan.

    Thank you for burning my nephew's CPU, ifixit) Shouldn't we disconnect the battery before LVDS and the rest?

    Nikita M - Yanıt

    Thank you I took your advice just to be safe.

    Kinu Grove - Yanıt

  4. Asus Zenbook UX303L Keyboard Replacement: adım 4, 3 resimden 1. Asus Zenbook UX303L Keyboard Replacement: adım 4, 3 resimden 2. Asus Zenbook UX303L Keyboard Replacement: adım 4, 3 resimden 3.
    • Remove the three screws from the hinges using a PH-1 screwdriver.

    • Open the device at a 90 degree angle to free the hinges.

  5. Asus Zenbook UX303L Keyboard Replacement: adım 5, 3 resimden 1. Asus Zenbook UX303L Keyboard Replacement: adım 5, 3 resimden 2. Asus Zenbook UX303L Keyboard Replacement: adım 5, 3 resimden 3.
    • Remove the screw attaching the cooling fan to the motherboard by using a PH-1 screwdriver.

    • Disconnect the wire attaching the cooling fan to the motherboard.

    • Gently lift and pull out the cooling fan.

  6. Asus Zenbook UX303L Keyboard Replacement: adım 6, 2 resimden 1. Asus Zenbook UX303L Keyboard Replacement: adım 6, 2 resimden 2.
    • Remove the four screws attached to the black covered copper bar next to the cooling fan using a PH-1 screwdriver.

    • Gently lift and remove the copper bar.

  7. Asus Zenbook UX303L Keyboard Replacement: adım 7, 1 resimden 1.
    • Remove the five screws from the battery pack using a PH-1 screwdriver.

  8. Asus Zenbook UX303L Keyboard Replacement: adım 8, 3 resimden 1. Asus Zenbook UX303L Keyboard Replacement: adım 8, 3 resimden 2. Asus Zenbook UX303L Keyboard Replacement: adım 8, 3 resimden 3.
    • Unhook the black, red, and white switch using the tweezers.

    • Detach the positive and negative red, white, yellow, and black switch.

    • Unhook the black and white coiled wire.

    • Lift and remove the battery pack.

  9. Asus Zenbook UX303L Keyboard Replacement: adım 9, 3 resimden 1. Asus Zenbook UX303L Keyboard Replacement: adım 9, 3 resimden 2. Asus Zenbook UX303L Keyboard Replacement: adım 9, 3 resimden 3.
    • Remove the three screws attaching the drive to the motherboard using a PH-1 screwdriver.

    • Gently lift and pull out the drive.

  10. Asus Zenbook UX303L Keyboard Replacement: adım 10, 2 resimden 1. Asus Zenbook UX303L Keyboard Replacement: adım 10, 2 resimden 2.
    • Remove the silver tape to free the fourth screw attaching the motherboard.

    • Remove the four screws attaching the motherboard using a PH-1 screwdriver.

  11. Asus Zenbook UX303L Keyboard Replacement: adım 11, 2 resimden 1. Asus Zenbook UX303L Keyboard Replacement: adım 11, 2 resimden 2.
    • Detach the four wires connected to the motherboard using tweezers.

    • Gently lift up and pull out the motherboard.

    Which cable is the right one for the led of the keyboard? Since my keyboard's led doesn't work anymore. Maybe I forgot to plug in a cable for the led?

    Sphere - Yanıt

  12. Asus Zenbook UX303L Keyboard Replacement: adım 12, 3 resimden 1. Asus Zenbook UX303L Keyboard Replacement: adım 12, 3 resimden 2. Asus Zenbook UX303L Keyboard Replacement: adım 12, 3 resimden 3.
    • Remove the small piece of the motherboard on the lower left hand corner by removing the four screws using a PH-1 screwdriver.

    • Detach the black and red coiled wire from the motherboard using tweezers.

    • Gently lift and remove the small piece of the motherboard.

  13. Asus Zenbook UX303L Keyboard Replacement: adım 13, 2 resimden 1. Asus Zenbook UX303L Keyboard Replacement: adım 13, 2 resimden 2.
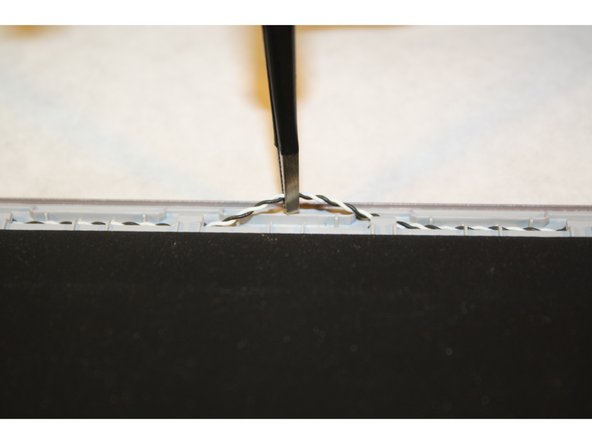
    • Place the plastic opening tool under the corners of the keyboard and use it to detach the keyboard all around.

    • Gently lift and remove the keyboard from its place.

    When you remove the keyboard, you’ll see that plastic circulars rivets will be broken. That’s frightened me, but it works witout them…

    I received a two parts keyboard, they must be pasted. I first put the keys part in place and then pasted the black film on it.

    Bernardu Cesari - Yanıt

Sonuç

To reassemble your device, follow these instructions in reverse order.

7 farklı kişi bu kılavuzu tamamladı.

Bianka Castaneda

Üyelik tarihi: 10/13/15

469 İtibar

2 adet Kılavuz yazıldı

Ekip

8 Yorum

Please tell me where did you buy the keyboard replace, I am looking for it in order to do the replacement for an UX303L (with spanish or english layout with big enter key). Thanks.

Pm - Yanıt

Step 2: There are screws under the rubber pads (at least on the UX303L).

Peter Sutton - Yanıt

Step 9: Its removing the hard drive/SSD not RAM.

Peter Sutton - Yanıt

Step 13: Please show me how to remove the keyboard out. It will break some plastic to pull the keyboard out.

Thanks,

Quang

Quang Nguyen - Yanıt

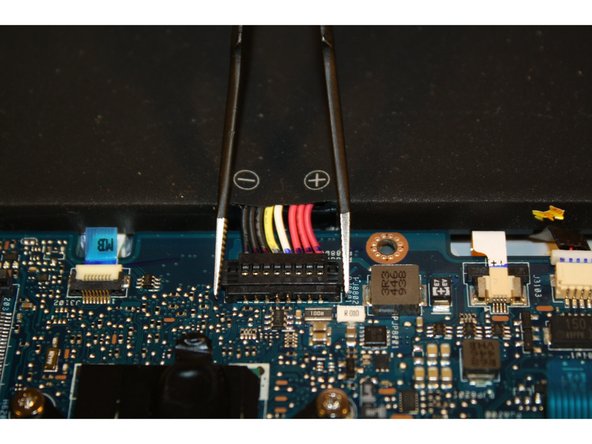
Battery pack should be removed first (at least before step 3) in order to avoid possible power surge

Andrey Arkhipov - Yanıt

Is better to get from Taobao Keyboard + chassis (they call case C). As ASUS keyboard is permanently attached to the case. Otherwise you have to break the plastic and use hot glue to glue back replacement keyboard.

cscs1956 - Yanıt

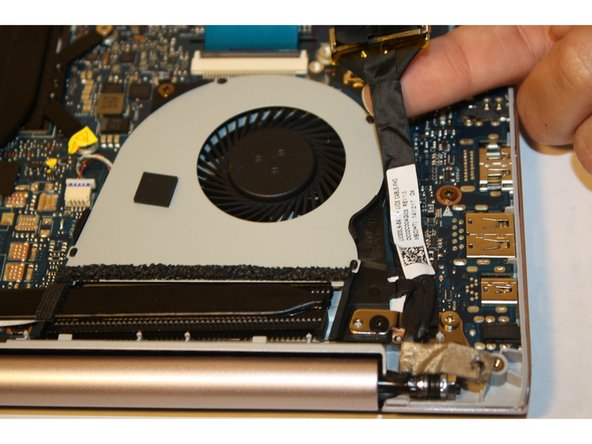
I’m sorry, but this guide is just completely irresponsible. The keyboard is held in place with plastic tabs that must be broken off, but this is never mentioned before we start. As others have pointed out, the battery must be disconnected before proceeding. Finally, the ‘black bar’ from step six is part of the cooling system, and once removed should be reapplied with fresh thermal paste.

Don’t waste your time or risk your electronics following this awful advice.

Dan - Yanıt

To remove back lid you should use T0 screwdriver not T5, you should edit this.

Emre Tuncer - Yanıt

Yorum Ekle

İstatistikleri Görüntüle:

Son 24 Saat: 1

Son 7 gün: 13

Son 30 gün: 68

Her zaman: 20,570