Giriş
This guide will walk you through the steps to replace a faulty LED Power Indicator in a Black and Decker LDX172C cordless drill. Steps one through three walk you through the disassembly process and step four walks you through LED removal and replacement. Tools necessary for this operation include a Philips screw driver set and a soldering work station. Approximate repair time is 40 minutes.
Neye ihtiyacın var
-
-
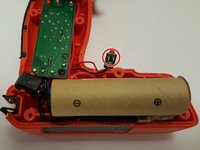
Place the drill on the work surface with the chuck facing downward. Locate and remove the two #2 X 10mm Phillips screws located right of the motor.
-
-
-
-
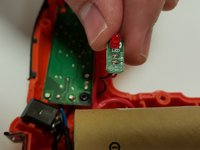
The LED is located on a small surface mount circuit board that easily slides out of its mounting location.
-
The LED is removed by freeing the solder joints on the bottom side of the circuit board.
-
Place the new LED through the same holes and re-solder it.
-
To reassemble repeat directions in reverse order.
-


To reassemble your device, follow these instructions in reverse order.
To reassemble your device, follow these instructions in reverse order.
Ekip

IUPUI, Team 3-3, Wilson Spring 2016 IUPUI, Team 3-3, Wilson Spring 2016 üyesi
IUPUI-WILSON-S16S3G3
4 Üyeler
7 adet Kılavuz yazıldı