Ana içeriğe geç
Onarım Topluluğuna Katılın - Hesap Oluşturun

Blackberry 7520 Keypad Replacement

Neye ihtiyacın var

  1. Blackberry 7520 Keypad Replacement, Battery: adım 1, 2 resimden 1. Blackberry 7520 Keypad Replacement, Battery: adım 1, 2 resimden 2.
    • Turn the phone upside down.

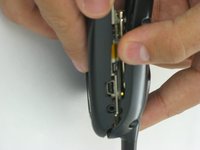
    • Push down on the black button on the back of the phone to slide the rear panel off.

    • The battery should be visible now.

    FixBot'a Sor

    Yorum Ekle

  2. Blackberry 7520 Keypad Replacement: adım 2, 3 resimden 1. Blackberry 7520 Keypad Replacement: adım 2, 3 resimden 2. Blackberry 7520 Keypad Replacement: adım 2, 3 resimden 3.
    • Hold the BlackBerry in one hand face-up with the screen facing towards you.

    • Gently smack the phone against your hand to dislodge the battery.

    FixBot'a Sor

    Yorum Ekle

  3. Blackberry 7520 Keypad Replacement, Motherboard: adım 3, 2 resimden 1. Blackberry 7520 Keypad Replacement, Motherboard: adım 3, 2 resimden 2.
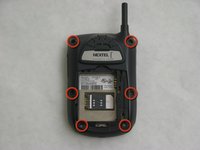
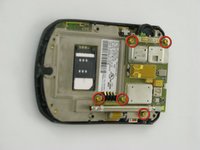
    • Use a T6 Torx screwdriver to remove the 6 screws holding the rear of the phone.

    FixBot'a Sor

    Yorum Ekle

  4. Blackberry 7520 Keypad Replacement: adım 4, 2 resimden 1. Blackberry 7520 Keypad Replacement: adım 4, 2 resimden 2.
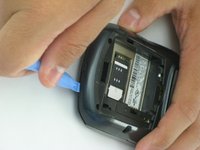
    • Use a pick or plastic opening tool to push the clips holding the rear away from you.

    • Applying too much pressure could break the plastic clips and permanently damage your Blackberry.

    FixBot'a Sor

    Yorum Ekle

  5. Blackberry 7520 Keypad Replacement: adım 5, 1 resimden 1.
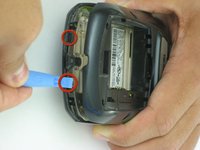
    • Repeat the process of unlatching the clips for the top section of the Blackberry.

    FixBot'a Sor

    Yorum Ekle

  6. Blackberry 7520 Keypad Replacement: adım 6, 2 resimden 1. Blackberry 7520 Keypad Replacement: adım 6, 2 resimden 2.
    • Slide the rear panel forward to reveal the motherboard.

    FixBot'a Sor

    Yorum Ekle

  7. Blackberry 7520 Keypad Replacement: adım 7, 2 resimden 1. Blackberry 7520 Keypad Replacement: adım 7, 2 resimden 2.
    • Remove the indicated screws using a T6 Torx screwdriver.

    FixBot'a Sor

    Yorum Ekle

  8. Blackberry 7520 Keypad Replacement: adım 8, 2 resimden 1. Blackberry 7520 Keypad Replacement: adım 8, 2 resimden 2.
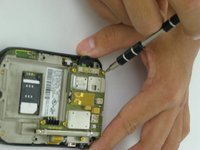
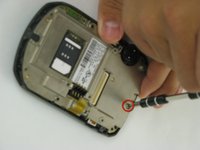
    • Remove the motherboard.

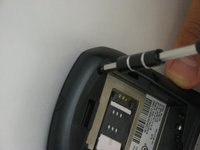
    • Remove the indicated screw using the T6 Torx screwdriver.

    FixBot'a Sor

    Yorum Ekle

  9. Blackberry 7520 Keypad Replacement: adım 9, 2 resimden 1. Blackberry 7520 Keypad Replacement: adım 9, 2 resimden 2.
    • Pull the metal plate away from the front panel of the cell phone.

    FixBot'a Sor

    Yorum Ekle

  10. Blackberry 7520 Keypad Replacement: adım 10, 1 resimden 1.
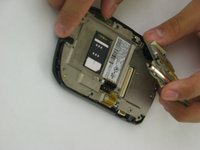
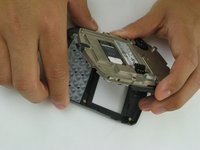
    • Place the faceplate face-down and the interior of the phone face-up, as shown.

    FixBot'a Sor

    Yorum Ekle

  11. Blackberry 7520 Keypad Replacement, Keypad: adım 11, 2 resimden 1. Blackberry 7520 Keypad Replacement, Keypad: adım 11, 2 resimden 2.
    Bu adımda kullanılan alet:
    Tweezers
    $4.99
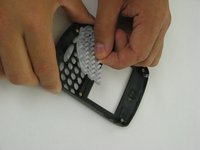
    • After removing the faceplate of the BlackBerry, place it facing down on a table as shown.

    • Using tweezers if needed, grip the keypad by one of the plastic nubs and pull it off of the pins.

    • Alternatively, you can pop the keypad out by holding the faceplate face-up and pressing the keys down. Be sure to catch the keypad when it falls out.

    FixBot'a Sor

    Yorum Ekle

  12. Blackberry 7520 Keypad Replacement: adım 12, 1 resimden 1.
    • If you are cleaning the keypad, use a fine brush to wipe any dirt from both the front and back of the pad.

    • You may also rinse the keypad with water, but make sure that it is completely dry before reinserting it on to the faceplate.

    FixBot'a Sor

    Yorum Ekle

  13. Blackberry 7520 Keypad Replacement: adım 13, 1 resimden 1.
    • To place the new or cleaned keypad in the faceplate, hold the faceplate in one hand face-down and grab the keypad by the edges in your other hand.

    • Align the holes in the keypad over the black pins in the faceplate and press down on the keypad until it is firmly in place. Flip the faceplate over to make sure that the keys are properly aligned.

    FixBot'a Sor

    Yorum Ekle

Sonuç

To reassemble your device, follow these instructions in reverse order.

İptal et: Bu kılavuzu tamamlamadım.

Nathan

Üyelik tarihi: 01/18/10

31 İtibar

6 adet Kılavuz yazıldı

Ekip

Cal Poly, Team 5-7, Forte Winter 2010 Cal Poly, Team 5-7, Forte Winter 2010 üyesi

CPSU-FORTE-W10S5G7

5 Üyeler

12 adet Kılavuz yazıldı

0Kılavuz Yorumları

Yorum Ekle

İstatistikleri Görüntüle:

Son 24 Saat: 3

Son 7 gün: 12

Son 30 gün: 48

Her zaman: 1,550