Ana içeriğe geç
Bowers and Wilkins T7 Access Panel Replacement

Bowers and Wilkins T7 Access Panel Replacement

Shane R. Cowper

Shane R. Cowper ve 4 diğer katkıda bulunanlar

En son February 21, 2025 tarihinde güncellendi

15 dakika
Orta

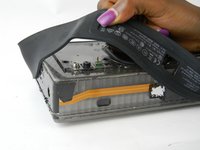
Use this guide to learn how to take off or replace your access panel for the Bowers and Wilkins T7 speaker, enabling you to replace every other part.

Neye ihtiyacın var

Aletler

Daha fazlasını göster…

  1. Bowers and Wilkins T7 Access Panel Replacement, Access Panel: adım 1, 1 resimden 1.
    • As with all electronic devices, make sure your device is powered off before you begin.

    • Gently lift up the access panel; it should easily "pop" open.

  2. Bowers and Wilkins T7 Access Panel Replacement: adım 2, 1 resimden 1.
    • Remove 14mm screws on the front panel with a J1 Phillips head screwdriver.

    • There are 8 screws in total.

  3. Bowers and Wilkins T7 Access Panel Replacement: adım 3, 2 resimden 1. Bowers and Wilkins T7 Access Panel Replacement: adım 3, 2 resimden 2.
    • Be gentle, the rubber seal is fragile and easy to tear, resulting in cosmetic damage to your device.

    • Using the ifixit Opening Tool, carefully pry off the rubber seal around the sides.

    • The seal is held by adhesive, if this is proving difficult you can use a heat gun to help the process.

  4. Bowers and Wilkins T7 Access Panel Replacement: adım 4, 2 resimden 1. Bowers and Wilkins T7 Access Panel Replacement: adım 4, 2 resimden 2.
    • The cover is the most difficult part to remove. As you work, pry continuously, moving the tool around the device, working it a little further as you go.

    • Using the ifixit Opening Tool, pry open at the seam found under the rubber seal.

    • As the cover starts to come off, you can lift up using your hand.

  5. Bowers and Wilkins T7 Access Panel Replacement: adım 5, 3 resimden 1. Bowers and Wilkins T7 Access Panel Replacement: adım 5, 3 resimden 2. Bowers and Wilkins T7 Access Panel Replacement: adım 5, 3 resimden 3.
    Bu adımda kullanılan alet:
    Tweezers
    $4.99
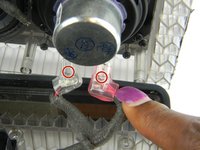
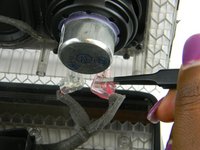
    • Gently squeeze the internal locking mechanism inside the red and white terminals with either your fingers or a pair of precision tweezers.

    • While squeezing the internal locking mechanism, pull back the terminal.

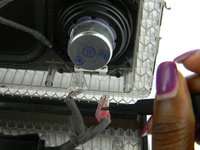
    • Repeat this process for the second speaker.

Sonuç

To reassemble your device, follow these instructions in reverse order.

2 farklı kişi bu kılavuzu tamamladı.

Shane R. Cowper

Üyelik tarihi: 03/02/17

131 İtibar

1 Kılavuz yazıldı

Ekip

USF Tampa, Team S7-G1, Cagle Spring 2017 USF Tampa, Team S7-G1, Cagle Spring 2017 üyesi

USFT-CAGLE-S17S7G1

5 Üyeler

6 adet Kılavuz yazıldı

0 Yorum

Yorum Ekle

İstatistikleri Görüntüle:

Son 24 Saat: 0

Son 7 gün: 6

Son 30 gün: 21

Her zaman: 2,978