Ana içeriğe geç

CPU Fan Replacement

Neye ihtiyacın var

  1. CPU Fan Replacement, Back Panel: adım 1, 2 resimden 1. CPU Fan Replacement, Back Panel: adım 1, 2 resimden 2.
    • Using the Phillips #1 screwdriver, remove the four 6mm screws on the back of the laptop.

  2. CPU Fan Replacement: adım 2, 2 resimden 1. CPU Fan Replacement: adım 2, 2 resimden 2.
    • Insert the plastic prying tool and pry the back panel off starting at an edge and moving your way around it.

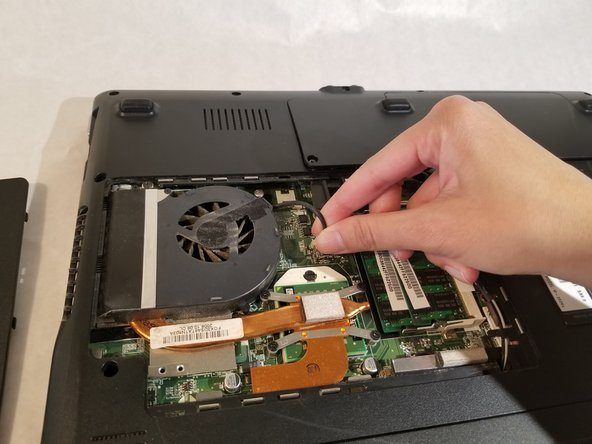
  3. CPU Fan Replacement, CPU Fan: adım 3, 2 resimden 1. CPU Fan Replacement, CPU Fan: adım 3, 2 resimden 2.
    • Remove the header by pulling on it with two fingers.

  4. CPU Fan Replacement: adım 4, 1 resimden 1.
    • Remove the six 2.5mm screws using a Phillips #1 screwdriver.

  5. CPU Fan Replacement: adım 5, 1 resimden 1.
    • Remove the fan by moving it to the side and lifting it out of the computer.

Sonuç

To reassemble your device, follow these instructions in reverse order.

Bir başkası bu kılavuzu tamamladı.

Armani Tayeh

Üyelik tarihi: 03/19/18

432 İtibar

4 adet Kılavuz yazıldı

Ekip

UMass Dartmouth, Team S3-G2, Peak Spring 2018 UMass Dartmouth, Team S3-G2, Peak Spring 2018 üyesi

UMASSD-PEAK-S18S3G2

2 Üyeler

14 adet Kılavuz yazıldı

0 Yorum

Yorum Ekle

İstatistikleri Görüntüle:

Son 24 Saat: 0

Son 7 gün: 2

Son 30 gün: 16

Her zaman: 733