Ana içeriğe geç

CR-10S Pro Noctua Fan Upgrade

Neye ihtiyacın var

  1. CR-10S Pro Noctua Fan Upgrade, Included kit parts: adım 1, 2 resimden 1. CR-10S Pro Noctua Fan Upgrade, Included kit parts: adım 1, 2 resimden 2.
    • Labeled bags are used in the following steps

    • Hardware

    • Power Supply Fan (Step 4)

    • Rear Case Exhaust Fan(Step 5)

    • Control Board Fan Assembly (Step 6)

  2. CR-10S Pro Noctua Fan Upgrade, Bottom cover and PSU mounting screws: adım 2, 3 resimden 1. CR-10S Pro Noctua Fan Upgrade, Bottom cover and PSU mounting screws: adım 2, 3 resimden 2. CR-10S Pro Noctua Fan Upgrade, Bottom cover and PSU mounting screws: adım 2, 3 resimden 3.
    • Using a #1 Phillips screwdriver, remove the 11 screws on the bottom and 2 screws on each side for a total of 15

    • Next, remove the bottom cover

    • With the bottom cover removed, turn the printer sideways and remove the power supple unit (PSU) screws while holding the PSU in place ribbon cable side up

  3. CR-10S Pro Noctua Fan Upgrade, Removing the PSU Fan: adım 3, 3 resimden 1. CR-10S Pro Noctua Fan Upgrade, Removing the PSU Fan: adım 3, 3 resimden 2. CR-10S Pro Noctua Fan Upgrade, Removing the PSU Fan: adım 3, 3 resimden 3.
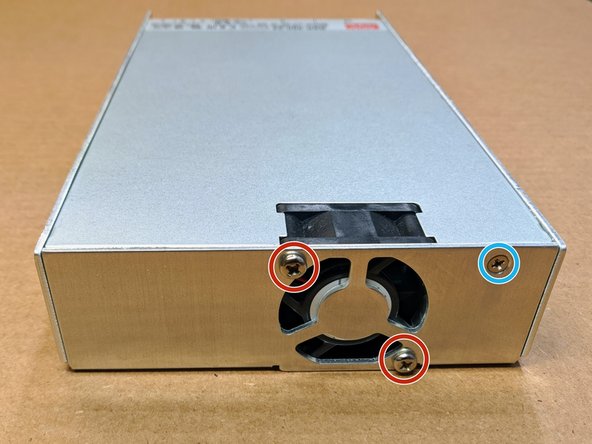
    • Remove the 6 PSU screws securing the cover (circled in blue)

    • Next, remove the 2 screws securing the original 4020 Fan (circled in red)

  4. CR-10S Pro Noctua Fan Upgrade, Installing PSU Fan: adım 4, 3 resimden 1. CR-10S Pro Noctua Fan Upgrade, Installing PSU Fan: adım 4, 3 resimden 2. CR-10S Pro Noctua Fan Upgrade, Installing PSU Fan: adım 4, 3 resimden 3.
    • Unplug the original fan cable

    • Original fan cable is glued down. Gently, pull up on the cable to remove after you unplug the connector

    • Route the new fan cable under the white wires

    • Plug in new fan cable

    • Mount fan with Self tapping screws included in the kit

    • Pay attention to the fan orientation and wire placement

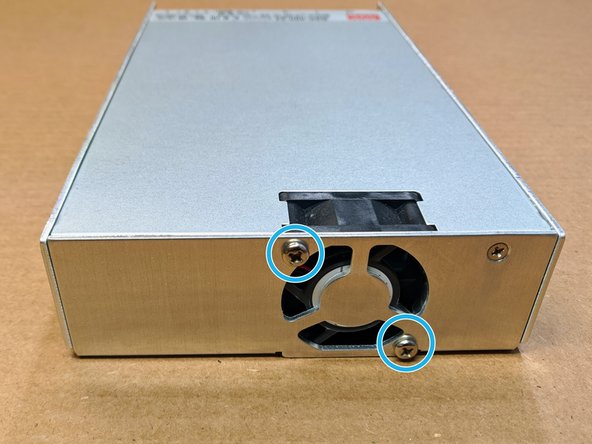
    • Follow step 2 in reverse for reinstallation of the PSU cover

  5. CR-10S Pro Noctua Fan Upgrade: adım 5, 2 resimden 1. CR-10S Pro Noctua Fan Upgrade: adım 5, 2 resimden 2.
    • Remove M3 Screw holding stock fan and replace the fan with the new 4010 fan using the included M3x12 socket head screws

    • Fork connector for the red(+V) and black(-V) wire are mounted to there respect screw terminals on the PSU

  6. CR-10S Pro Noctua Fan Upgrade, Control Fan Assembly Installation: adım 6, 3 resimden 1. CR-10S Pro Noctua Fan Upgrade, Control Fan Assembly Installation: adım 6, 3 resimden 2. CR-10S Pro Noctua Fan Upgrade, Control Fan Assembly Installation: adım 6, 3 resimden 3.
    • Remove original motherboard mounting screws and save for future step

    • Included Nylon standoffs replace control board mounting screws

    • Make sure SD card slot and USB cable slot maintain alignment with the frame cutouts

    • Place the Control Fan Assembly as shown

    • Use the previously remove M3 screws to secure the 3D printed fan mount to the standoffs.

    • Plug in Fan adapter cable

Sonuç

To reassemble your device, follow these instructions in reverse order.

AJ Pereira

Üyelik tarihi: 05/29/20

2.707 İtibar

16 adet Kılavuz yazıldı

Ekip

Tiny Machines 3D Tiny Machines 3D üyesi

Community

5 Üyeler

41 adet Kılavuz yazıldı

8 Yorum

So where do you get the parts kit? I don’t see that in the post anywhere.

Tim Gray - Yanıt

I would like to know where the parts kit can be purchased as well, either that or a list of part numbers.

lauriecrabb - Yanıt

You can email us at support@tinymachines3d.com to order a kit

AJ Pereira -

Does this apply to v2

Jack Gillson - Yanıt

Yes, it does apply to the CR10S Pro V2 as well

AJ Pereira -

Yorum Ekle

İstatistikleri Görüntüle:

Son 24 Saat: 4

Son 7 gün: 19

Son 30 gün: 94

Her zaman: 7,681