Bu sürüm, hatalı düzenlemeler içerebilir. En son doğrulanmış bellek kopyası dönün.
Neye ihtiyacın var
-
Bu adım çevrilmemiş. Çevrilmesine yardım edin
-
Remove the two 4.8 mm black screws above the lens on the front of the camera.
-
-
Bu adım çevrilmemiş. Çevrilmesine yardım edin
-
Remove the 4.3 mm black screw under the lens ring, and the 4.8 mm black screw under the camera.
-
-
Bu adım çevrilmemiş. Çevrilmesine yardım edin
-
Remove the 4.8 mm black screw on the left side of the camera.
-
-
Bu adım çevrilmemiş. Çevrilmesine yardım edin
-
Remove the front panel by lifting it away from the camera's body.
-
-
Bu adım çevrilmemiş. Çevrilmesine yardım edin
-
Remove seven 4.25 mm black screws on the bottom panel.
-
-
-
Bu adım çevrilmemiş. Çevrilmesine yardım edin
-
Remove the plastic remote control socket cap by pulling it straight out.
-
-
Bu adım çevrilmemiş. Çevrilmesine yardım edin
-
Slide the panel toward the bottom of the camera to remove.
-
-
Bu adım çevrilmemiş. Çevrilmesine yardım edin
-
Remove the single 4.8 silver screw from the control socket.
-
-
Bu adım çevrilmemiş. Çevrilmesine yardım edin
-
Desolder connections to replace the remote control socket.
-
-
Bu adım çevrilmemiş. Çevrilmesine yardım edin
-
Remove one 4.8 mm silver screw securing Remote Control Socket to camera.
-
-
Bu adım çevrilmemiş. Çevrilmesine yardım edin
-
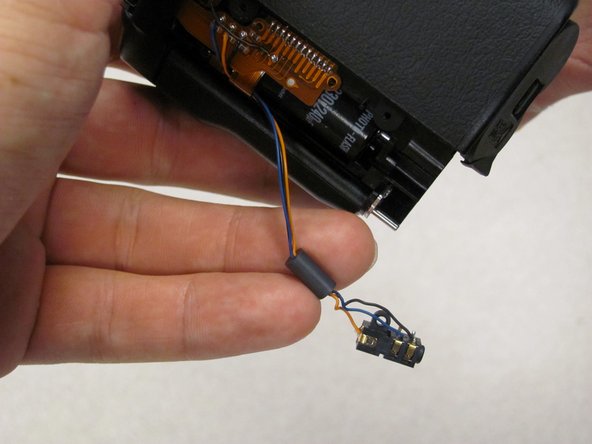
Remote Control Socket is now secured by 3 wires.
-
Desolder connections to replace Remote Control Socket.
-
İptal et: Bu kılavuzu tamamlamadım.
2 farklı kişi bu kılavuzu tamamladı.


