Ana içeriğe geç
Onarım Topluluğuna Katılın - Hesap Oluşturun

Canon EOS 5D Mark II Top Panel Replacement

Neye ihtiyacın var

    1. Canon EOS 5D Mark II Top Panel Replacement, Clock Battery: adım 1, 1 resimden 1.
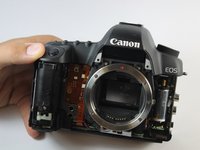
      • Lift the rubber flap covering the input/output jacks.

      FixBot'a Sor

      Yorum Ekle

    2. Canon EOS 5D Mark II Top Panel Replacement: adım 2, 1 resimden 1.
      • Using a Phillips #000, remove the single 3.4 mm screw.

      FixBot'a Sor

      Yorum Ekle

    3. Canon EOS 5D Mark II Top Panel Replacement: adım 3, 1 resimden 1.
      • This step will permanently erase all user settings.

      • The memory battery can now be easily slid out of place.

      • If you are following this guide in an effort to perform a hard reset, you should now press the shutter button multiple times in order to drain any left over power, then replace the batteries and power the device back on. You have just performed a hard reset!

      FixBot'a Sor

      Yorum Ekle

    1. Canon EOS 5D Mark II Top Panel Replacement, Back Panel: adım 4, 1 resimden 1.
      • Peel back the rubber cover above the in/out ports to reveal two screw heads.

      FixBot'a Sor

      Yorum Ekle

    2. Canon EOS 5D Mark II Top Panel Replacement: adım 5, 1 resimden 1.
      • Remove both 5.4 mm screws using a Phillips #0.

      FixBot'a Sor
      Yorum Ekle

    3. Canon EOS 5D Mark II Top Panel Replacement: adım 6, 1 resimden 1.
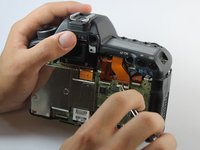
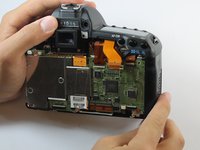
      • Lift the in/out port plastic covering from the bottom where the backup battery used to be.

      FixBot'a Sor
      Yorum Ekle

    4. Canon EOS 5D Mark II Top Panel Replacement: adım 7, 1 resimden 1.
      • Remove each 6.3 mm screw on either side of the viewfinder using a Phillips #0 screwdriver.

      FixBot'a Sor

      Yorum Ekle

    5. Canon EOS 5D Mark II Top Panel Replacement: adım 8, 1 resimden 1.
      • Remove the three 4.8 mm screws on the bottom of the back plate using a Phillips #0.

      FixBot'a Sor

      Yorum Ekle

    6. Canon EOS 5D Mark II Top Panel Replacement: adım 9, 1 resimden 1.
      • Peel back the rubber covering next to the menu dial to access the screw.

      • Remove the single 3.4 mm screw using a Phillips #0.

      FixBot'a Sor

      Yorum Ekle

    7. Canon EOS 5D Mark II Top Panel Replacement: adım 10, 1 resimden 1.
      • The back panel can now fall off easily by turning the device upside down. Be sure to catch it so the data ribbons do not tear or tug.

      FixBot'a Sor

      Yorum Ekle

    8. Canon EOS 5D Mark II Top Panel Replacement: adım 11, 1 resimden 1.
      • Remove each data ribbon cable from the motherboard by applying pressure down towards the motherboard and gently sliding your thumb upwards on the slot where the cable meets the motherboard. This will raise a very small clip that locks the cable in place.

      • The back panel is now free from the rest of the device.

      FixBot'a Sor

      Yorum Ekle

    1. Canon EOS 5D Mark II Top Panel Replacement, Front Panel: adım 12, 1 resimden 1.
      Bu adımda kullanılan alet:
      Tweezers
      $4.99
      • Using tweezers, pull out the wire attaching the front panel to the motherboard.

      FixBot'a Sor

      Yorum Ekle

    2. Canon EOS 5D Mark II Top Panel Replacement: adım 13, 1 resimden 1.
      • Peel off the rubber cover on the front panel in order to access the screws underneath.

      FixBot'a Sor

      Yorum Ekle

    3. Canon EOS 5D Mark II Top Panel Replacement: adım 14, 1 resimden 1.
      • Remove each of the 4.9 mm three screws using a Phillips #0.

      FixBot'a Sor

      Yorum Ekle

    4. Canon EOS 5D Mark II Top Panel Replacement: adım 15, 1 resimden 1.
      • Remove the two 4.8 mm screws above where the lens would be using a Phillips #0.

      FixBot'a Sor

      Yorum Ekle

    5. Canon EOS 5D Mark II Top Panel Replacement: adım 16, 1 resimden 1.
      • Remove the single screw underneath where the lens would be using a Phillips #0.

      FixBot'a Sor

      Yorum Ekle

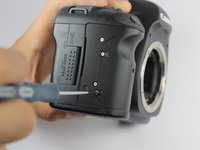
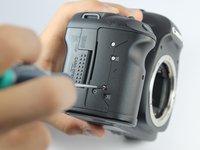
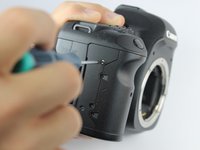
    6. Canon EOS 5D Mark II Top Panel Replacement: adım 17, 3 resimden 1. Canon EOS 5D Mark II Top Panel Replacement: adım 17, 3 resimden 2. Canon EOS 5D Mark II Top Panel Replacement: adım 17, 3 resimden 3.
      • Remove the four 3.0 mm screws next to the memory card reader using a Phillips #0.

      FixBot'a Sor

      Yorum Ekle

    7. Canon EOS 5D Mark II Top Panel Replacement: adım 18, 2 resimden 1. Canon EOS 5D Mark II Top Panel Replacement: adım 18, 2 resimden 2.
      • Remove the front panel by lifting upwards from the right side where the in/out ports used to be.

      FixBot'a Sor

      Yorum Ekle

    1. Canon EOS 5D Mark II Top Panel Replacement, Top Panel: adım 19, 1 resimden 1.
      • Remove the single 5.9 mm screw next to the the strap loop on the same side as the shutter button.

      FixBot'a Sor

      Yorum Ekle

    2. Canon EOS 5D Mark II Top Panel Replacement: adım 20, 1 resimden 1.
      • Remove the single 3.8 mm screw underneath the camera strap on the same side as the in/out ports.

      • If you are having problems finding this screw, note the orientation of the viewfinder in the bottom center of the photo.

      FixBot'a Sor

      Yorum Ekle

    3. Canon EOS 5D Mark II Top Panel Replacement: adım 21, 2 resimden 1. Canon EOS 5D Mark II Top Panel Replacement: adım 21, 2 resimden 2.
      Bu adımda kullanılan alet:
      Tweezers
      $4.99
      • Using tweezers or your thumb, raise the clasp holding the topmost data ribbon cable in order to release it.

      FixBot'a Sor

      Yorum Ekle

    4. Canon EOS 5D Mark II Top Panel Replacement: adım 22, 1 resimden 1.
      • The top panel is now free from the rest of the device. Lift to remove.

      FixBot'a Sor

      Yorum Ekle

Sonuç

To reassemble your device, follow these instructions in reverse order.

İptal et: Bu kılavuzu tamamlamadım.

15 farklı kişi bu kılavuzu tamamladı.

Mike Seed

Üyelik tarihi: 09/22/14

3.166 İtibar

8 adet Kılavuz yazıldı

Ekip

USF Tampa, Team 1-6, Hickman Fall 2014 USF Tampa, Team 1-6, Hickman Fall 2014 üyesi

USFT-HICKMAN-F14S1G6

3 Üyeler

17 adet Kılavuz yazıldı

13Kılavuz Yorumları

The strap hook on the left side of my 5d2 body got bent in a fall and I want to replace it. Do I have to go through all these steps or is there an easier way to get to it ? Thanks

Tim - Yanıt Paylaş

Everything it's very nice in this guide.

I just have a question?

Where do I can find the top panel to buy it?

It's seem almost impossible...

stefano masetti - Yanıt Paylaş

I would also like to know where a replacement top panel can be purchased from.

t1000email - Yanıt Paylaş

I purchased one on Ebay , (US) $100 USD

yanhao996 - Yanıt Paylaş

The guide is useful and quite easy to follow. Thanks

Janes - Yanıt Paylaş

Yorum Ekle

İstatistikleri Görüntüle:

Son 24 Saat: 2

Son 7 gün: 14

Son 30 gün: 60

Her zaman: 15,934