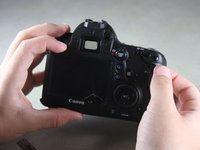
Ana içeriğe geç

Canon EOS 6D Image Sensor Replacement

Neye ihtiyacın var

  1. Canon EOS 6D Image Sensor Replacement, Rear Body Panel: adım 1, 1 resimden 1.
    • Remove the viewfinder cover by pinching the sides and sliding it upward.

  2. Canon EOS 6D Image Sensor Replacement: adım 2, 1 resimden 1.
    • Open the battery door on the bottom of the camera.

    • Use your thumb to slide the small black tab on the inside of the battery door up and pull the door off the camera.

  3. Canon EOS 6D Image Sensor Replacement: adım 3, 1 resimden 1.
    • Slide your fingernail or the flat end of the spudger underneath the rubber covering and gently peel it off all sides of the camera.

  4. Canon EOS 6D Image Sensor Replacement: adım 4, 1 resimden 1.
    • Open the covers to the HDMI/AV/MIC ports on the side of the camera by gently pulling outward on the bottom of the covers.

    • Rotate the covers to the side so that you can see the connection ports inside.

    • Remove the following screws:

    • Two silver 5mm Phillips #00

    • One black 6mm Phillips #00

  5. Canon EOS 6D Image Sensor Replacement: adım 5, 1 resimden 1.
    • Remove the cover to the HDMI/AV/MIC ports by gently lifting the tab on the bottom edge of the camera.

  6. Canon EOS 6D Image Sensor Replacement: adım 6, 1 resimden 1.
    • Rotate your camera so the bottom side is facing you.

    • Remove the following screws:

    • One 6mm Phillips #00

    • Two 3mm Phillips #00

  7. Canon EOS 6D Image Sensor Replacement: adım 7, 1 resimden 1.
    • Rotate your camera so the back is facing you.

    • Remove the following screws:

    • Three silver 5mm Phillips #00

    • Two black 6mm Phillips #00

    • One black 4mm Phillips #00

  8. Canon EOS 6D Image Sensor Replacement: adım 8, 2 resimden 1. Canon EOS 6D Image Sensor Replacement: adım 8, 2 resimden 2.
    • A black ribbon wire connects the rear panel to the inside of the camera. Breaking this wire would make your rear screen and buttons non-functional.

    • Carefully use your fingers to tilt the back panel downward to about a 90 degree angle.

    • Use the flat end of the spudger to gently pry off the ribbon wire from the inside of the camera.

  9. Canon EOS 6D Image Sensor Replacement, Front and Top Body Panels: adım 9, 1 resimden 1.
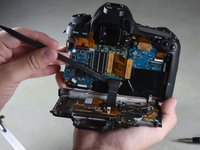
    • Remove the 8mm Phillips #00 screw from the bottom of the front of the camera.

  10. Canon EOS 6D Image Sensor Replacement: adım 10, 1 resimden 1.
    • Rotate the camera so the side with the SD card slot is facing you.

    • Remove the 4mm Phillips #00 screw from the bottom edge of this side.

  11. Canon EOS 6D Image Sensor Replacement: adım 11, 1 resimden 1.
    • Rotate the camera so the bottom is facing you.

    • Remove the following screws:

    • Two 8mm Phillips #00

    • One 4mm Phillips #00

  12. Canon EOS 6D Image Sensor Replacement: adım 12, 1 resimden 1.
    • Remove the bottom panel from the camera by using your fingers to pull outward on the tab inside the battery compartment.

  13. Canon EOS 6D Image Sensor Replacement: adım 13, 1 resimden 1.
    • Rotate the camera so the front is facing you.

    • Remove the following screws:

    • Three 5mm Phillips #00

    • Two 6mm Phillips #00

    • One 4mm Phillips #00

  14. Canon EOS 6D Image Sensor Replacement: adım 14, 1 resimden 1.
    • Rotate the camera so the side with the SD card slot is facing you.

    • Remove the following screws:

    • One 4mm fine-thread Phillips #00

    • Two 4mm coarse-thread Phillips #00

  15. Canon EOS 6D Image Sensor Replacement: adım 15, 1 resimden 1.
    • The red speaker wire is attached to the inside of the front panel. Opening the front panel forcefully may break it.

    • Slowly fold the front panel to the right without pulling it away from the right edge of the camera.

  16. Canon EOS 6D Image Sensor Replacement: adım 16, 1 resimden 1.
    • Remove the 4mm Phillips #00 screw on the inside of the front panel to separate the panel from the speaker wire.

  17. Canon EOS 6D Image Sensor Replacement: adım 17, 1 resimden 1.
    • Remove the 4mm Phillips #00 screw from the inside of the top panel, below the strap hook.

  18. Canon EOS 6D Image Sensor Replacement: adım 18, 1 resimden 1.
    • Remove the 4mm Phillips #00 screw from the inside of the top panel, below the shutter button.

  19. Canon EOS 6D Image Sensor Replacement: adım 19, 1 resimden 1.
    • Rotate the camera so the top is facing you.

    • Remove the 6mm Phillips #00 screw from next to the analog screen.

  20. Canon EOS 6D Image Sensor Replacement: adım 20, 1 resimden 1.
    • Rotate the camera so the back is facing you.

    • Remove the Phillips #00 screw from the viewfinder focus.

  21. Canon EOS 6D Image Sensor Replacement: adım 21, 1 resimden 1.
    • Carefully detach the two light brown ribbon wires on the top panel:

    • The right ribbon by prying it out with the flat end of the spudger.

    • The left ribbon by using tweezers to gently wiggle it out toward the top.

  22. Canon EOS 6D Image Sensor Replacement: adım 22, 1 resimden 1.
    • A ribbon wire connects the inside of the top panel to the body of the camera.

    • Slowly lift the top panel to about an inch above the body of the camera.

    • Carefully use the flat end of the spudger to detach the ribbon wire from the top of the camera.

  23. Canon EOS 6D Image Sensor Replacement: adım 23, 1 resimden 1.
    • Grip the remaining side panel with your fingers and gently pop it off the camera.

  24. Canon EOS 6D Image Sensor Replacement, Image Sensor: adım 24, 1 resimden 1.
    • Carefully peel the black tape off from across the back of the camera.

  25. Canon EOS 6D Image Sensor Replacement: adım 25, 1 resimden 1.
    • Use the pointed end of the spudger to lift up on the silver latches on four ribbon wires.

  26. Canon EOS 6D Image Sensor Replacement: adım 26, 1 resimden 1.
    • Use the pointed end of the spudger to carefully slide out the four light brown ribbon wires.

  27. Canon EOS 6D Image Sensor Replacement: adım 27, 1 resimden 1.
    • Use the flat end of the spudger to lift up on the large, light brown ribbon wire in the middle of the camera.

  28. Canon EOS 6D Image Sensor Replacement: adım 28, 1 resimden 1.
    • Remove two 4mm screws from the metal plate on the back of the camera.

  29. Canon EOS 6D Image Sensor Replacement: adım 29, 1 resimden 1.
    • Use the pointed end of the spudger to carefully remove the metal plate.

  30. Canon EOS 6D Image Sensor Replacement: adım 30, 1 resimden 1.
    • Remove six 4mm Phillips #00 screws from the back of the camera.

  31. Canon EOS 6D Image Sensor Replacement: adım 31, 2 resimden 1. Canon EOS 6D Image Sensor Replacement: adım 31, 2 resimden 2.
    • Slide the flat end of the spudger under the top of the large blue panel and carefully pry it off.

  32. Canon EOS 6D Image Sensor Replacement: adım 32, 1 resimden 1.
    • Remove three 6mm Torx T6 screws from the back of the camera.

  33. Canon EOS 6D Image Sensor Replacement: adım 33, 1 resimden 1.
    • Use tweezers to remove the small metal plate and the thin strip of black tape underneath it.

  34. Canon EOS 6D Image Sensor Replacement: adım 34, 1 resimden 1.
    • Remove two Phillips #00 screws from the back of the camera.

  35. Canon EOS 6D Image Sensor Replacement: adım 35, 2 resimden 1. Canon EOS 6D Image Sensor Replacement: adım 35, 2 resimden 2.
    • Use your fingers to grip the top of the image sensor and pull it slightly outward.

    • Lift the sensor out toward the top of the camera.

Sonuç

To reassemble your device, follow these instructions in reverse order.

11 farklı kişi bu kılavuzu tamamladı.

Justin Thomas

Üyelik tarihi: 04/22/14

2.148 İtibar

6 adet Kılavuz yazıldı

Ekip

Cal Poly, Team 11-48, Amido Spring 2014 Cal Poly, Team 11-48, Amido Spring 2014 üyesi

CPSU-AMIDO-S14S11G48

4 Üyeler

18 adet Kılavuz yazıldı

8 Yorum

Hi, after replacement I've got strong fixed pattern noise. Any ideas what went wrong? Do i need somehow to calibrate it?

hornetsixone - Yanıt

oh shi~ sensor placed on springs...it's be hard to calibrate focal plane at home

war666beast - Yanıt

WARNING!!!!!

Removing the CMOS sensor, as shown above, will render your camera useless!! (no focus)

WHY?

This sensor (and many others) are very precisely tension-adjusted. It's called FBD or Flange-Back Distance. It's the distance between the lens mount surface and the actual surface of the CMOS sensor (below a low pass filter and below any sensor glass). Requires a special Canon tool to measure and adjust. There is a way around - you can use a high precision digital micrometer to measure it before removal and then adjust after putting it back in place. Still, high precision is required. Canon might refuse to work on your camera after you do it in a way illustrated above. I know at least a couple of such cases and one of them was related to this specific "repair guide". Please be careful!

Mike / camera repair tech

Mike - Yanıt

after open my camera 14 times, I fix part of this problem adjusting the sensor, but now the phase detection works in a vertical position shoot, when I put the camera in horizontal, do not work. Is there some of you having this problem? the whey Im using to do the adjustment is counting how many turns I did on each screw, after tighten all 3

gaucho2012 - Yanıt

How do you get to the SDslot to fix or replace???

Mamoru - Yanıt

Yorum Ekle

İstatistikleri Görüntüle:

Son 24 Saat: 5

Son 7 gün: 15

Son 30 gün: 85

Her zaman: 17,793