Ana içeriğe geç

Canon PowerShot S110 Lens Replacement

Neye ihtiyacın var

  1. Canon PowerShot S110 Lens Replacement, Battery Removal: adım 1, 2 resimden 1. Canon PowerShot S110 Lens Replacement, Battery Removal: adım 1, 2 resimden 2.
    • Remove the battery by sliding open the cover on the bottom of the camera.

    • This must be done in order to avoid causing any short circuits, and to continue with disassembly.

  2. Canon PowerShot S110 Lens Replacement: adım 2, 3 resimden 1. Canon PowerShot S110 Lens Replacement: adım 2, 3 resimden 2. Canon PowerShot S110 Lens Replacement: adım 2, 3 resimden 3.
    • Removing the following 6 Phillips screws will allow access to the inside of the camera:

    • Remove two screws on the right-side of the camera, near the HDMI port.

    • Remove two screws on the opposite side of the camera.

    • Remove the last two screws on the underside of the camera, near the tripod mounting hole.

  3. Canon PowerShot S110 Lens Replacement: adım 3, 1 resimden 1.
    • Release all clips around the outside plastic shell, and it will lift off.

  4. Canon PowerShot S110 Lens Replacement: adım 4, 1 resimden 1.
    • Remove the Phillips screw near the display holding the bracket in place.

    • Remove the second Phillips screw in the bottom corner, making it easier to remove the bracket.

  5. Canon PowerShot S110 Lens Replacement: adım 5, 1 resimden 1.
    • Lift out the display mounting bracket, and set it aside.

  6. Canon PowerShot S110 Lens Replacement: adım 6, 3 resimden 1. Canon PowerShot S110 Lens Replacement: adım 6, 3 resimden 2. Canon PowerShot S110 Lens Replacement: adım 6, 3 resimden 3.
    • Using a plastic spudger, slowly pull out the ribbon using the hole shown in the image. The first of three logic connectors connecting the display to the camera is now removed.

    • The display should now be partially disconnected from the back side of the camera.

  7. Canon PowerShot S110 Lens Replacement: adım 7, 3 resimden 1. Canon PowerShot S110 Lens Replacement: adım 7, 3 resimden 2. Canon PowerShot S110 Lens Replacement: adım 7, 3 resimden 3.
    • In order to remove the other two connectors, the front of the case must be removed. Slowly pry around the edges using a plastic prying tool to free the case. A lens-ring piece will fall out from the inside of the camera; set this aside.

    • Remove the two screws that hold the top piece of the plastic case in. One is short, one is long.

    • With a spudger remove the two rubber pads from the top of the camera to prevent pulling on the flex cable.

  8. Canon PowerShot S110 Lens Replacement: adım 9, 3 resimden 1. Canon PowerShot S110 Lens Replacement: adım 9, 3 resimden 2. Canon PowerShot S110 Lens Replacement: adım 9, 3 resimden 3.
    • Flip up the tab holding down this logic ribbon.

    • Flip up a second tab holding down this other ribbon; both the cables should be easily removable following this.

  9. Canon PowerShot S110 Lens Replacement: adım 10, 3 resimden 1. Canon PowerShot S110 Lens Replacement: adım 10, 3 resimden 2. Canon PowerShot S110 Lens Replacement: adım 10, 3 resimden 3.
    • Flip up the tab and remove the last ribbon.

    • The display can now be lifted off the camera and the logic ribbons attached in the front can slide out.

  10. Canon PowerShot S110 Lens Replacement: adım 11, 2 resimden 1. Canon PowerShot S110 Lens Replacement: adım 11, 2 resimden 2.
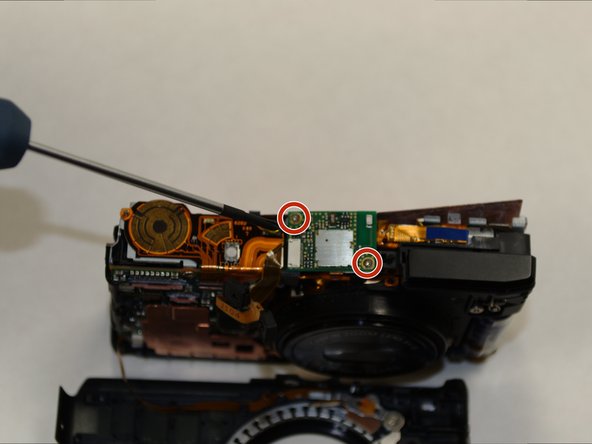
    • Using a Phillips screwdriver, remove the screws on the small circuit board at the top of the camera.

    • This will allow you to finish removing the copper panel with either your hands or a prying tool.

  11. Canon PowerShot S110 Lens Replacement: adım 12, 1 resimden 1.
    • Using a Phillips screwdriver, remove the 8 screws attaching the metal panel to the camera.

    • During reassembly, make sure the screws go back in their specific holes, to avoid damage to the camera.

    • To remove the flash assembly, disconnect the flex cable connection, then move the flash unit out of the way.

    • Exercise caution when handling the flash unit, as there is minimal plastic protection preventing an electric shock.

  12. Canon PowerShot S110 Lens Replacement: adım 14, 1 resimden 1.
    • Remove the Phillips screw on the front facing side of the lens.

  13. Canon PowerShot S110 Lens Replacement: adım 15, 2 resimden 1. Canon PowerShot S110 Lens Replacement: adım 15, 2 resimden 2.
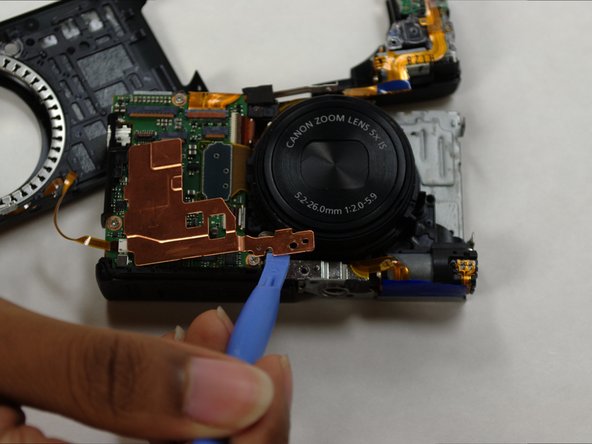
    • Remove the Phillips screw holding the copper plate in place.

    • Use a prying tool to lift off the copper plate.

  14. Canon PowerShot S110 Lens Replacement: adım 16, 2 resimden 1. Canon PowerShot S110 Lens Replacement: adım 16, 2 resimden 2.
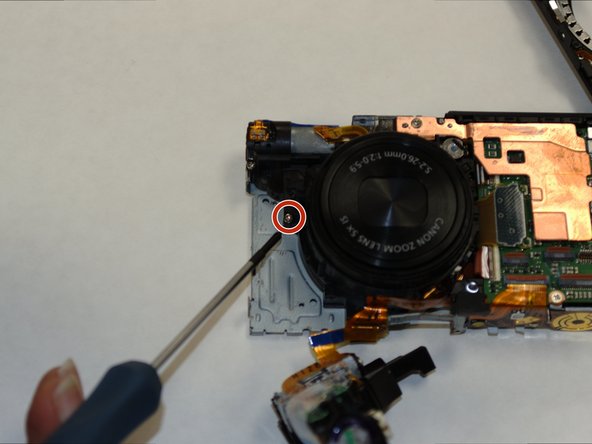
    • Remove the indicated screw on the front facing side of the lens using a Philips screwdriver.

    • Next, remove the small attached ribbon by lifting up the clip and gently pulling the ribbon out.

  15. Canon PowerShot S110 Lens Replacement: adım 17, 1 resimden 1.
    • Lift the lens up to reveal the screws underneath.

    • Remove the 4 Phillips screws connecting the lens to the lens bracket.

  16. Canon PowerShot S110 Lens Replacement: adım 18, 2 resimden 1. Canon PowerShot S110 Lens Replacement: adım 18, 2 resimden 2.
    • Using a prying tool, remove the lens bracket.

    • Handle your new lens carefully upon reassembly, as it's very fragile.

Sonuç

To reassemble your device, follow these instructions in reverse order.

9 farklı kişi bu kılavuzu tamamladı.

Pierre

Üyelik tarihi: 07/17/15

401 İtibar

1 Kılavuz yazıldı

Ekip

UW Tacoma, Team 1-2, Liner SU 2015 UW Tacoma, Team 1-2, Liner SU 2015 üyesi

UWT-LINER-SU15S1G2

4 Üyeler

3 adet Kılavuz yazıldı

9 Yorum

Great guide. My camera broke, couple of weeks back. The lens was extended and it won't retract. It just gives the lens error message. Orders a replacement lens from eBay fro $35 and used this guide to replace it.

dhanu802 - Yanıt

There is a step missing, on removing the flash, one side screw and one front, above the lens, otherwise perfect. thank you so much, just as above I had a lens error and ordered a replacement for 14£ from ebay. all works now. thanks.

Adrian Salariu - Yanıt

Is there no other 'fix' without replacing the lens assembly on this particular "Lens error "issue?

profeduards - Yanıt

@profeduards: try to reseat the flexes from the aperture and IS. You can disassemble the lens to reset the position and/or remove sand but make lots of pictures of the process, and mark (with pencil) a line over the rings (from the front) to know what ring goes where when reassembling. It's possible to reassemble without (as I did, lens was extended so i couldnt) but the process is long, arduous and takes a lot of patience.

Mrten - Yanıt

Thanks, my Lens was bricked, and with a new Lens kit @15$ from china, it was fixed.

jeromemathey - Yanıt

Yorum Ekle

İstatistikleri Görüntüle:

Son 24 Saat: 1

Son 7 gün: 7

Son 30 gün: 95

Her zaman: 11,316