Bu sürüm, hatalı düzenlemeler içerebilir. En son doğrulanmış bellek kopyası dönün.
Neye ihtiyacın var
-
Bu adım çevrilmemiş. Çevrilmesine yardım edin
-
Remove the four 2mm Phillips #00 screws on both sides of the camera.
-
-
Bu adım çevrilmemiş. Çevrilmesine yardım edin
-
Remove the single 4mm Phillips #00 screw from the bottom.
-
-
Bu adım çevrilmemiş. Çevrilmesine yardım edin
-
Remove the 3mm Phillips #000 screw from the top of the camera.
-
-
-
Bu adım çevrilmemiş. Çevrilmesine yardım edin
-
Pry the golden ribbon cable from the motherboard with a plastic opening tool.
-
-
Bu adım çevrilmemiş. Çevrilmesine yardım edin
-
Remove the 3mm Phillips #000 screw from the motherboard.
-
-
Bu adım çevrilmemiş. Çevrilmesine yardım edin
-
Use a plastic opening tool to flip up the retaining flap on the ribbon cable ZIF socket.
-
-
Bu adım çevrilmemiş. Çevrilmesine yardım edin
-
Unplug the small chip from the face of the camera using a pair of tweezers.
-
-
Bu adım çevrilmemiş. Çevrilmesine yardım edin
-
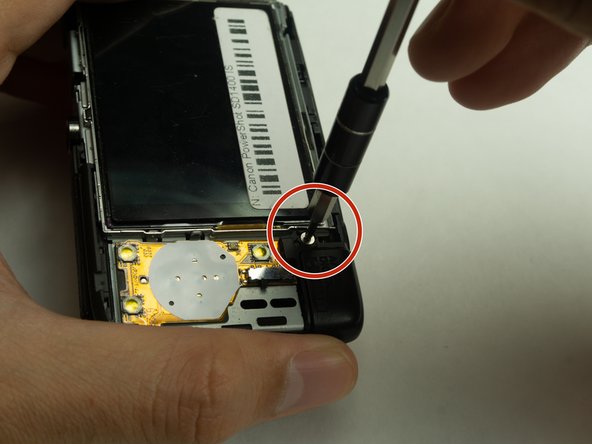
Remove the 3mm Phillips #000 screw from the rear face of the camera.
-
-
Bu adım çevrilmemiş. Çevrilmesine yardım edin
-
Pry the golden ribbon cable attached to the USB port using a plastic opening tool.
-
-
Bu adım çevrilmemiş. Çevrilmesine yardım edin
-
Remove the 3mm Phillips #000 screw located at the top right of the USB port.
-


İptal et: Bu kılavuzu tamamlamadım.
Bir başkası bu kılavuzu tamamladı.
Ekip

IUPUI, Team S1-G2, Harley Spring 2018 IUPUI, Team S1-G2, Harley Spring 2018 üyesi
IUPUI-HARLEY-S18S1G2
7 Üyeler
4 adet Kılavuz yazıldı