Ana içeriğe geç

Canon PowerShot SX120 IS Back Cover Replacement

Neye ihtiyacın var

  1. Canon PowerShot SX120 IS Back Cover Replacement, Back Cover: adım 1, 1 resimden 1.
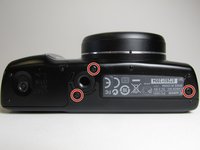
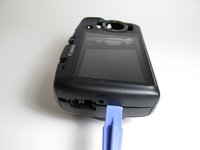
    • Turning the camera so the screen is facing you.

    • Remove the two black 3.4 mm screws with a Phillips #00 screwdriver.

  2. Canon PowerShot SX120 IS Back Cover Replacement: adım 2, 1 resimden 1.
    • Put the camera with the lens facing up and turn it to the side so the DC IN A/V OUT DIGITAL is facing you.

    • Remove the single black 3.4 mm screw with a Phillips #00 screwdriver.

  3. Canon PowerShot SX120 IS Back Cover Replacement: adım 3, 2 resimden 1. Canon PowerShot SX120 IS Back Cover Replacement: adım 3, 2 resimden 2.
    • Put the camera with the lens facing up, and turn it to the side where the battery cover is located.

    • Remove the three black 3.4 mm screws with a Phillips #00 screwdriver.

  4. Canon PowerShot SX120 IS Back Cover Replacement: adım 4, 2 resimden 1. Canon PowerShot SX120 IS Back Cover Replacement: adım 4, 2 resimden 2.
    • Put the camera with the lens facing up, turn it to the side where the compartment of the battery (CR1220) for time/date is located.

    • Remove the single black 3.4 mm screw with a Phillips #00 screwdriver.

  5. Canon PowerShot SX120 IS Back Cover Replacement: adım 5, 1 resimden 1.
    • Put the camera with the lens facing down, and turn it to the side where the DC IN A/V OUT DIGITAL cover and the silver lanyard attachment are located.

    • Open the DC IN A/V OUT DIGITAL cover.

    • Remove the single black 3.4 mm screw with a Phillips #00 screwdriver.

  6. Canon PowerShot SX120 IS Back Cover Replacement: adım 6, 3 resimden 1. Canon PowerShot SX120 IS Back Cover Replacement: adım 6, 3 resimden 2. Canon PowerShot SX120 IS Back Cover Replacement: adım 6, 3 resimden 3.
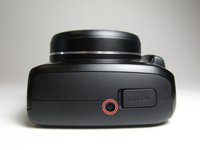
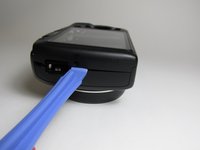
    • Turn the camera with the lens facing down.

    • Opening the camera can be challenging. Don't get discouraged if it takes you a few tries before the camera is opened.

    • Use the iFixit opening tool to make leverage. Insert the opening tool in the seam where the front case and the back case assemble.

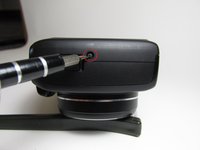
    • Carefully put pressure on the opening tool so the cover can gradually open.

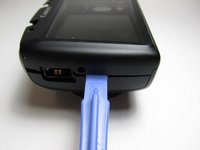
    • Slowly slide the opening tool along the gap and around the edge of the camera.

    • When you are dissembling the back cover, the DC IN A/V OUT DIGITAL cover will also disassemble and fall off.

  7. Canon PowerShot SX120 IS Back Cover Replacement: adım 7, 1 resimden 1.
    • Remove the back cover and the DC IN A/V OUT DIGITAL cover from the camera.

Sonuç

To reassemble your device, follow these instructions in reverse order.

2 farklı kişi bu kılavuzu tamamladı.

Maria

Üyelik tarihi: 03/13/14

875 İtibar

1 Kılavuz yazıldı

Ekip

Bir Yorum

It took me 2 hours to install the battery door. I dropped one screw and could not find it any more it just vanished.

I was lucky to find one just like the one I lost after a half hour search.All in all I did a pretty good good job for an

auto mechanic .Thanks very much for your help, it was very easy to follow your instructions.

Fred Czarnik

Frederick Czarnik - Yanıt

Yorum Ekle

İstatistikleri Görüntüle:

Son 24 Saat: 0

Son 7 gün: 1

Son 30 gün: 11

Her zaman: 1,689