Ana içeriğe geç

Canon Selphy CP1200 Print Mechanism Replacement

Neye ihtiyacın var

  1. Canon Selphy CP1200 Print Mechanism Replacement, LCD/Buttons: adım 1, 1 resimden 1.
    • Unscrew the four 6mm PH000 corner screws.

    • This will require a screwdriver with a long, narrow shaft.

  2. Canon Selphy CP1200 Print Mechanism Replacement: adım 2, 1 resimden 1.
    • Unscrew the three 4mm PH1 screws on the bottom of the printer.

  3. Canon Selphy CP1200 Print Mechanism Replacement: adım 3, 1 resimden 1.
    • Gently pry open the top of the case from either the front or back.

    • A plastic opening tool may help.

    • Be careful in lifting the top assembly as it is attached to the motherboard at this point.

  4. Canon Selphy CP1200 Print Mechanism Replacement: adım 4, 1 resimden 1.
    • Keeping the top assembly elevated, detach the ribbon cables connecting the LCD and buttons to the motherboard from the motherboard.

    • Tweezers may be useful given the limited space between the top assembly and motherboard.

    • The top assembly, containing both the LCD and buttons, will now be completely free

  5. Canon Selphy CP1200 Print Mechanism Replacement, Motherboard: adım 5, 1 resimden 1.
    • Detach the fan cable from the motherboard.

  6. Canon Selphy CP1200 Print Mechanism Replacement: adım 6, 1 resimden 1.
    • Detach the ribbon cable leading to the DC in port and battery leads.

    • Tweezers may be useful.

  7. Canon Selphy CP1200 Print Mechanism Replacement: adım 7, 1 resimden 1.
    • Unscrew the three 3mm PH000 screws from the motherboard.

  8. Canon Selphy CP1200 Print Mechanism Replacement: adım 8, 1 resimden 1.
    • Disconnect the bundled cables leading to the printing mechanism.

  9. Canon Selphy CP1200 Print Mechanism Replacement: adım 9, 1 resimden 1.
    • Gently lift the motherboard and detach the ribbon cables leading to the print mechanism.

    • Tweezers may be useful due to the limited amount of space.

  10. Canon Selphy CP1200 Print Mechanism Replacement, Print Mechanism: adım 10, 2 resimden 1. Canon Selphy CP1200 Print Mechanism Replacement, Print Mechanism: adım 10, 2 resimden 2.
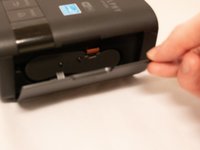
    • Open the side door and depress the ink cassette release.

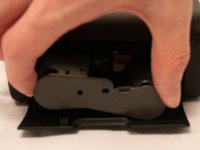
    • Slide out and remove the ink cassette.

  11. Canon Selphy CP1200 Print Mechanism Replacement: adım 11, 1 resimden 1.
    • Unscrew the three 3mm PH000 screws securing the metal plate to the printing mechanism.

  12. Canon Selphy CP1200 Print Mechanism Replacement: adım 12, 1 resimden 1.
    • Lift out the print mechanism of the printer case.

Sonuç

To reassemble your device, follow these instructions in reverse order.

2 farklı kişi bu kılavuzu tamamladı.

Bir Yorum

Gut, hat geklappt!

Antonina Aroutjunova - Yanıt

Yorum Ekle

İstatistikleri Görüntüle:

Son 24 Saat: 0

Son 7 gün: 10

Son 30 gün: 54

Her zaman: 2,265