Ana içeriğe geç
Casio CTK-501 LCD Screen Replacement

Casio CTK-501 LCD Screen Replacement

Jimmy Winne

Jimmy Winne ve 6 diğer katkıda bulunanlar

En son February 20, 2024 tarihinde güncellendi

15 - 20 dakika
Orta
Eksik Adımlar
Daha İyi Resimler Gerekli

At some point during the use of your Casio CTK-501, you might encounter a time where the LCD screen starts to malfunction or in some cases just stop working. With this guide we will help you get to the screen, and show you how to replace it so that the screen can work like new.

For this repair you will need a total of two things, a #2 Phillips head screwdriver, and two pieces of tape. If you're not sure if you have the right tools or if you're not sure where to get them, the links to both the tape and screwdriver have been provided.

Before starting on this guide, check again to see if the screen is working or not, power it on and off a couple times, and make sure it's connected to a power source. If the problem still persists and the screen isn't working, you can continue with the guide, but check and be sure that the device is completely powered off before starting to take it apart.

Neye ihtiyacın var

iFixit bu bağlantılar üzerinden satın aldığınızda komisyon kazanır.
  1. Casio CTK-501 LCD Screen Replacement, Bottom Panel: adım 1, 2 resimden 1. Casio CTK-501 LCD Screen Replacement, Bottom Panel: adım 1, 2 resimden 2.
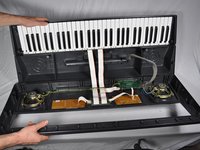
    • Flip the keyboard over so that the bottom is facing up.

    • Remove the twenty-seven 12 mm screws from the dark-grey panel using a Phillips #2 screwdriver.

  2. Casio CTK-501 LCD Screen Replacement: adım 2, 1 resimden 1.
    • Remove the bottom panel by lifting and pulling it towards yourself.

  3. Casio CTK-501 LCD Screen Replacement: adım 3, 2 resimden 1. Casio CTK-501 LCD Screen Replacement: adım 3, 2 resimden 2.
    • Flip open the top half of the keyboard.

    • Set the keyboard onto the bottom half with the internal parts facing up.

    • Be careful not to let the bottom drop.

  4. Casio CTK-501 LCD Screen Replacement, LCD Screen: adım 4, 1 resimden 1.
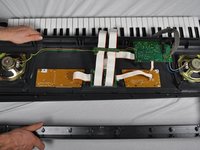
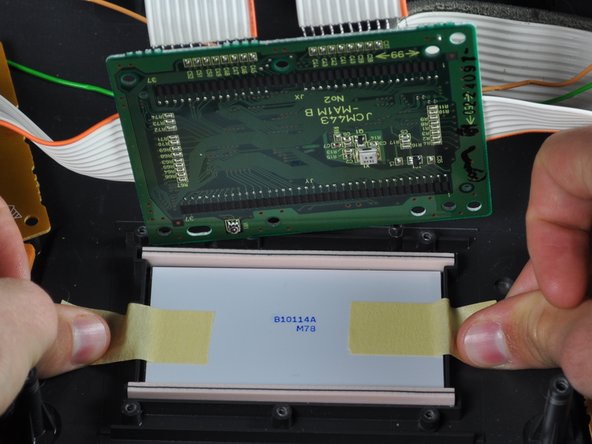
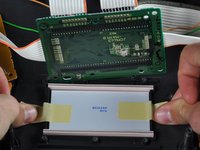
    • Completely unscrew and remove all six of the screws on the central circuit board.

  5. Casio CTK-501 LCD Screen Replacement: adım 5, 1 resimden 1.
    • Lift the circuit board out of your way.

  6. Casio CTK-501 LCD Screen Replacement: adım 6, 1 resimden 1.
    • Remove tape from the LCD screen and remove the screen completely.

  7. Casio CTK-501 LCD Screen Replacement: adım 7, 2 resimden 1. Casio CTK-501 LCD Screen Replacement: adım 7, 2 resimden 2.
    • Replace the LCD screen and tape it down to the top cover.

  8. Casio CTK-501 LCD Screen Replacement: adım 8, 1 resimden 1.
    • Place the circuit board back on top of the LCD screen.

    • Screw all of the screws completely in their original positions.

Sonuç

To reassemble your device, follow these instructions in reverse order.

2 farklı kişi bu kılavuzu tamamladı.

Jimmy Winne

Üyelik tarihi: 10/04/12

578 İtibar

6 adet Kılavuz yazıldı

Ekip

Cal Poly, Team 9-16, Amido Fall 2012 Cal Poly, Team 9-16, Amido Fall 2012 üyesi

CPSU-AMIDO-F12S9G16

4 Üyeler

6 adet Kılavuz yazıldı

3Kılavuz Yorumları

Where did you get the replacement LCD screen? I'm looking for one for my CTK-573 keyboard mbuseck1@yahoo.com

mbuseck1 - Yanıt

Hi. Would this screen work for CTK 481?

José Saldaña - Yanıt

hi. I have the ctk 4300. i would like to know where i can get one.Binitintimo@gmail.com

timo binitin - Yanıt

Yorum Ekle

İstatistikleri Görüntüle:

Son 24 Saat: 0

Son 7 gün: 1

Son 30 gün: 30

Her zaman: 5,256