Ana içeriğe geç

Bu kılavuzda güncel değişiklikler var. En son onaylanmamış sürüme geçin.

Cobra 29 LTD Classic Outer Cover Replacement

Neye ihtiyacın var

  1. Cobra 29 LTD Classic Outer Cover Replacement, Power Cable: adım 1, 2 resimden 1. Cobra 29 LTD Classic Outer Cover Replacement, Power Cable: adım 1, 2 resimden 2.
    • Turn the power switch, the leftmost knob, counterclockwise to off.

  2. Cobra 29 LTD Classic Outer Cover Replacement: adım 2, 2 resimden 1. Cobra 29 LTD Classic Outer Cover Replacement: adım 2, 2 resimden 2.
    • Turn the device around and firmly pull the power cable plug to remove it from the radio.

  3. Cobra 29 LTD Classic Outer Cover Replacement, Antenna Cable: adım 3, 2 resimden 1. Cobra 29 LTD Classic Outer Cover Replacement, Antenna Cable: adım 3, 2 resimden 2.
    • Unscrew the securing cap counterclockwise from the antenna connector.

  4. Cobra 29 LTD Classic Outer Cover Replacement: adım 4, 2 resimden 1. Cobra 29 LTD Classic Outer Cover Replacement: adım 4, 2 resimden 2.
    • Gently pull the antenna cable to remove it from the back of the radio.

  5. Cobra 29 LTD Classic Outer Cover Replacement, Microphone: adım 5, 2 resimden 1. Cobra 29 LTD Classic Outer Cover Replacement, Microphone: adım 5, 2 resimden 2.
    • Unscrew the cap counterclockwise on the microphone plug to disconnect the cable.

  6. Cobra 29 LTD Classic Outer Cover Replacement: adım 6, 1 resimden 1.
    • Gently unplug the microphone plug.

  7. Cobra 29 LTD Classic Outer Cover Replacement, Outer Cover: adım 7, 2 resimden 1. Cobra 29 LTD Classic Outer Cover Replacement, Outer Cover: adım 7, 2 resimden 2.
    • Unscrew the top four 6.0mm Phillips head screws counterclockwise on the left and right side of the device using a #1 Phillips head screwdriver.

  8. Cobra 29 LTD Classic Outer Cover Replacement: adım 8, 3 resimden 1. Cobra 29 LTD Classic Outer Cover Replacement: adım 8, 3 resimden 2. Cobra 29 LTD Classic Outer Cover Replacement: adım 8, 3 resimden 3.
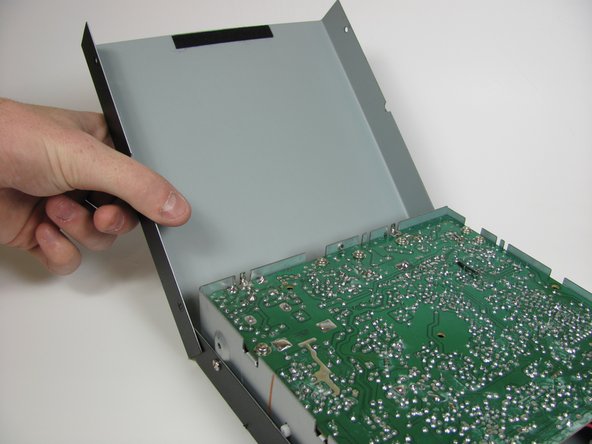
    • Gently life and remove the top cover.

  9. Cobra 29 LTD Classic Outer Cover Replacement: adım 9, 3 resimden 1. Cobra 29 LTD Classic Outer Cover Replacement: adım 9, 3 resimden 2. Cobra 29 LTD Classic Outer Cover Replacement: adım 9, 3 resimden 3.
    • Gently set down on a hard, flat, non-conductive surface to minimize risk of shock or breaking your radio.

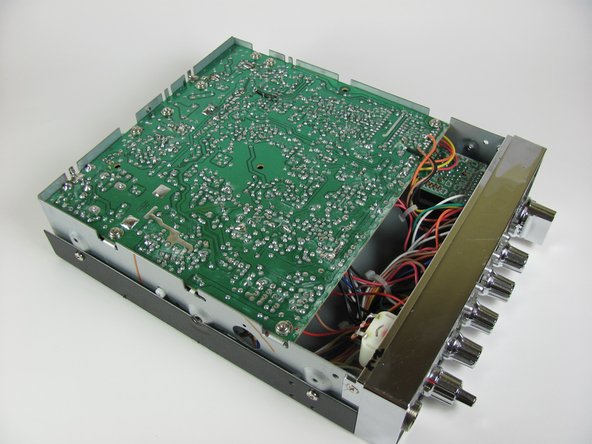
    • Carefully flip the radio over.

  10. Cobra 29 LTD Classic Outer Cover Replacement: adım 10, 2 resimden 1. Cobra 29 LTD Classic Outer Cover Replacement: adım 10, 2 resimden 2.
    • Unscrew the four 6.0mm Phillips head screws counterclockwise on the left and right side of the device that connect the remaining cover, using a #1 Phillips head screwdriver.

  11. Cobra 29 LTD Classic Outer Cover Replacement: adım 11, 3 resimden 1. Cobra 29 LTD Classic Outer Cover Replacement: adım 11, 3 resimden 2. Cobra 29 LTD Classic Outer Cover Replacement: adım 11, 3 resimden 3.
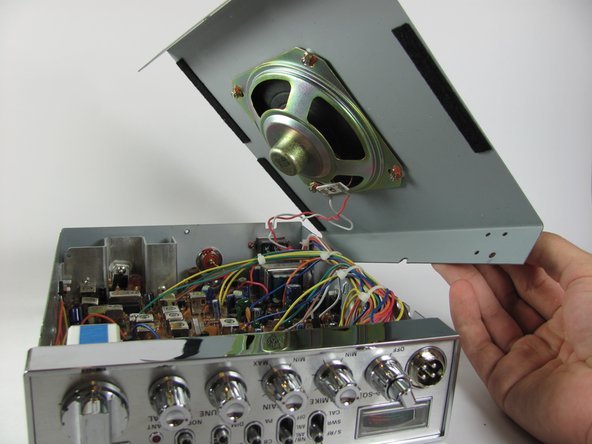
    • Watch out for the wires connected to the speaker. These short wires will not allow you to move the cover very far.

    • Gently lift and remove the case cover.

Sonuç

To reassemble your device, follow these instructions in reverse order.

2 farklı kişi bu kılavuzu tamamladı.

Chase

Üyelik tarihi: 10/20/13

267 İtibar

2 adet Kılavuz yazıldı

Ekip

Cal Poly, Team 11-37, Amido Fall 2013 Cal Poly, Team 11-37, Amido Fall 2013 üyesi

CPSU-AMIDO-F13S11G37

4 Üyeler

9 adet Kılavuz yazıldı

0 Yorum

Yorum Ekle

İstatistikleri Görüntüle:

Son 24 Saat: 0

Son 7 gün: 1

Son 30 gün: 7

Her zaman: 1,639