Ana içeriğe geç

Bu sürüm, hatalı düzenlemeler içerebilir. En son doğrulanmış bellek kopyası dönün.

Neye ihtiyacın var

  1. Bu adım çevrilmemiş. Çevrilmesine yardım edin

    : adım 1, 2 resimden 1. : adım 1, 2 resimden 2.
    • Turn the power switch, the leftmost knob, counterclockwise to off.

  2. Bu adım çevrilmemiş. Çevrilmesine yardım edin

    : adım 2, 2 resimden 1. : adım 2, 2 resimden 2.
    • Turn the device around and firmly pull the power cable plug to remove it from the radio.

  3. Bu adım çevrilmemiş. Çevrilmesine yardım edin

    : adım 3, 2 resimden 1. : adım 3, 2 resimden 2.
    • Unscrew the securing cap counterclockwise from the antenna connector.

  4. Bu adım çevrilmemiş. Çevrilmesine yardım edin

    : adım 4, 2 resimden 1. : adım 4, 2 resimden 2.
    • Gently pull the antenna cable to remove it from the back of the radio.

  5. Bu adım çevrilmemiş. Çevrilmesine yardım edin

    : adım 5, 2 resimden 1. : adım 5, 2 resimden 2.
    • Unscrew the cap counterclockwise on the microphone plug to disconnect the cable.

  6. Bu adım çevrilmemiş. Çevrilmesine yardım edin

    : adım 6, 1 resimden 1.
    • Gently unplug the microphone plug.

  7. Bu adım çevrilmemiş. Çevrilmesine yardım edin

    : adım 7, 2 resimden 1. : adım 7, 2 resimden 2.
    • Unscrew the top four 6.0mm Phillips head screws counterclockwise on the left and right side of the device using a #1 Phillips head screwdriver.

  8. Bu adım çevrilmemiş. Çevrilmesine yardım edin

    : adım 8, 3 resimden 1. : adım 8, 3 resimden 2. : adım 8, 3 resimden 3.
    • Gently life and remove the top cover.

  9. Bu adım çevrilmemiş. Çevrilmesine yardım edin

    : adım 9, 3 resimden 1. : adım 9, 3 resimden 2. : adım 9, 3 resimden 3.
    • Gently set down on a hard, flat, non-conductive surface to minimize risk of shock or breaking your radio.

    • Carefully flip the radio over.

  10. Bu adım çevrilmemiş. Çevrilmesine yardım edin

    : adım 10, 2 resimden 1. : adım 10, 2 resimden 2.
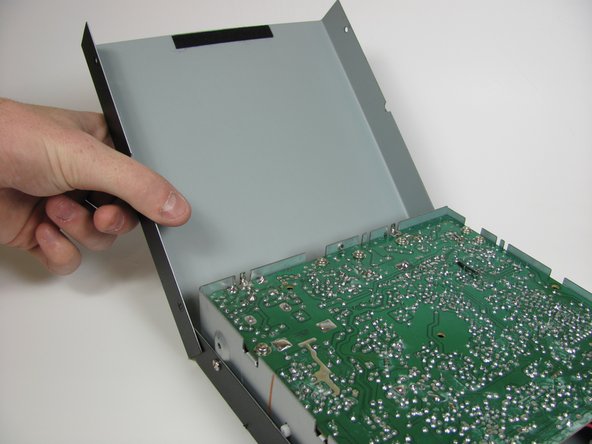
    • Unscrew the four 6.0mm Phillips head screws counterclockwise on the left and right side of the device that connect the remaining cover, using a #1 Phillips head screwdriver.

  11. Bu adım çevrilmemiş. Çevrilmesine yardım edin

    : adım 11, 3 resimden 1. : adım 11, 3 resimden 2. : adım 11, 3 resimden 3.
    • Watch out for the wires connected to the speaker. These short wires will not allow you to move the cover very far.

    • Gently lift and remove the case cover.

Bitiş Çizgisi

2 farklı kişi bu kılavuzu tamamladı.

Chase

Üyelik tarihi: 10/20/13

267 İtibar

2 adet Kılavuz yazıldı

Ekip

Cal Poly, Team 11-37, Amido Fall 2013 Cal Poly, Team 11-37, Amido Fall 2013 üyesi

CPSU-AMIDO-F13S11G37

4 Üyeler

9 adet Kılavuz yazıldı

0 Yorum

Yorum Ekle

İstatistikleri Görüntüle:

Son 24 Saat: 1

Son 7 gün: 5

Son 30 gün: 11

Her zaman: 1,646