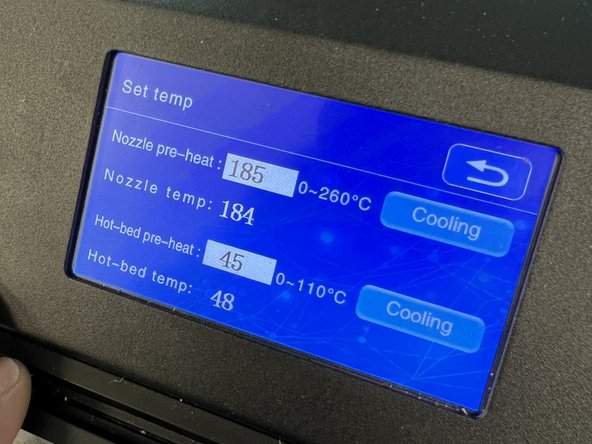
Ana içeriğe geç

Creality Ender 3 V2 Extruder Nozzle Replacement

Neye ihtiyacın var

  1. Creality Ender 3 V2 Extruder Nozzle Replacement, Extruder Nozzle: adım 1, 1 resimden 1.
    • Move the extruder carriage to the center of the machine.

  2. Creality Ender 3 V2 Extruder Nozzle Replacement: adım 2, 1 resimden 1.
    • Use a 2 mm Allen wrench to remove the two screws located on the back of the extruder shroud.

  3. Creality Ender 3 V2 Extruder Nozzle Replacement: adım 3, 1 resimden 1.
    • Carefully remove the shroud by pulling it away from the hot end of the 3D printer.

  4. Creality Ender 3 V2 Extruder Nozzle Replacement: adım 4, 3 resimden 1. Creality Ender 3 V2 Extruder Nozzle Replacement: adım 4, 3 resimden 2. Creality Ender 3 V2 Extruder Nozzle Replacement: adım 4, 3 resimden 3.
    • Remove the silicon sleeve around the heat block.

    • Before removing the nozzle, you must bring the printer up to operating temperature in order to remove the leftover filament from the extruder.

  5. Creality Ender 3 V2 Extruder Nozzle Replacement: adım 5, 2 resimden 1. Creality Ender 3 V2 Extruder Nozzle Replacement: adım 5, 2 resimden 2.
    • Once the excess filament has been removed, loosen the nozzle by a quarter turn using the wrench provided, then either power off or cool down the printer.

    • Do not attempt to fully remove the nozzle while the printer is at operating temperature. Allow the nozzle to fully cool before removal.

  6. Creality Ender 3 V2 Extruder Nozzle Replacement: adım 6, 3 resimden 1. Creality Ender 3 V2 Extruder Nozzle Replacement: adım 6, 3 resimden 2. Creality Ender 3 V2 Extruder Nozzle Replacement: adım 6, 3 resimden 3.
    • Before removing the nozzle check the temperature by bringing the back of your hand near the nozzle; do not touch it. If you feel any heat on the back of your hand, then wait another 10-15 minutes before removing the nozzle.

    • If the nozzle is fully cooled, remove the nozzle.

  7. Creality Ender 3 V2 Extruder Nozzle Replacement: adım 7, 2 resimden 1. Creality Ender 3 V2 Extruder Nozzle Replacement: adım 7, 2 resimden 2.
    • Screw on the new nozzle into the heat block with your wrench.

    • To fully tighten the nozzle, bring the printer back to operating temperature and do a final tightening of the nozzle.

    • Printer must be at operating temperature when fully tightening in order to prevent leaks in the future.

Sonuç

Print away!

7 farklı kişi bu kılavuzu tamamladı.

Ekip

0 Yorum

Yorum Ekle

İstatistikleri Görüntüle:

Son 24 Saat: 23

Son 7 gün: 136

Son 30 gün: 636

Her zaman: 17,539