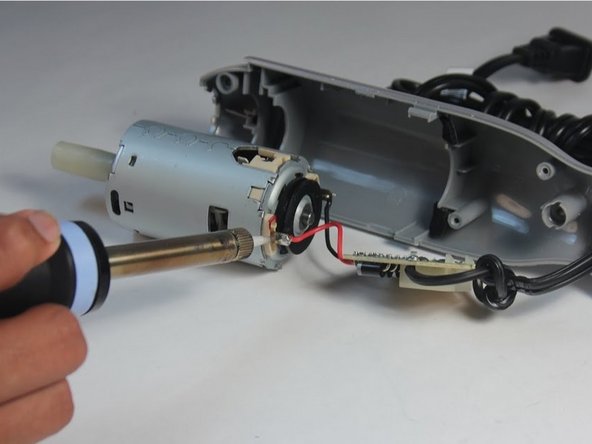
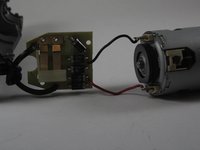
Ana içeriğe geç

Cuisinart Smart Stick CSB-75 Motor Replacement

Neye ihtiyacın var

  1. Cuisinart Smart Stick CSB-75 Motor Replacement, Motor: adım 1, 3 resimden 1. Cuisinart Smart Stick CSB-75 Motor Replacement, Motor: adım 1, 3 resimden 2. Cuisinart Smart Stick CSB-75 Motor Replacement, Motor: adım 1, 3 resimden 3.
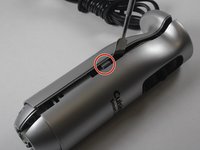
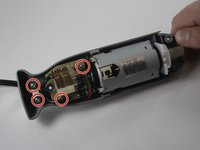
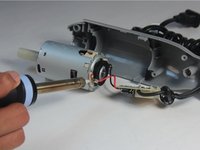
    • Located on the back of the motor body are three screw covers. To remove the three grey screw covers, use a Flat Head Screwdriver (1.0mm or 1.5mm).

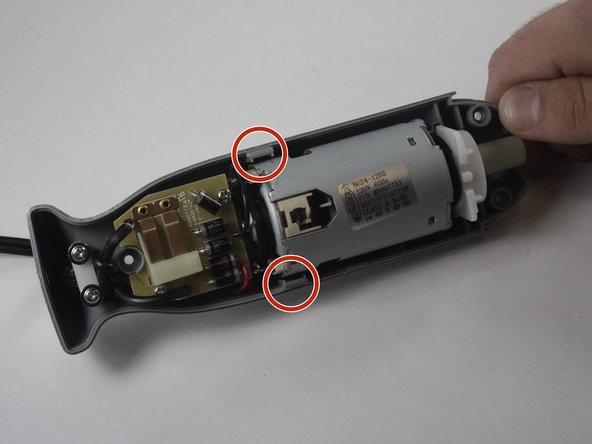
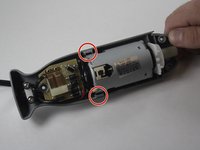
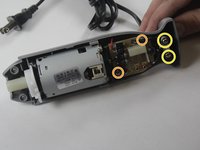
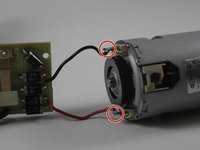
    • After prying these off, the screws will be exposed.

  2. Cuisinart Smart Stick CSB-75 Motor Replacement: adım 2, 2 resimden 1. Cuisinart Smart Stick CSB-75 Motor Replacement: adım 2, 2 resimden 2.
    • Remove three 13.3 mm Phillips PH#2 screws.

  3. Cuisinart Smart Stick CSB-75 Motor Replacement: adım 3, 3 resimden 1. Cuisinart Smart Stick CSB-75 Motor Replacement: adım 3, 3 resimden 2. Cuisinart Smart Stick CSB-75 Motor Replacement: adım 3, 3 resimden 3.
    • Pry open Cuisinart using a plastic opening tool.

    • The metal spudger is great when you need serious prying power, but the regular black nylon spudger or a plastic opening tool should be used whenever possible.

    • Make sure to pry open near the clips of the smart stick for easy opening.

  4. Cuisinart Smart Stick CSB-75 Motor Replacement: adım 4, 3 resimden 1. Cuisinart Smart Stick CSB-75 Motor Replacement: adım 4, 3 resimden 2. Cuisinart Smart Stick CSB-75 Motor Replacement: adım 4, 3 resimden 3.
    • Unscrew the 4 screws on inside.

    • Remove 2 13.3mm Phillips PH#2 screws.

    • Remove 2 17.5 mm Phillips PH#2 screws.

    • Unscrewing these screws will isolate the motor.

  5. Cuisinart Smart Stick CSB-75 Motor Replacement: adım 5, 3 resimden 1. Cuisinart Smart Stick CSB-75 Motor Replacement: adım 5, 3 resimden 2. Cuisinart Smart Stick CSB-75 Motor Replacement: adım 5, 3 resimden 3.
    • Refer to these steps on Soldering to replace the motor in the smart stick.

    • Be careful when soldering; it gets very hot.

Sonuç

To reassemble your device, follow these instructions in reverse order.

6 farklı kişi bu kılavuzu tamamladı.

Jordan Robinson

Üyelik tarihi: 09/02/15

557 İtibar

4 adet Kılavuz yazıldı

Ekip

USF Tampa, Team 16-2, Wollert Fall 2015 USF Tampa, Team 16-2, Wollert Fall 2015 üyesi

USFT-WOLLERT-F15S16G2

4 Üyeler

4 adet Kılavuz yazıldı

5 Yorum

where can I find the coupling from the motor to the shaft?

Alejandro Serra - Yanıt

Thanks for this tutorial Jordan! I have the same question than Alejandro Serra though, I was wondering if someone know where we can find the plastic coupling between the motor shaft and the kitchen tool. Mine is striped and I can’t find this specific part. This is a shame since the motor is in perfect shape so just a little plastic part is ruining the whole device. If anyone has see this part or if you have a way to fix a stripped one, please let me know!

Gabriel Boulanger Théberge - Yanıt

Hello, did u ever end up finding this same piece of plastic you were looking for? Turns out mine is stripped too and i need one

Yazan Ahmad -

Does anyone know where to find small replacement parts for this? I'm specifically looking for the white (I think nylon) cylindrical piece which is held by friction to the motor shaft, and which has teeth on the inside to engage with the blade shaft.

Basil Yokarinis - Yanıt

Yorum Ekle

İstatistikleri Görüntüle:

Son 24 Saat: 2

Son 7 gün: 20

Son 30 gün: 96

Her zaman: 7,726