Bu sürüm, hatalı düzenlemeler içerebilir. En son doğrulanmış bellek kopyası dönün.
Neye ihtiyacın var
-
Bu adım çevrilmemiş. Çevrilmesine yardım edin
-
Press down on battery door release tab to flip the battery door open.
-
-
Bu adım çevrilmemiş. Çevrilmesine yardım edin
-
Pull the two halves of the XT60 power connector apart.
-
-
Bu adım çevrilmemiş. Çevrilmesine yardım edin
-
Silver-topped propeller collets unscrew counter-clockwise
-
Black-topped propeller collets unscrew clockwise
-
-
Bu adım çevrilmemiş. Çevrilmesine yardım edin
-
For propellors with silver collets: Use a 12 mm wrench or socket to loosen silver collets in the counter-clockwise direction.
-
Once free, unscrew and remove the collet.
-
-
Bu adım çevrilmemiş. Çevrilmesine yardım edin
-
For propellors with black collets: Use a 12 mm wrench or socket to loosen black collets in the clockwise direction.
-
Once free, unscrew and remove the collet.
-
-
Bu adım çevrilmemiş. Çevrilmesine yardım edin
-
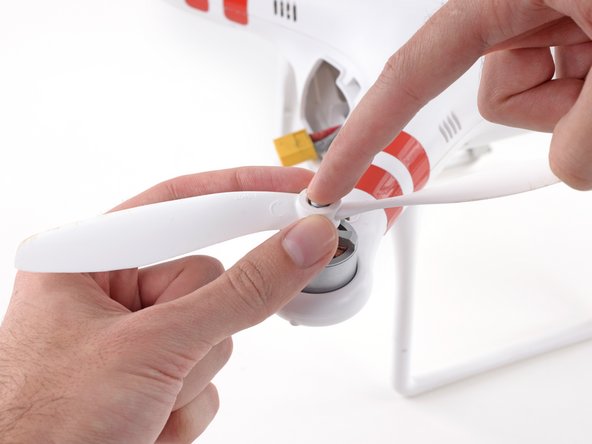
Gently press down the motor shaft and lift the propeller up to remove it.
-
-
Bu adım çevrilmemiş. Çevrilmesine yardım edin
-
Remove the following screws from the underside of the drone:
-
Twelve 2.0 mm hex screws
-
Four Phillips #0 screws
-
-
-
Bu adım çevrilmemiş. Çevrilmesine yardım edin
-
Loosen the cable from the plastic landing gear.
-
Unplug the magnetometer molex connector.
-
-
Bu adım çevrilmemiş. Çevrilmesine yardım edin
-
Lift up on the top portion of the shell and set it on its side.
-
-
Bu adım çevrilmemiş. Çevrilmesine yardım edin
-
Lift the GPS cable molex connector up out of its socket on the main board.
-
-
Bu adım çevrilmemiş. Çevrilmesine yardım edin
-
Gently pull the slack of the magnetometer cable through the case bottom shell.
-
The case top shell should now have enough slack to work on the interior of the Phantom.
-
-
Bu adım çevrilmemiş. Çevrilmesine yardım edin
-
Twist the molex and cable as shown to prepare it for insertion through the case bottom shell.
-
-
Bu adım çevrilmemiş. Çevrilmesine yardım edin
-
Insert the molex connector through one of the landing gear holes and case bottom shell.
-
Pull the cable through.
-
-
Bu adım çevrilmemiş. Çevrilmesine yardım edin
-
Place the H3-2D mounting bracket on the bottom side of the Phantom.
-
Line up the mounting holes and screw in the two bolts to secure the mounting bracket.
-
-
Bu adım çevrilmemiş. Çevrilmesine yardım edin
-
Twist the other end of the G8 cable molex connector as shown in order to plug in the H3-2D gimbal.
-
-
Bu adım çevrilmemiş. Çevrilmesine yardım edin
-
Pass the G8 molex connector through the side of the H3-2D gimbal.
-
Plug in and firmly secure the connector.
-
-
Bu adım çevrilmemiş. Çevrilmesine yardım edin
-
Pull the gimbal wire through the case bottom shell and plug in the connector to the G8 plug on the mainboard.
-
-
Bu adım çevrilmemiş. Çevrilmesine yardım edin
-
Place the gimbal on the mount with the front facing the same side as the battery cover.
-
-
Bu adım çevrilmemiş. Çevrilmesine yardım edin
-
Mount the four rubber dampers on the gimbal to the mounting bracket.
-
Pinch two sides of the rubber dampers and press it into the mounting bracket holes.
-
-
Bu adım çevrilmemiş. Çevrilmesine yardım edin
-
Confirm the dampers are installed correctly by twisting them at least 180 degrees.
-
-
Bu adım çevrilmemiş. Çevrilmesine yardım edin
-
Pull the excess slack in the gimbal cable up into the body of the Phantom.
-
-
Bu adım çevrilmemiş. Çevrilmesine yardım edin
-
Line up the GoPro camera with the pins on the gimbal mount.
-
Press the GoPro camera firmly against the gimbal and ensure a snug fit.
-
-
Bu adım çevrilmemiş. Çevrilmesine yardım edin
-
Place the securing bracket over the camera and line up the bolt holes.
-
Secure the two mounting screws with a Phillips #0 driver.
-


İptal et: Bu kılavuzu tamamlamadım.
8 farklı kişi bu kılavuzu tamamladı.

Ekip

Cal Poly, Team 25-89, Amido Spring 2010 Cal Poly, Team 25-89, Amido Spring 2010 üyesi
CPSU-AMIDO-S10S25G89
4 Üyeler
63 adet Kılavuz yazıldı