Giriş
In this guide, we will show you how to remove and replace Memory Modules 1 & 2.
Neye ihtiyacın var
-
-
Align the tabs on the new base cover with the slots on the computer base
-
-
-
Slide the base cover toward the back of the computer and align the screws holes on the base cover with the screw holes on the computer base.
-
-
-
Replace the screws that secure the base cover to the computer base.
-
-
-
Using the battery cable, lift and release the battery from the tabs on the computer base.
-
-
-
Press and hold the power button for five seconds to ground the system board.
-
-
-
Align the screw holes on the battery with the screw holes on the computer base.
-
-
-
-
Remove the screws that secure the hard-drive assembly to the computer base.
-
-
-
Using the pull-tab, lift the hard-drive assembly off the computer base.
-
-
-
Remove the screws that secure the hard-drive bracket to the hard drive.
-
-
-
Replace the screws that secure the hard-drive bracket to the hard drive.
-
-
-
Align the screw holes on the hard-drive bracket with the screw holes on the hard drive.
-
-
-
Place the hard-drive assembly in the hard-drive bay.
-
-
-
Align the screw holes on the hard-drive assembly with the screw holes on the computer base.
-
-
-
Replace the screws that secure the hard-drive assembly to the computer base.
-
-
-
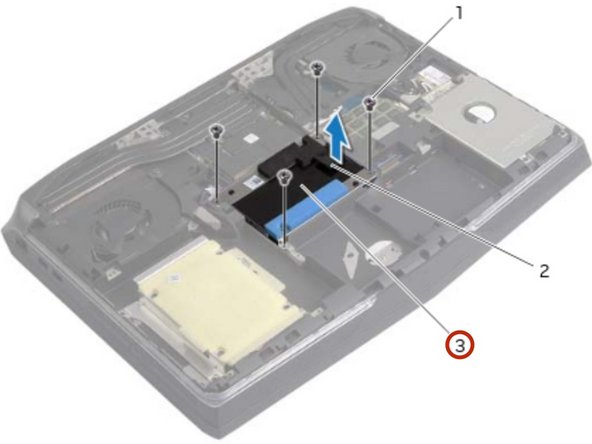
Remove the screws that secure the hard-drive assembly to the computer base.
-
-
-
Using the pull-tab, gently lift the hard-drive assembly.
-
-
-
Lift the latch and disconnect the hard-drive cable from the system board.
-
-
-
Remove the screws that secure the hard-drive bracket to the hard drive.
-
-
-
Align the screw holes on the hard-drive bracket with the screw holes on the hard drive.
-
-
-
Replace the screws that secure the hard-drive bracket to the hard drive.
-
-
-
Place the hard-drive assembly in the hard-drive bay.
-
-
-
Align the screw holes on the hard-drive assembly with the screw holes on the computer base.
-
-
-
Replace the screws that secure the hard-drive assembly to the computer base.
-
-
-
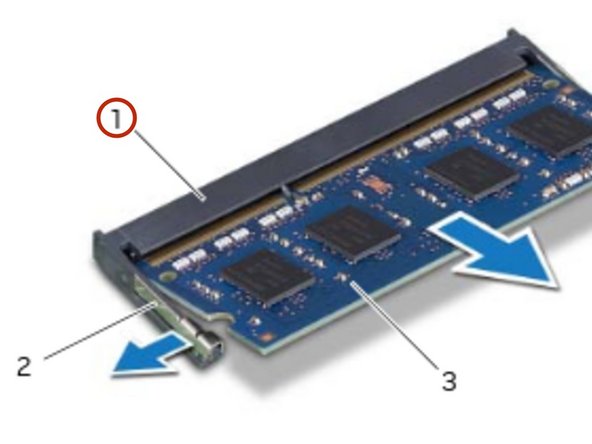
Using your fingertips, carefully spread apart the securing clips at the sides of the memory-module connector until the memory module pops up.
-
-
-
Slide and remove the memory module from the memory-module connector.
-
-
-
Align the notch on the NEW memory module with the tab on the memory-module connector.
-
-
-
Slide the memory module into the connect or at a 45-degree angle, and press the memory module down until it clicks in place. If you do not hear the click, remove and reinstall the memory module
-


To reassemble your device, follow these instructions in reverse order.
To reassemble your device, follow these instructions in reverse order.

Ekip
