Giriş
Overheating in a laptop is commonly caused by a fan clogged with dust and fluff. Mild cases can be cured by applying a vacuum cleaner to the vents and/or probing the outlet vent to dislodge matted dust, but disassembly is required for more thorough cleaning. From this guide you will be able to access all the main components of the laptop.
Neye ihtiyacın var
-
-
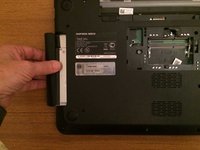
Turn the laptop over and unlock the battery by sliding the two locking tabs away from each other. The one on the left is spring loaded. Slide the battery out.
-
Simply slide the battery out in the direction shown.
-
-
-
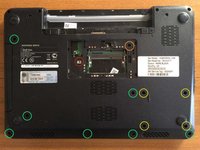
Undo the locking screw on RAM cover, then prise open the cover.
-
Release the RAM module or modules by pushing the metal clips outwards. Put the modules aside.
-
-
-
Remove a 5mm screw to the left of the RAM sockets, then pull out the CD/DVD drive. (Not necessary if you are only replacing the keyboard.)
-
Remove a 5mm screw to the right and the rear of the RAM sockets.
-
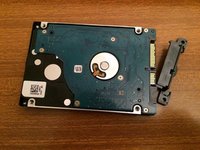
If you are going to remove the hard disk, motherboard or fan, remove 4 3mm screws.
-
Remove 7 5mm screws. (There are 6 more at the rear which should be left.)
-
-
-
-
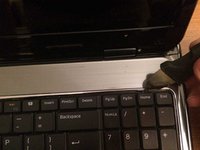
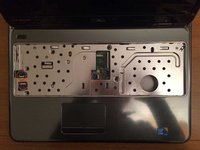
With a thin metal spudger you should now be able to release 4 clips along the top of the keyboard in order to lift it out.
-
Lift the keyboard slightly from the back, disengaging its tabs along the front panel at the front. Turn it over towards you, taking care not to strain the ribbon.
-
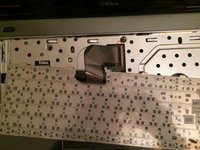
Gently lift the locking bar on the ribbon socket and withdraw the ribbon. Put the keyboard aside.
-
-
Bu adımda kullanılan alet:Tweezers$4.99
-
Gently lift the black locking tabs and disconnect the 3 narrow ribbon cables.
-
On reassembly, after closing the locking tabs, pull gently on the ribbons. If they come out of the sockets then they weren't fully inserted. Fully inserting them can be a little fiddly, and tweezers can help.
-
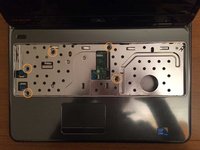
Remove 5 screws labelled M2.5x5 on the mid plate.
-
-
-
Disengage two adjacent small connectors at the front right hand side of the motherboard. Do not pull by the wires, but rather ease the plugs out of their sockets.
-
Disengage two connectors towards the rear of the motherboard. The one with the blue tab is disengaged simply by pulling upwards on the tab. On reassembly, make sure it is properly aligned before pressing it back. It should engage with a positive snap.
-
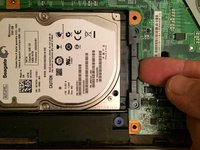
Remove two screws at the rear right hand side of the motherboard.
-
On the underside of the motherboard between the two screws just removed, the motherboard plugs into a socket on the supplementary IO board to its right. List this section of the motherboard to disengage the connector, then lift it out of the laptop shell.
-
On reassembly and before replaong the screws, make sure that none of the 4 cables disconnected at the start of this step are trapped under the motherboard.
-
-
-
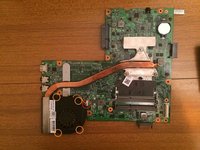
Turn the motherboard over and disconnect the fan.
-
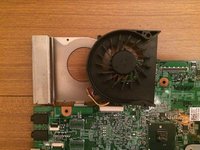
Remove 4 small screws which retain the fan.
-
Turn the motherboard the right way up again and lift off the fan. remove any build-up of dust, and blow through the radiator fins to ensure they are clear.
-


To reassemble your device, follow these instructions in reverse order.
To reassemble your device, follow these instructions in reverse order.
İptal et: Bu kılavuzu tamamlamadım.
6 farklı kişi bu kılavuzu tamamladı.

Ekip

1Rehber Yorum
This site is definitely the best to understand the fixing of laptop parts. Thanks for sharing.