Ana içeriğe geç

Dell Inspiron 8600 LCD Replacement

Neye ihtiyacın var

  1. Dell Inspiron 8600 LCD Replacement, Hinge Cover: adım 1, 3 resimden 1. Dell Inspiron 8600 LCD Replacement, Hinge Cover: adım 1, 3 resimden 2. Dell Inspiron 8600 LCD Replacement, Hinge Cover: adım 1, 3 resimden 3.
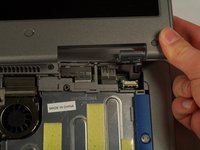
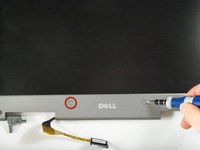
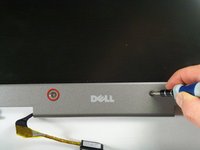
    • Insert a spudger into the notch at the far left side of the top blue panel and pry the hinge cover off.

    • You may need to pry the other side off as well. You can do this by inserting the spudger between the hinge and the top cover.

    • Be careful of the wire attached to the underside of the hinge cover.

  2. Dell Inspiron 8600 LCD Replacement: adım 2, 1 resimden 1.
    • Pull the small black tab on the right hand side of the laptop.

    • You have now removed the hinge cover.

  3. Dell Inspiron 8600 LCD Replacement, Display Module: adım 3, 2 resimden 1. Dell Inspiron 8600 LCD Replacement, Display Module: adım 3, 2 resimden 2.
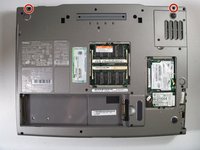
    • Flip the laptop over and remove the indicated screws.

    • Flip the laptop back over.

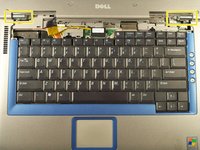
    • Find the two places where the display module is attached to the base of the computer.

  4. Dell Inspiron 8600 LCD Replacement: adım 4, 1 resimden 1.
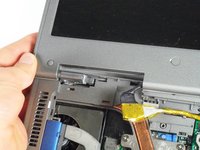
    • Disconnect the video card from the display module by gently lifting upwards on the black tab.

  5. Dell Inspiron 8600 LCD Replacement: adım 5, 2 resimden 1. Dell Inspiron 8600 LCD Replacement: adım 5, 2 resimden 2.
    • Lift the display module directly upwards from the base of the computer.

  6. Dell Inspiron 8600 LCD Replacement: adım 6, 1 resimden 1.
    • Now remove the display module.

  7. Dell Inspiron 8600 LCD Replacement, LCD: adım 7, 3 resimden 1. Dell Inspiron 8600 LCD Replacement, LCD: adım 7, 3 resimden 2. Dell Inspiron 8600 LCD Replacement, LCD: adım 7, 3 resimden 3.
    • First, remove the plastic tabs that are covering the interior screws.

    • After removing the tabs, remove the interior screws using a #1 Philips Screwdriver.

    • Note there are 8 tabs and 8 screws in total.

  8. Dell Inspiron 8600 LCD Replacement: adım 8, 1 resimden 1.
    • Now that the screws are removed, press the plastic casing inward to loosen the case. Then remove the plastic case from the monitor unit.

  9. Dell Inspiron 8600 LCD Replacement: adım 9, 1 resimden 1.
    • Using a Philips #1 screwdriver remove the screws holding the LCD in place.

    • Note there are 8 screws in total for this step, 4 on each side of the unit.

  10. Dell Inspiron 8600 LCD Replacement: adım 10, 1 resimden 1.
    • Remove the broken LCD unit, and replace with new unit.

Sonuç

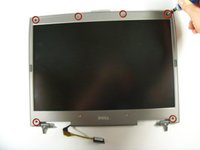
To reassemble your device, follow these instructions in reverse order.

2 farklı kişi bu kılavuzu tamamladı.

Perry

Üyelik tarihi: 04/12/11

251 İtibar

4 adet Kılavuz yazıldı

Ekip

Cal Poly, Team 18-22, Garner Spring 2011 Cal Poly, Team 18-22, Garner Spring 2011 üyesi

CPSU-GARNER-S11S18G22

4 Üyeler

16 adet Kılavuz yazıldı

Bir Yorum

which controller board do i have to use for this model ?

bcdoor - Yanıt

Yorum Ekle

İstatistikleri Görüntüle:

Son 24 Saat: 0

Son 7 gün: 1

Son 30 gün: 4

Her zaman: 4,637