Giriş
The Latitude E6400 is a super easy to repair laptop, and has a lot of easily replaceable parts, allowing for quick repairs like this one. Remember to be precise and slow when unscrewing and applying paste. Remember: You should never have to force anything with tech, if you are forcing it, you are doing it wrong.
WARNING: THERMAL PASTE IS NOT REPLACEABLE. WHEN YOU REMOVE THE HEATSINK, YOU HAVE TO REPLACE THE THERMAL PASTE. THERMAL PASTE IS PRETTY HARD TO WASH OFF BODY AND GLOVES (but is non-toxic).
Pictures and text written by ouimetnick and yogurtboi445.
Neye ihtiyacın var
-
-
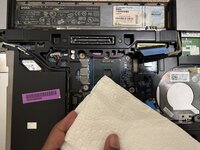
Disconnect all chargers and accessories, and shut down or hold power button for 10 seconds until laptop shuts off.
-
Flip the laptop over, and push the two tabs shown in the photo inwards until it clicks. push battery upwards away from laptop to remove battery.
-
Using a Philips #2 screwdriver, unscrew the center screw on the back cover. The screw is captive so it will not leave the base, but will click when fully loosened.
-
Push the base cover down towards you until it slides down a little bit with a click, then lift the protruding part up to remove the cover
-
-
-
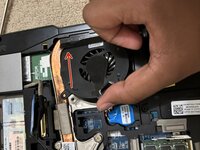
Disconnect the fan cable by gently pulling up on the plastic connector.
-
Unscrew the 2 silver screws holding the fan in place.
-
Remove the piece of black tape sealing the fan to the exhaust vent. Pull up on the left side of the fan next to the CMOS coin battery to remove the fan
-
Use a toothbrush or small soft paintbrush and an air duster or canned air to remove dust from the exhaust vent, and the fan blades, which need to be held in place with a finger or toothpick. (optional)
-
-
-
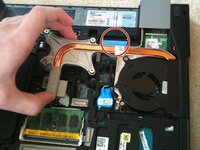
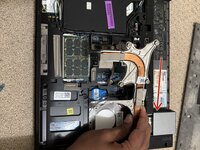
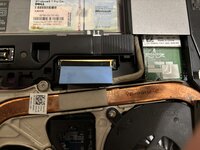
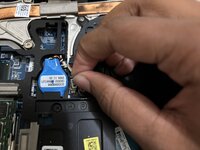
Disconnect the blue connector near the top right screw of the heatsink (display cable, circled in red) by pulling on the blue tab gently. Gently push and/or tape the cable to the chassis away from the heatsink.
-
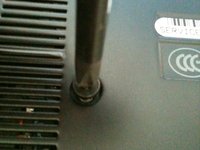
Slowly unscrew the 4 screws holding the heatsink in, unscrewing each one at the same time, and not one at a time. The recommended screw turning is 1-2 turns per screw. The heatsink will slowly lose pressure and come off, and the screws will make a light click when they are loose.
-
Carefully lift the heatsink from the side with the screws, making sure to pull to the left to free the exhaust side.
-
-
-
-
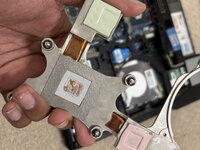
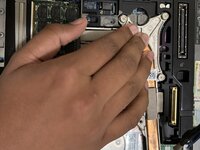
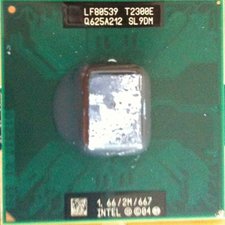
Use isopropyl alcohol (wipes or liquid on a q-tip, 90% or higher) to wipe off thermal paste from the CPU die AND THE COOLER. If using isopropyl alcohol under 90%, make sure the wipe or q-tip is damp, and use some scrubbing force with a fingernail or toothpick (thermal paste gets on skin and clothes and is hard to remove, use gloves).
-
Make sure the CPU die and cooler are completely clean of thermal paste, and dry. If not dry, use a regular paper towel to dry off.
-
-
-
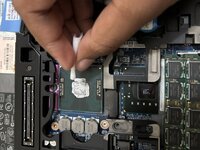
Grab your tube of thermal paste, if you don't have one, I recommend Arctic MX-4. THERMAL PASTE IS NOT REUSABLE, YOU MUST REPLACE THE THERMAL PASTE IF YOU REMOVE THE HEATSINK, but the thermal pads (soft foam colored pads) are reusable.
-
Carefully line up the tube end with the center of the CPU, and put a small pea sized dot in the center. DO NOT SPREAD IT, THE HEATSINK WILL SPREAD IT.
-
-
-
Place the heatsink at an angle, putting the exhaust vent end in first, and slowly laying the CPU end onto the CPU, and make sure to distribute even pressure to allow the thermal paste to spread over the CPU.
-
Use the same screwing method as before to screw the heatsink back into place, screwing each screw at the same time, not one at a time. Screw each one 1-2 rotations at a time to ensure even pressure. BE CAREFUL NOT TO OVERTIGHTEN AS YOU RISK DAMAGING THE MOTHERBOARD.
-
If you removed the blue display cable prior to removing the heatsink, push the display cable back in slowly, pushing the top edge into the crack and pushing down with gentle force.
-
-
-
Insert the fan black side up, inserting at an angle exhaust side first. Once placed down, screw the fan screws back in, and reconnect the fan connector.
-
-
-
Slide the base cover back on, inserting it with a 1cm gap protruding off of the edge opposite to the battery, then push the base cover towards the battery until the screw holes align and there are no gaps.
-
Tighten the captive screw in the middle. Once tightened, check to make sure the base doesn't slide off again.
-
Slide the battery in until you hear a click and it cannot be removed.
-


Be sure to test the laptop by turning it on, and doing tasks like web browsing, video watching, and some light gaming and monitoring temperatures using HWMonitor. Temperatures should not go over 70 degrees Celsius, and fan should kick in while gaming but shouldn't while web browsing or video watching.
Be sure to test the laptop by turning it on, and doing tasks like web browsing, video watching, and some light gaming and monitoring temperatures using HWMonitor. Temperatures should not go over 70 degrees Celsius, and fan should kick in while gaming but shouldn't while web browsing or video watching.
İptal et: Bu kılavuzu tamamlamadım.
13 farklı kişi bu kılavuzu tamamladı.
5Kılavuz Yorumları
Followed this guide hoping to reduce the loud fan noise from my E6400. You missed out the important step of applying new thermal paste after removing the old stuff. Also, you don't mention the other two chips under the heatsink (presume the GPU and northbridge/chipset). On mine these had spongy, compressible pads where I would have expected thermal paste or a thermal sticker. I wasn't sure whether to remove these or not, since they are quite thick - it seemed unlikely that normal thermal paste could bridge the gap. After putting everything back together the machine is still very noisy so it seems that the cpu temperature is not causing the high fan speed.
Step 4 shows how to clean the old thermal paste off the processor. The rubber squares are thermal pads. Take care not to rip or damage them, or they will need to be replaced.
In the unverified new version, I added the steps to replace the thermal paste. The loud noise might be a bad fan bearing. Download HWMonitor to see the CPU temps. If its over 50 idling, and 70 doing any work, you might want to try new thermal paste, or clean or replace the fans and paste. The chip to the right of the CPU is usually the GPU, marked nVidia if you have the Quadro Model, and there is a chip under the CPU which I do not know the function of.
Regarding the thermal pads, what replacements would be recommended? While repairing mine I saw that the thermal pad was torn and forgot to get a measure of its thickness.
I don't know, but usually they are all one size and compress themselves.