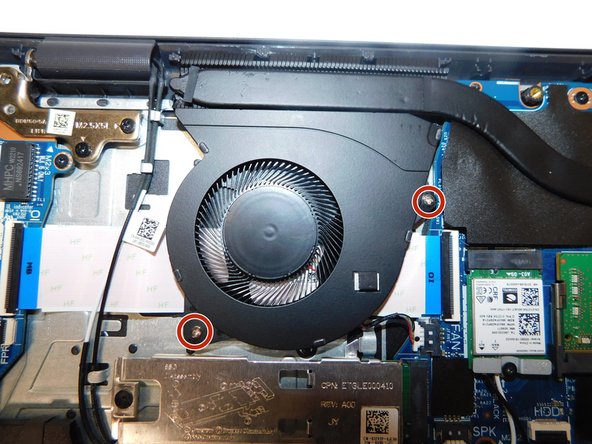
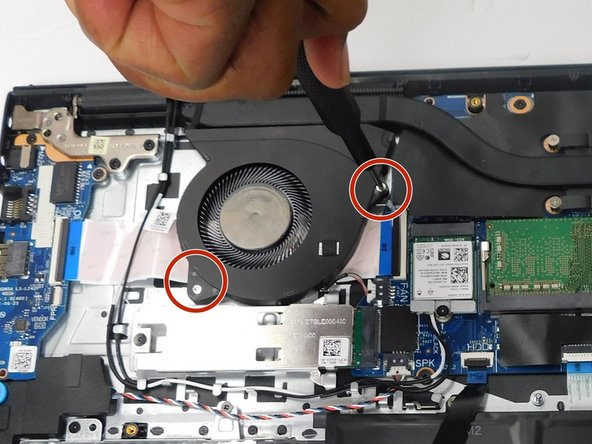
Ana içeriğe geç

Dell Vostro 3510 CPU Fan Replacement

Neye ihtiyacın var

  1. Dell Vostro 3510 CPU Fan Replacement, CPU Fan: adım 1, 2 resimden 1. Dell Vostro 3510 CPU Fan Replacement, CPU Fan: adım 1, 2 resimden 2.
    • Ensure the laptop is powered off.

    • Flip the laptop over.

  2. Dell Vostro 3510 CPU Fan Replacement: adım 2, 1 resimden 1.
    Bu adımda kullanılan alet:
    Magnetic Project Mat
    $19.95
    Satın Al
    • Use a Phillips #0 screwdriver to remove the six 1 mm screws (circled in red).

    • Loosen the two captive 1 mm screws on the back corners.

    • Keep track of each screw and make sure it goes back exactly where it came from to avoid damaging your laptop

  3. Dell Vostro 3510 CPU Fan Replacement: adım 3, 2 resimden 1. Dell Vostro 3510 CPU Fan Replacement: adım 3, 2 resimden 2.
    • Open up the back cover of the laptop.

    • It is much easier to open up the laptop with any type of spudger or with Jimmy.

  4. Dell Vostro 3510 CPU Fan Replacement: adım 4, 1 resimden 1.
    • Remove the battery cable from the motherboard by lightly pulling on the black tape attached to the ribbon cable.

  5. Dell Vostro 3510 CPU Fan Replacement: adım 5, 3 resimden 1. Dell Vostro 3510 CPU Fan Replacement: adım 5, 3 resimden 2. Dell Vostro 3510 CPU Fan Replacement: adım 5, 3 resimden 3.
    • Remove the two 1 mm screws that secure the CPU fan.

  6. Dell Vostro 3510 CPU Fan Replacement: adım 6, 2 resimden 1. Dell Vostro 3510 CPU Fan Replacement: adım 6, 2 resimden 2.
    • Gently pull the fan cable out of its socket.

    • Safely remove the CPU fan

Sonuç

To reassemble your device, follow these instructions in reverse order.

Jhoan Cruz

Üyelik tarihi: 02/01/24

483 İtibar

3 adet Kılavuz yazıldı

Ekip

Gateway, Team 16-1, Gonzalez Spring 2024 Gateway, Team 16-1, Gonzalez Spring 2024 üyesi

GCC-GONZALEZ-S24S16G1

4 Üyeler

3 adet Kılavuz yazıldı

0 Yorum

Yorum Ekle

İstatistikleri Görüntüle:

Son 24 Saat: 0

Son 7 gün: 5

Son 30 gün: 30

Her zaman: 43