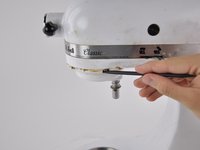
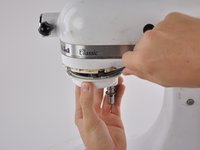
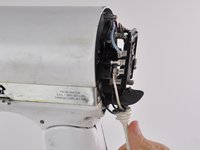
Ana içeriğe geç

Disassembling KitchenAid Classic Mixer K45SSWH Motor Housing Cover

Neye ihtiyacın var

  1. Disassembling KitchenAid Classic Mixer K45SSWH Motor Housing Cover, Motor Housing Cover: adım 1, 2 resimden 1. Disassembling KitchenAid Classic Mixer K45SSWH Motor Housing Cover, Motor Housing Cover: adım 1, 2 resimden 2.
    • Using a spudger, gently pry off the aluminum drip ring.

  2. Disassembling KitchenAid Classic Mixer K45SSWH Motor Housing Cover: adım 2, 1 resimden 1.
    • Using a 4 mm pin punch and hammer, hammer the pin until it is dislodged from the planetary gear cover.

  3. Disassembling KitchenAid Classic Mixer K45SSWH Motor Housing Cover: adım 3, 2 resimden 1. Disassembling KitchenAid Classic Mixer K45SSWH Motor Housing Cover: adım 3, 2 resimden 2.
    • Using a spudger, pry the planetary gear cover from the mixer shaft.

  4. Disassembling KitchenAid Classic Mixer K45SSWH Motor Housing Cover: adım 4, 1 resimden 1.
    • Using a flathead screwdriver, remove the five 28 mm front motor housing screws.

    • Using the same flathead screwdriver, remove the two 28 mm locking screws.

    • One of the locking screws contains a safety locking mechanism. Do not interchange these screws with the front motor housing screws.

  5. Disassembling KitchenAid Classic Mixer K45SSWH Motor Housing Cover: adım 5, 1 resimden 1.
    • Turn your device around. Using the same flathead screwdriver, remove the two 28 mm rear locking screws.

    • One of the rear motor housing screws contains a safety locking mechanism. Do not interchange these screws with the front motor housing screws.

  6. Disassembling KitchenAid Classic Mixer K45SSWH Motor Housing Cover: adım 6, 2 resimden 1. Disassembling KitchenAid Classic Mixer K45SSWH Motor Housing Cover: adım 6, 2 resimden 2.
    • Using a Phillips #2 screwdriver, remove the 10 mm screw from top of back cover.

    • The rear cover is now completely free from the mixer.

  7. Disassembling KitchenAid Classic Mixer K45SSWH Motor Housing Cover: adım 7, 2 resimden 1. Disassembling KitchenAid Classic Mixer K45SSWH Motor Housing Cover: adım 7, 2 resimden 2.
    • Carefully pull the power cord from the notch in back of the mixer.

    • The motor housing cover is now completely free from the base of the mixer.

  8. Disassembling KitchenAid Classic Mixer K45SSWH Motor Housing Cover: adım 8, 1 resimden 1.
    • Lift the motor housing cover from the mixer base.

    • Be sure to place the cover upside-down to prevent grease from leaking out.

Sonuç

To reassemble your device, follow these instructions in reverse order.

32 farklı kişi bu kılavuzu tamamladı.

Chris Gonzales

Üyelik tarihi: 10/12/14

1.519 İtibar

2 adet Kılavuz yazıldı

Ekip

Cal Poly, Team 14-28, Maness Fall 2014 Cal Poly, Team 14-28, Maness Fall 2014 üyesi

CPSU-MANESS-F14S14G28

4 Üyeler

22 adet Kılavuz yazıldı

24 Yorum

Well fine job! Just finished and t works!!!

James Anderson - Yanıt

Instruccion is exelent but I veleave the problem is electric. can you give aidea. dhe machine does’nt work at all

Aristides Aleman - Yanıt

Thank you! I'm repainting my white mixer a deep cherry red gloss to match my kitchen. These mixers can last 20+ years, if you take care of them. But, who wants the same color kitchen for that long? Bonus: saved $50+ by painting it the color I wanted, rather than pay the extra for a mixer from the colored choices.

Heather Schrader - Yanıt

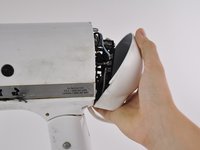
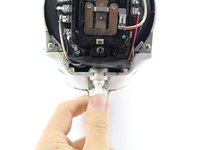
Do the motor housing sometimes become to hard to remove? I followed all the steps yet it still acts as if something inside the housing is keeping it from coming off.

Royce M - Yanıt

Nothing else, only the planetary assembly, and the 9 big housing screws. Once those are off, it can take a lot of jiggling and persistence, mostly because there’s a vacuum between the vertical shaft and the bushing inside. Remember to loosen the cord in case to prevent yanking it accidentally when the cover comes off.

Ariel Cornejo -

Yorum Ekle

İstatistikleri Görüntüle:

Son 24 Saat: 42

Son 7 gün: 290

Son 30 gün: 1,319

Her zaman: 96,026