Ana içeriğe geç
Onarım Topluluğuna Katılın - Hesap Oluşturun

Disassembling Nokia 2366i Keypad

Neye ihtiyacın var

  1. Disassembling Nokia 2366i Keypad, Battery: adım 1, 2 resimden 1. Disassembling Nokia 2366i Keypad, Battery: adım 1, 2 resimden 2.
    • Turn off the phone.

    • Position the phone so that the back side is in view.

    FixBot'a Sor

    Yorum Ekle

  2. Disassembling Nokia 2366i Keypad: adım 2, 1 resimden 1.
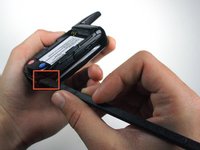
    • Apply pressure on the cover while simultaneously sliding the cover downward.

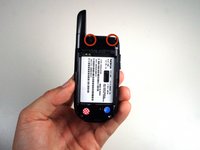
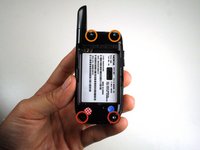
    • Remove the back battery cover.

    FixBot'a Sor

    Yorum Ekle

  3. Disassembling Nokia 2366i Keypad: adım 3, 3 resimden 1. Disassembling Nokia 2366i Keypad: adım 3, 3 resimden 2. Disassembling Nokia 2366i Keypad: adım 3, 3 resimden 3.
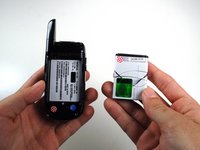
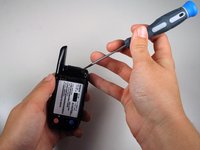
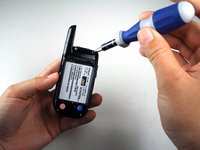
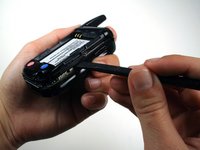
    • Insert the spudger between the base of the phone and the phone battery.

    • Position the phone so that the battery won't fall out of the phone.

    • Carefully lift the battery out of the phone.

    • The battery lifts out of the phone easily.

    FixBot'a Sor

    Yorum Ekle

  4. Disassembling Nokia 2366i Keypad, Rear Case: adım 4, 2 resimden 1. Disassembling Nokia 2366i Keypad, Rear Case: adım 4, 2 resimden 2.
    • Use a Phillips #00 screwdriver or your fingers to remove the rubber tabs at top back of the phone.

    FixBot'a Sor

    Yorum Ekle

  5. Disassembling Nokia 2366i Keypad: adım 5, 2 resimden 1. Disassembling Nokia 2366i Keypad: adım 5, 2 resimden 2.
    • Remove four 5mm screws from the back of the phone using a T6 Torx screwdriver:

    • 2 screws at the bottom

    • 2 screws at the top

    FixBot'a Sor

    Yorum Ekle

  6. Disassembling Nokia 2366i Keypad: adım 6, 2 resimden 1. Disassembling Nokia 2366i Keypad: adım 6, 2 resimden 2.
    • Rotate the phone clockwise so the edge is facing you.

    • Insert the spudger in tabs between the outer casing and the inside frame.

    • Slide the spudger upwards.

    • This will remove the rear case of the phone.

    FixBot'a Sor

    Yorum Ekle

  7. Disassembling Nokia 2366i Keypad: adım 7, 1 resimden 1.
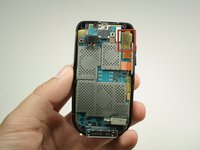
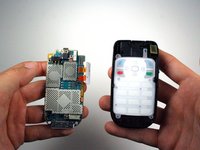
    • The phone should now be in two different sections.

    • 1) The rear case of the phone.

    • 2) The motherboard and the rest of the phone.

    FixBot'a Sor

    Yorum Ekle

  8. Disassembling Nokia 2366i Keypad, Motherboard: adım 8, 2 resimden 1. Disassembling Nokia 2366i Keypad, Motherboard: adım 8, 2 resimden 2.
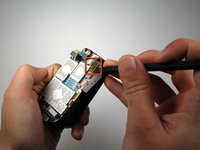
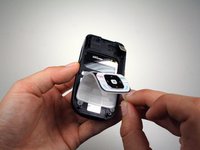
    • Use the spudger to lift off the yellow clip near the top right corner of the motherboard.

    FixBot'a Sor

    Yorum Ekle

  9. Disassembling Nokia 2366i Keypad: adım 9, 2 resimden 1. Disassembling Nokia 2366i Keypad: adım 9, 2 resimden 2.
    • Rotate the phone counterclockwise so that the edge is facing you.

    • Use the spudger to lift the motherboard out of the base of the phone.

    • Remove the motherboard from the base of the phone.

    FixBot'a Sor

    Yorum Ekle

  10. Disassembling Nokia 2366i Keypad, Keypad: adım 10, 1 resimden 1.
    • Place key pad in view.

    FixBot'a Sor

    Yorum Ekle

  11. Disassembling Nokia 2366i Keypad: adım 11, 2 resimden 1. Disassembling Nokia 2366i Keypad: adım 11, 2 resimden 2.
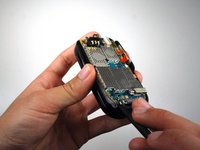
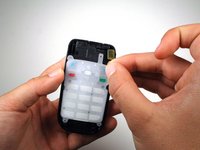
    • Use your fingers to remove the keypad by carefully pulling from the top of the phone towards the bottom of the phone.

    FixBot'a Sor

    Yorum Ekle

Sonuç

To reassemble your device, follow these instructions in reverse order.

İptal et: Bu kılavuzu tamamlamadım.

Bir başkası bu kılavuzu tamamladı.

Michael Machado

Üyelik tarihi: 01/21/11

337 İtibar

3 adet Kılavuz yazıldı

Ekip

Cal Poly, Team 1-14, Amido Winter 2011 Cal Poly, Team 1-14, Amido Winter 2011 üyesi

CPSU-AMIDO-W11S1G14

5 Üyeler

17 adet Kılavuz yazıldı

0Kılavuz Yorumları

Yorum Ekle

İstatistikleri Görüntüle:

Son 24 Saat: 1

Son 7 gün: 7

Son 30 gün: 47

Her zaman: 1,204