Giriş
If your tablet's camera is having issues with its display, or is cracked, then you can use this guide to replace it. You will need a prying tool to remove the backplate, as well as a Phillips #00 screwdriver to remove screws. You may also want to use adhesive tape to further secure components after the replacement. With this in-depth guide, you will be able to fully replace your Dragon Touch Y88X Plus camera.
-
-
First, start by removing the backplate from the device using your IFixit opening tool.
 FixBot'a Sor
-
-
-
Next, remove any adhesives that are keeping internal components of the device in place.
-
-
-
-
Carefully peel the old battery from the adhesive using your iFixit pry tool.
-
-
-
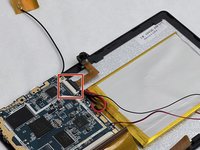
In order to remove the old camera, you must disconnect the ribbon that connects to the camera.
-
To remove the ribbon, flip the black switch where it is connected to the motherboard and gently pull the ribbon out and replace it with your replacement Dragon Touch Y88X Plus camera.
-


To reassemble your device, follow these instructions in reverse order.
İptal et: Bu kılavuzu tamamlamadım.
2 farklı kişi bu kılavuzu tamamladı.

Ekip

UMass Dartmouth, Team 1-4, Petersen Fall 2023 UMass Dartmouth, Team 1-4, Petersen Fall 2023 üyesi
UMASSD-PETERSEN-F23S1G4
4 Üyeler
4 adet Kılavuz yazıldı