Ana içeriğe geç

Dyson DC58 Cyclone Replacement

Neye ihtiyacın var

  1. Dyson DC58 Cyclone Replacement, Bin: adım 1, 1 resimden 1.
    • Make sure your vacuum is unplugged.

    • Avoid pressing the red trigger on the vacuum handle; this will power on the vacuum.

  2. Dyson DC58 Cyclone Replacement: adım 2, 1 resimden 1.
    • Locate the red lever parallel to the red trigger and on the side of the clear bin.

  3. Dyson DC58 Cyclone Replacement: adım 3, 1 resimden 1.
    • Push the red lever downward to open the clear bin. You may need to do this over a trash bin if there is debris in the clear bin.

  4. Dyson DC58 Cyclone Replacement: adım 4, 2 resimden 1. Dyson DC58 Cyclone Replacement: adım 4, 2 resimden 2.
    • Push the red lever downward again while pulling the clear bin away from the main body of the Dyson vacuum.

  5. Dyson DC58 Cyclone Replacement, Main Body: adım 5, 1 resimden 1.
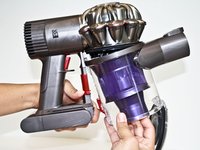
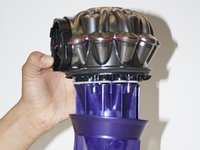
    • Flip the vacuum over so that the silver cyclone part of the vacuum is now at the base.

  6. Dyson DC58 Cyclone Replacement: adım 6, 2 resimden 1. Dyson DC58 Cyclone Replacement: adım 6, 2 resimden 2.
    • Locate the two visible white clips seen between the main body and the purple cyclone of the vacuum.

    • Use tweezers to pinch the two visible white clips together.

    • It may require a few tries to pinch the clips since the space between the main body and cyclone is small.

  7. Dyson DC58 Cyclone Replacement: adım 7, 1 resimden 1.
    • Tilt and pull the main body away from the purple cyclone of the vacuum.

    • You may hear a loud snap when the cyclone is released from the main body, this is to be expected.

  8. Dyson DC58 Cyclone Replacement, Cyclone: adım 8, 2 resimden 1. Dyson DC58 Cyclone Replacement, Cyclone: adım 8, 2 resimden 2.
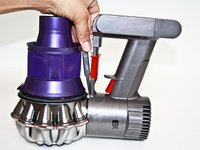
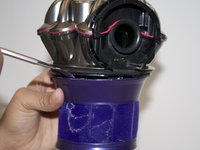
    • Use the metal spudger placed between the black rim and the purple rim to separate the purple screen cover from the cyclone body.

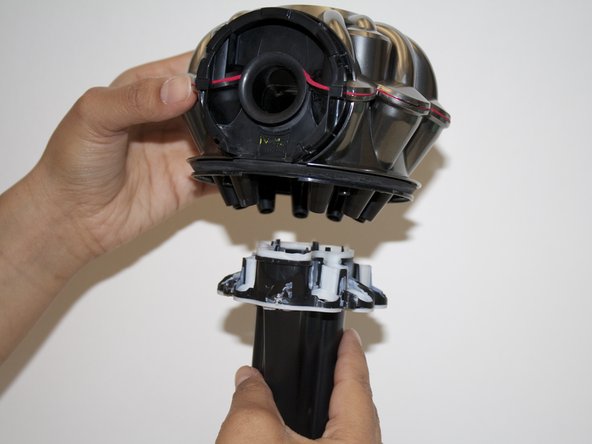
    • Pry all the way around the screen cover.

  9. Dyson DC58 Cyclone Replacement: adım 9, 1 resimden 1.
    • Use a T9 screw driver to remove the five 14mm screws around the edge of the cyclone body.

  10. Dyson DC58 Cyclone Replacement: adım 10, 2 resimden 1. Dyson DC58 Cyclone Replacement: adım 10, 2 resimden 2.
    • Pull down on the black tube-like part of the silver cyclone body to remove it from the cyclone of the Dyson.

    • You may need to wiggle the tube as you are pulling down to loosen the pieces apart.

Sonuç

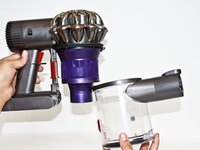
To reassemble your device, follow these instructions in reverse order.

19 farklı kişi bu kılavuzu tamamladı.

Herllaine Asistio

Üyelik tarihi: 09/17/15

221 İtibar

1 Kılavuz yazıldı

Ekip

CSU Fullerton, Team 2-4, Bruce Fall 2015 CSU Fullerton, Team 2-4, Bruce Fall 2015 üyesi

CSUF-BRUCE-F15S2G4

4 Üyeler

19 adet Kılavuz yazıldı

11 Yorum

Great job, very useful thanks

Don - Yanıt

Fantastic thanks!!!!

robh - Yanıt

Very helpful indeed.

macx - Yanıt

Thanks. Had to wash out the dog smell. This did the trick.

David Parsons - Yanıt

Thanks. Had to wash out the dog smell. This did the trick when new filters wouldn't. Shame on Dyson for not making an easier to clean vacuum.

David Parsons - Yanıt

Yorum Ekle

İstatistikleri Görüntüle:

Son 24 Saat: 6

Son 7 gün: 30

Son 30 gün: 135

Her zaman: 23,589